Wednesday, December 2, 2020

Sick of Modern Farmhouse? ‘Fixer to Fabulous’ Reveals What’s Hot Now

fixer to fabulous

HGTV

Modern farmhouse design has been popular for years, but if you’re tired of barn doors and shiplap, the latest episode of “Fixer to Fabulous” shows off a cooler alternative: modern industrial.

In “Old Dojo to Modern Mojo,” Jenny and Dave Marrs help Jennifer and Philip Cristofaros reimagine an old karate studio in Arkansas. They’re given a big budget of $215,000 to fix up this home, but they’ll need every penny because this space needs a ton of work.

Read on to find out how Dave and Jenny create the quintessential modern industrial home, which might inspire some upgrades around your own abode, too.

Cement siding, painted black, creates a modern exterior

house
This house was previously used as a karate studio.

HGTV

Jenny and Dave know that Jennifer and Philip love modern industrial style, so they start their renovation by giving the exterior a sleek upgrade.

They cover this former karate studio with cement siding to give it a clean, modern look.

“It’s really simple, has clean lines, and it’s going to look really sleek and modern,” Jenny says of the paneling.

house
Concrete panels make this house look modern.

HGTV

Then to finish the exterior, Dave and Jenny paint the siding black to make it look extra contemporary.

While black concrete siding on a house may sound dark and uninviting, when paired with a mature tree in the front yard and plenty of new greenery, this house looks both modern and comfortable.

Polish concrete floors for an industrial look

living room
Jennifer and Philip Cristofaros love the look of the concrete underneath the carpeting they had removed.

HGTV

Jennifer and Philip love the industrial modern style, so when they pull up the carpet in their new home and find concrete, they decide to keep the look.

Jenny and Dave think this is a great idea, and they offer to bring in a team to make the concrete look even better.

“They take a diamond stone and come in here and grind the concrete,” Dave says, examining the floor.

living room
These concrete floors go with the industrial style.

HGTV

When the polishing is done, the floors look shiny and sleek. This living room still has that industrial look, but now, with a glossy sheen, these concrete floors look finished.

Brick veneer can add texture—and look as good as the real thing

kitchen
This old karate studio presented a blank canvas.

HGTV

While Jenny and Dave decide to use a lot of concrete in this industrial renovation, they realize that they’ll need to mix it up with some other materials so that the home doesn’t end up looking cold and flat.

Philip and Jennifer mentioned that they used to live in New York City, so Jenny is inspired to bring a little bit of city style to this house.

kitchen
This brick wall gives the kitchen a modern industrial look.

HGTV

Dave adds a layer of brick to the kitchen wall, giving the space an urban feel. When it’s finished, the brick veneer looks surprisingly authentic.

“It just feels like you uncovered a wall in an old building like in Manhattan,” Jenny says of the finished product.

The brick provides texture and color to the industrial home and adds a warm, rustic quality to a space that otherwise might feel too modern.

A bit of color can keep an industrial space from looking cold

living room
This mural is a great contrast to the modern style.

HGTV

While the brick wall adds color and texture to the kitchen, Jenny and Dave know it’s not enough to offset all of the industrial modern features in this living space.

So they commission a bright and bold mural to be painted on one of the walls. The floral statement piece is a stark contrast to the muted colors and clean lines in the rest of the house, which makes the home feel dynamic.

“It is the perfect contrast,” Jenny says.

Painted concrete looks just like modern tile

patio
Jenny Marrs painted this concrete patio, and it looks just like tile.

HGTV

Dave and Jenny know that it’s going to take a lot of cash to turn this old dojo into a dream home, so they’re careful to save money wherever they can.

Jenny comes up with an idea to save money on the new patio by painting the concrete slab, rather than buying tile. She uses a stencil to paint a geometric design directly on the concrete.

“I do think it is going to define the space and set it apart from just a normal concrete slab patio,” Jenny says.

After the work is done overall, it’s hard to believe this house was once a run-down karate studio. It looks like Jenny and Dave have earned their black belt in modern industrial design!

The post Sick of Modern Farmhouse? ‘Fixer to Fabulous’ Reveals What’s Hot Now appeared first on Real Estate News & Insights | realtor.com®.

Tuesday, December 1, 2020

5 Ways You’re Killing Your Houseplants—and How To Stop

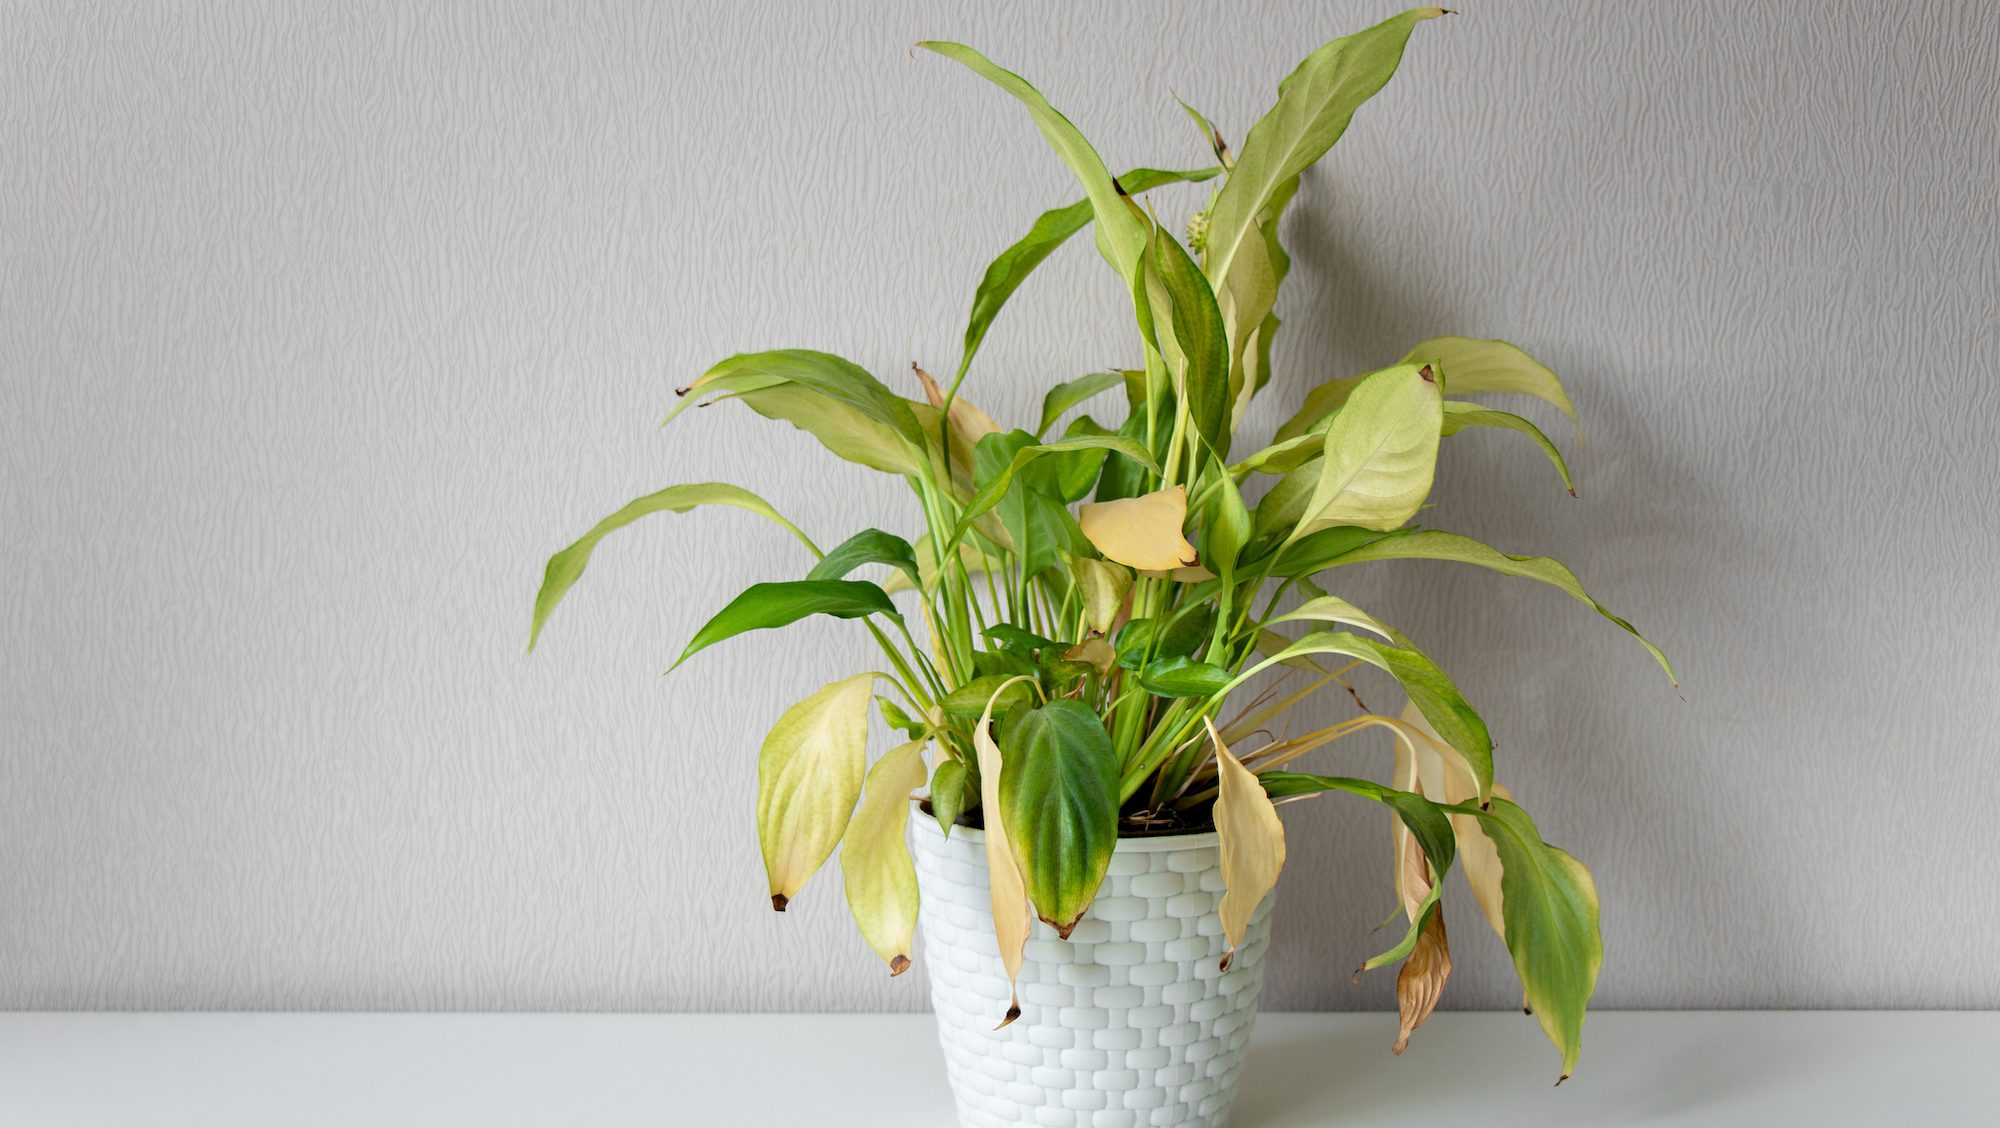
dying houseplant

Yelena Khayrullina/Getty Images

Houseplants often are a designer’s secret weapon—pops of greenery can instantly elevate anybody’s home decor, no matter the style. But while a thriving plant can complete the look of any room, a dying one quickly becomes a depressing focal point.

What’s worse: Once you realize you have an unhappy houseplant, it can be surprisingly difficult to diagnose what’s wrong. Are you giving it too much water, or not enough? Does it need more light, or less?

Rather than letting you waste one more minute guessing what’s wrong, we’ve gathered up five of the most common ways people kill their houseplants—and how you can identify (and fix) the problem before it’s too late.

1. Underwatering

One of the most common downfalls of houseplants is underwatering. Whether you forgot to water it one week or just didn’t realize how much water your plant truly needs—underwatering happens.

Horticulturalist Andrew Gaumond, of Petal Republic, explains what underwatering looks like and how to fix it.

“The most probable cause of droopy leaves is lack of moisture in the soil base,” says Gaumond. “A moisture meter or probe—maybe even your fingers—are your best friends here to determine the moisture content around the base of the planter. If it’s bone-dry, it’s clear your plant is in need of a good drink.”

Another sign of underwatering is yellowing leaves.

“Yellowing leaves that feel a little crisp to the touch and are also potentially curling is another telltale sign your plant is underwatered,” Gaumond says.

If your plants look anything like this, check the soil to see how dry it is. If it feels dry, give your plants a good, long drink. Assuming you have drainage holes on your pot, try watering the plant until water runs out the bottom, then continue to monitor the soil to see how quickly it dries out again.

2. Overwatering

An overwatered plant can be hard to diagnose, since it looks a lot like an underwatered plant. But diagnose it you must—and fast, since overwatering is one of the easiest ways to kill your plants quickly.

“The most serious sign of an unhappy houseplant would be blackening or wilting leaves, which are often caused by chronic overwatering,” says Zachary Smith, arborist and president of Smith’s Pest Management.

“This is a common problem with houseplants, where the plant has too much water and the leaves are wilting or drooping because the roots are suffocating in standing water,” Smith explains.

If you’re facing droopy, blackened leaves right now, check the soil to see how wet it is. Be sure the plant has proper drainage (that is, a way to get rid of excess water) and let it dry out completely—for at least a week—before giving it any more water.

3. Inadequate light

If watering isn’t the issue, then the next likely cause for an unhappy houseplant is insufficient sunlight.

“Brown or yellow leaves may be a sign of insufficient light or nutrient deficiency,” says Smith.

One way to determine whether or not your houseplant is suffering from inadequate sunlight: Simply read up on it.

If you know the name of your plant, you can easily look up how many hours of sunlight it needs, and what kind (direct or indirect).

If you don’t know the name of your plant, check out this forum on Reddit. By posting a photo of your plant, others will help you identify what it is so you can research what it needs and place it in a brighter spot in your home.

But be forewarned: “It’s very hard to correct insufficient light issues, as most houseplants need more light than most houses can provide, with many houseplants on a slow decline from the day they’re purchased because of light levels.” Smith cautions.

If that’s the case, it might be time to bid adieu to your light-loving houseplant and opt for one that thrives in dimmer conditions.

4. Too much light

On the other hand, it may be that your houseplant is unhappy as a result of too much light. Here’s what that looks like.

“A plant receiving too much light might draw its leaves down around the pot as it tries to get away from the light,” says Lisa Eldred Steinkopf of The Houseplant Guru. “It also may be discolored and appear bleached out. Plants can actually be sunburned, just like us, and it shows up as dead patches of brown tissue on the leaves.”

If you see any of these symptoms, it might be time to relocate your plant to a different spot in the house. Again, spend some time reading up on your plant and be sure to note what kind of light it needs. For example, lots of indirect light is not the same as a few hours of direct sunlight. Get to know your plant’s needs, and make adjustments from there.

5. Environmental factors

Beyond watering and light issues, there are a few other things that can cause houseplants to die. Namely, environmental factors such as temperature and humidity levels. If a room is too cold, or a plant is drying out at rapid speed next to a heater, these could be reasons your plant isn’t doing so hot.

“Avoid cold drafts, hot air blowing on them from the furnace, letting them dry out completely, keeping them overly wet, too low or too high light, and low humidity,” suggests Steinkopf.

If this sounds like a tall order, it is. But by carefully choosing the best location for each of your houseplants (not just sticking them in some random corner), and reading up on what they need, you’ll have a much better chance at keeping them alive and healthy.

“The first thing is always to diagnose what the problem is and find the solution to fix it,” says Steinkopf. “Sometimes that isn’t possible, and it’s OK to have a plant die on your watch. That’s how we all learn. If you made mistakes, learn from them, and most importantly, don’t give up!”

The post 5 Ways You’re Killing Your Houseplants—and How To Stop appeared first on Real Estate News & Insights | realtor.com®.

‘Bargain Mansions’ Reveals One Simple Way To Make a House Stand Out

bargain mansions

HGTV

Tamara Day of “Bargain Mansions” loves taking risks with her renovations. But do such gambles pay off with a flip?

In the “House From the Trees” episode, Day buys a beautiful home in Old Leawood, KS, for $275,000. She plans to put $150,000 into renovations, which means she’s all in for an investment of $425,000. She plans to list the house for $575,000, which promises a hefty return of $150,000.

So what does Day do to merit such a markup? Check out some of her upgrades below, which might inspire some changes around your own abode, too.

Daring colors can make a property stand out

barn
This property came with an adorable barn.

HGTV

This property comes with a small barn in front of the main house. It’s the first thing buyers will see when they drive up, so Day is determined make it a statement piece.

She decides to go bold and paint the barn a dusty pink with white trim. This is an unconventional color for a barn, but Day is sure it’s the right choice.

“This is going to be one of those spaces that totally pops,” Day says.

barn
Tamara Day proves that it’s fun to play with color.

HGTV

While one might consider this a bad sales tactic because so few buyers would want a pink barn, Day points out that this wild feature is sure to attract attention from buyers, which could mean more interest and a better price.

If potential buyers hated the color, they could easily paint the barn. But until then, it’s a fun feature that makes a strong first impression.

Go old school with a classic mantel

fireplace
This fireplace has lots of classic charm.

HGTV

When Day buys this house, the living room fireplace is covered in an ’80s brick veneer. Right away, Day knows that she needs to replace it.

Day ends up finding an old mantel from another old Kansas City home. While an older fireplace design may not seem like a good idea, the new mantel fits the era of the home and brings some elegance to the updated living room.

In the end, Day loves the new mantel.

“This fireplace mantel really brings a touch of classic Kansas City character to this room,” she says.

Open up the staircase with more railings

stairs
The staircase splits up the living room.

HGTV

While Day makes some risky design choices on this home, some of her improvements are a little safer. She notices that the bulky staircase takes up a lot of space on the first floor, so she decides to open up the walls to make these stairs feel less intrusive.

“Having the staircase in the center of the home meant blocking off the formal living space from the rest of the home,” Day says. “I wanted to open it up, putting handrails on both sides of the stairs to the basement, making it feel much more open between the family room and the rest of the home.”

stairs
With the railings replacing part of the wall, this space looks more open.

HGTV

The walls surrounding the basement stairs are removed and replaced with handrails. The railings allow for improved sightlines and make the whole home seem more open.

Cover damaged walls with thick wallpaper

bedroom
This bedroom’s walls needed a refresh.

HGTV

After painting the barn pink, Day wants to continue playing with color throughout the house. However, the master bedroom has green textured walls, which are difficult to paint.

She explains that she could remove the texture and paint over it, but it may be easier to go a different route.

bedroom
With some new wallpaper, this bedroom suddenly looks beautiful.

HGTV

“We can sand it and paint it,” Day says, “but that seemed a little bit boring when, for the same price, we could put some wallpaper in that gave it richness, texture, and a little bit of a fun color.”

She chooses a lavender wallpaper that is just as memorable as the pink paint on the barn. It brightens the room while giving it depth and adding an elegant, feminine style. It’s a bold choice, and definitely one buyers will remember.

Use classic subway tile in a new way

shower
Day uses a traditional tile to make this shower look wonderfully unique.

HGTV

Day plays with risky paint colors and unique wallpaper in this renovation, so it makes sense that she also wants to push the envelope when it comes to her tile design. So in the master bedroom she plans to use a traditional subway tile in a way that’ll stand out.

“I’m always looking for ways to reinvent your basic subway tile,” Day explains.

She uses white subway tiles, paired with a darker tone, to create an alternating vertical and horizontal pattern.

With gorgeous designs and bold colors everywhere from the barn to the bathroom, Day’s latest renovation looks fantastic. She may have to be patient until the right buyer walks in, but we think it will be well worth the wait.

The post ‘Bargain Mansions’ Reveals One Simple Way To Make a House Stand Out appeared first on Real Estate News & Insights | realtor.com®.

Monday, November 30, 2020

The Property Brothers Reveal the Best Bathroom Upgrade of 2020

Property Brothers

HGTV

Ever wonder what it’d be like to renovate your parents’ house? That’s what Drew and Jonathan Scott face on the latest “Property Brothers: Forever Home.”

In the Season 4 episode “Buying Mom and Dad’s House,” the brothers help Mike and Ashley renovate Ashley’s parents’ house in Las Vegas. The home is woefully outdated, but Ashley and Mike have an impressive $155,000 budget to update this old house.

Here’s how the Scott brothers bring this house into the modern age—with some take-home lessons you might be inspired to try in your own abode.

A large island can help define an open floor plan

island
The Scott brothers know that an outdated kitchen can age the whole house.

HGTV

Ashley’s parents’ old house was renovated in the early 2000s, so it’s still in fairly good shape. Still, Drew and Jonathan know that the home, especially the kitchen, could use some updates.

The brothers replace the dark cabinets and add some fun new lighting fixtures, but when it comes to the kitchen island, the brothers realize that they’re going to need to make a big change.

island
This bigger island makes the kitchen feel brand-new.

HGTV

The existing island is already large, but once the brothers take down a living room wall, the space feels awkwardly open. Jonathan points out that with the wall gone, the kitchen and living room need an even larger island to fill up the space.

“Having the island here with the breakfast bar seating will just be that perfect way to anchor the kitchen,” he says.

With dark cabinets and a crisp white counter, this new, bigger island is a welcome addition. Plus, the brothers note that the additional counter space will come in handy when Ashley’s extended family gather to whip up their Italian meals.

“This is going to be the perfect Italian family pasta-making station,” Drew says of the new island.

Faux beams look about as good as real ones

beams
These faux beams add a rustic look to the living room.

HGTV

Mike and Ashley would love some faux beams in the living room, but Drew and Jonathan run into a problem when they realize the ceilings are wider than expected.

Jonathan explains that the beams are too short for this living room and, if installed as is, they’d end right in the middle of the ceiling.

“Normally we take them either into a shorter run right into the wall or into another beam,” Jonathan says, inspecting the space.

So the brothers plan to install two beams that could meet in the middle of the ceiling and order faux brackets to conceal the seams. The brackets are made of foam, making them lightweight while still looking great.

Large sliding doors add indoor-outdoor flow

sliders
These sliding doors make the space feel much larger.

HGTV

While Mike and Ashley are most focused on making this home kid-friendly for their future family, they’d also like to have a great space for entertaining their friends.

So Drew and Jonathan install large, glass sliding doors on either side of the fireplace. These doors provide a beautiful view of the backyard, plus the indoor-outdoor flow will help large gatherings feel less crowded.

“Not only are they going to have a total of 20 linear feet of glass, but they’re also going to have these beautiful sliders that open up,” Jonathan says, “5 feet opening on one side, 5 feet on the other side—so they can throw parties and have everybody come in and out.”

A steam shower is the latest, greatest bathroom luxury

bathroom
The steam shower looks perfect in this big bathroom.

HGTV

Drew and Jonathan know that style updates are a must for this old home, but they also realize that the house could use some modern comforts.

The brothers decide to give the master bathroom a makeover by adding one of the hottest amenities of the year: a steam shower. The new shower is certainly luxurious, but the brothers explain that it can be tricky installing this modern feature because it requires unique materials.

Jonathan explains that while natural stone tiles may be popular these days, porcelain tile is best for this kind of shower.

“Nonporous tiles like porcelain won’t absorb the heat the same way as natural stone will,” he says.

Wainscoting can add personality to a bedroom

bedroom
This bedroom was definitely dated and needed a refresh.

HGTV

Of course, Ashley and Mike don’t want to be reminded of Ashley’s parents when they’re in their new master bedroom, so Drew and Jonathan know they need to give the room a new look.

They replace the dated, bulky furniture with more modern pieces, and they add some dark wainscoting behind the headboard for a new style.

Jonathan points out that this update is easy to install, and it’s an elegant way to make a room look a little different.

“It’s a great way to create an upscale-looking design without blowing your budget,” says Jonathan.

bedroom
Drew and Jonathan Scott knew dark wainscoting would make this bedroom look modern and bold.

HGTV

The post The Property Brothers Reveal the Best Bathroom Upgrade of 2020 appeared first on Real Estate News & Insights | realtor.com®.

How To Keep Bugs From Hitching a Ride Into Your Home via Your Christmas Tree

Alphotographic/Getty Images

Beloved traditions like trimming the tree and decking the halls are what make the holidays a cherished time of year. Yes, even this year. But beware, homeowners: Fresh holiday greenery and decorations stored in the attic could bring holiday grinches like spiders, ticks, and ants into your house.

“While these decorations are meant to bring joy, they can actually end up causing quite a headache if any pests manage to catch a ride into your home,” said Cindy Mannes, senior vice president of public affairs for the National Pest Management Association.

Mannes says bugs like to hide deep in the branches of trees and wreaths, and many other pests, including spotted lanternflies, like to lay eggs in them.

“This makes thorough inspections crucial to preventing an infestation,” she says.

Don’t let your holly, jolly holidays become a pest nightmare before Christmas. To keep unwelcome bugs out of your festivities this holiday season, consider the following tips.

Carefully inspect live greenery

Part of the fun of the holidays is decorating with live greenery like wreaths, trees, and garlands. But live greenery should always be checked for signs of pests or eggs.

“Homeowners can help prevent the spread of pests by buying healthy plant material,” says Sarah Scally, assistant horticulturist for the Maine Department of Agriculture, Conservation, and Forestry. Before purchasing, look at the tree, wreath, or garland for signs of pests, including insects, egg masses, and disease symptoms.

“Avoid greenery that is yellowing, drooping, losing needles, oozing sap, or has holes or sawdust on twigs or trunks. These can all be signs that pests may be present,” says Scally.

Shake out all live greenery

Once you’ve thoroughly examined your greenery, there’s one extra step to take just in case your eyes missed something.

“Pests such as spiders, mites, and ticks are known to nest in live garlands and wreaths,” says Mannes. “Shake out trees to dislodge any hiding hitchhikers you might not be able to see at first glance.”

Properly store firewood

Being prepared for a cold winter means stocking up on firewood for your fireplace or backyard fire pit. But be sure you properly store your wood supply to avoid pests.

Mannes recommends storing firewood at least 20 feet from your home and 5 feet off the ground to limit access for pests.

“Firewood poses a high risk of moving serious invasive pests—such as emerald ash borer and Asian longhorned beetle—inside your home. Purchase firewood that is grown locally. If local firewood is not available, purchase firewood that has been heat-treated,” says Scally.

She says regulations concerning firewood vary by state, so be sure to check and follow any local regulations before moving firewood.

Inspect firewood before bringing indoors

Having extra firewood ready to go for your fireplace is essential to keep that roaring, crackling fireplace going. With the temperatures dipping outside, you’re going to want to quickly brave the frigid air to grab more wood for your fire. Be sure to check for any signs of pests before bringing anything indoors.

“A warm fire is the perfect way to get cozy on a cold winter night, but firewood stored outdoors and brought inside can also create pest problems. Spiders, ants, and termites are known to take shelter amidst firewood stored outdoors and can easily hitch a ride into the home,” says Mannes. “Inspect any firewood before bringing it indoors to ensure that pests stay outside.”

Dispose of greenery responsibly

Holiday cleanup sadly ends with the unhappy task of ditching your evergreen decor. But when disposing of live greenery, place it as far from the home as possible to avoid attracting pests to your property.

“These pieces of live greenery can attract mice, rats, and other pests looking for harborage sites during the winter,” says Mannes.

Scally says if your greenery appears to have been pest-free, it is fine to compost, but “if over the holiday season it becomes obvious that there is a pest present, the greenery should be bagged and disposed of with the regular trash.”

Contact a  licensed pest control

If an infestation is suspected, it’s important to enlist the help of professionals. Pests that enter a home (e.g., termites, ants, and rodents) can create serious health threats to humans and significant property damage. Don’t try to go it alone.

“Rodents are known to spread over 35 diseases worldwide, and termites cause more than $5 billion in U.S. property damage every year,” says Mannes.

The post How To Keep Bugs From Hitching a Ride Into Your Home via Your Christmas Tree appeared first on Real Estate News & Insights | realtor.com®.

What Is Laundry Stripping? A Mesmerizing Way To Deep-Clean Clothes

Laundry stripping

deepblue4you / Getty Images

Sure, you wash your dirty clothes, but have you tried the hot new “quarancleaning” trend of laundry stripping?

Laundry-stripping video tutorials have taken off on TikTok and other social media outlets, and for good reason. The videos start by showing a bathtub full of crystal-clear water, to which is added a load of supposedly clean laundry and a few magic ingredients. After a few time-lapsed hours go by, the water is a dingy gray-brown and the clothes are, presumably, really clean.

If you’re wondering how to strip laundry and whether it’s safe, you’re not alone. Here’s what you need to know about this viral cleaning trend and how to pull it off at home.

What is laundry stripping?

Laundry stripping is essentially a deep-cleaning process that rids your clothing and linens of all the nasty gunk, body oil, dirt, fabric softener, and other residue that may not be removed by regular washing machines.

“It provides physical proof that our regular laundry methods might not be working as well as we thought they were,” says Michelle Hansen, a professional organizer and cleaning expert with Practical Perfection.

Laundry stripping is actually a well-established cleaning process used by big companies like P&G, which makes laundry detergents and other household products.

According to Jennifer Ahoni, a senior scientist for Tide who works in the P&G Fabric Care laboratory, the company’s scientists use a special heavy-duty detergent instead of borax, baking soda, and regular detergent, but the goal and outcome is the same: superclean fabrics, without any unwanted residue.

“We strip fabrics before testing, and we also strip fabrics between testing,” she says. “We do this in order to eliminate contamination from chemicals applied to fabrics during the manufacturing process on new items and the transfer of laundry product residues on washed items between testing.”

How to strip laundry at home

If you want to try laundry stripping yourself, it’s pretty easy to get started with the following cleaning products you likely already have around the house:

  • Powdered laundry detergent
  • Borax
  • Baking soda

People use varying amounts of each of these ingredients, but some of the most popular recipes call for around half-cup detergent, quarter-cup borax, and quarter-cup baking soda for a bathtub full of water.

In your own DIY laundry-stripping formula, each chemical has a role to play, Ahoni says.

The borax and baking soda help release hard-water minerals trapped in fabrics, the detergent breaks down and removes any buildup, and the hot water helps to loosen residues and other dirt, she says.

Start by filling a bathtub or a large sink with hot water, then add the detergent, borax, and baking soda. Stir the water (you can use a large spoon or a broomstick). Toss your clean laundry in, making sure you don’t overflow the tub, then stir the water again to make sure your laundry is submerged.

You can check on your laundry’s progress every few hours, but you’ll want to soak your clothes for at least five or six hours. By then, the water will probably have turned a dark, murky color.

Afterward, wring all the dirty water out of your laundry, drain the tub, toss the items into the washing machine and run them through the rinse cycle without any detergent. Dry and fold as normal.

Is laundry stripping safe?

While laundry stripping isn’t likely to ruin your linens, it can cause bright colors to fade over time, so you’ll want to do this sparingly with colors. You’ll also want to avoid using laundry stripping for delicates or anything that you’d otherwise take to the dry cleaner.

Before stripping, make sure to read the labels on your laundry carefully, since hot water is typically a no-go for fabrics like polyester or nylon.

White towels, bedsheets, and other linens, on the other hand, are fair game. You can even try laundry stripping on items like pillows, comforters, and blankets.

When you wear the laundry-stripped clothes or sleep under the sheets later, your skin isn’t likely to be irritated by all the various powders used in the process. That said, if your skin is extra sensitive, you’ll want to use a fragrance-free or unscented detergent.

How often to strip laundry

“Laundry stripping is a long process and should only be done to clothes a few times a year to avoid damage to clothes,” Hansen says.

Bottom line: Though laundry stripping is kind of fun and the results are dramatic, it’s probably not something you’re going to do every day.

Ahoni says you can achieve similar results by washing with a heavy-duty hygienic laundry detergent or a purifying/detoxifying fabric softener like 9 Elements lemon laundry purifying softener (9 Elements, $21.99) in your regular washing machine.

The post What Is Laundry Stripping? A Mesmerizing Way To Deep-Clean Clothes appeared first on Real Estate News & Insights | realtor.com®.

I Live in My Home Like I’m Staging It for Sale—Here’s Why You Should, Too

living in a staged home

PeopleImages/Getty Images

Two years ago, my husband and I were gearing up to put our first home on the market, which meant our house was due for a deep cleaning and an organizational overhaul.

After we got the house sparkling clean and staged for sale, we started to fall in love with it all over again. We looked around at our newly organized pantry and immaculate closets and wondered, Why haven’t we always lived like this?

Now in our new house, I’ve taken lessons from the home-staging process to maintain a relatively clean, uncluttered space. Of course, maintaining a pristine home 24/7 isn’t realistic—I’d drive myself nuts if I snapped every time laundry piled up or a crumb hit the counter.

But if you’re looking for a little inspiration to keep your space tidy, try it out: Imagine you’re staging it for sale. It’s not about aiming for a picture-perfect home, and you don’t need to repaint all the walls in neutral colors or buy trendy decor. For me, simply pretending that I need to spiff up my home for a prospective buyer is motivation to keep organized—and ultimately, I’m the one who benefits from it.

Here are a few reasons this method works so well.

1. You’re forced to confront the closets and corners you’ve been ignoring

Right before we listed our house, our real estate agent sent a professional stager to assess the space. The stager made a beeline to our messy laundry area in the basement and suggested buying a few inexpensive baskets to consolidate all of the items strewed atop the washer and dryer.

It seemed so obvious—why hadn’t I thought of this?!—but her simple tip made a serious difference.

One Target trip later, my detergent, fabric softener, and dryer sheets were neatly concealed in a basket on top of the dryer that was both cute and functional.

Giving myself permission to splurge on wicker baskets also gave me an incentive to declutter closets and bathrooms. I’m not an interior decorator by any stretch of the imagination, but reframing organization as an opportunity to decorate and beautify has made it feel like less of a chore.

2. Less bedroom clutter = less stress

At our first house, our bedroom had become a magnet for miscellaneous items. Little did I know that crumpled clothing on the floor and cluttered nightstands aren’t just an eyesore—all that extra junk can also increase stress levels.

When the stager spotted our dressers and nightstands covered in tchotchkes, her instructions were simple: Clear away the clutter if you want to appeal to prospective buyers.

I dutifully followed her orders, and I quickly found that a tidy bedroom appealed more to me, too. After decluttering, I took away a new perspective on what my bedroom could be: an organized oasis for relaxation instead of just a crash pad.

As a final touch, the stager also gave us extra throw pillows for the bed to make the room cozier and more inviting. I’ve taken a page from her playbook in our new house, incorporating a fluffy accent pillow on the bed to add a warm touch that makes the room feel more Zen and less like a zoo.

3. Clearing out the kitchen can be life-changing

If there’s one thing I learned from working with a professional stager, it’s that I have a habit of covering every open surface with stuff, including (and especially) the kitchen counters. At first, my husband and I balked when she told us to hide the coffee maker, toaster, and steak knives during every showing and open house.

We used those items all the time! Where else would they go?

But after we found a new home for the appliances, we came to embrace her suggestion. The coffee maker didn’t really need a permanent residence next to the sink, and with all the counter space we freed up, it felt like a new (and much larger) kitchen.

The newfound space for food prep was a bonus for my husband and me—not just a ploy to appeal to prospective buyers.

4. You’ll always be ready for surprise guests

Preparing for overnight guests used to be an ordeal. Now, when my family shows up for a last-minute visit, I don’t need to panic. The “live in your home like you’re staging it for sale” mantra is a lifesaver when it comes time to entertain.

By maintaining a solid baseline for cleanliness and organization, I can prepare for guests with just a quick breeze through the house to pick up stray items and wipe down counters and bathroom surfaces.

5. Eventually, organizing becomes automatic instead of traumatic

The early days of decluttering a space or staging a house can be fairly intense. For the first time in months (or maybe years), you’re coming face to face with the messy corners and overflowing closets that have become catchall storage spaces.

But once you get through the initial work, keeping your space clean doesn’t require as much thought or effort. Over time, you’ll fall into a rhythm that’s sustainable. It’s way easier to maintain an organized house than it is to organize a disastrous space from scratch.

The post I Live in My Home Like I’m Staging It for Sale—Here’s Why You Should, Too appeared first on Real Estate News & Insights | realtor.com®.