Wednesday, June 30, 2021

8 Trendy Teen Bedroom Decorating Ideas That’ll Make Them Love You for at Least a Week

teen bedroom decor

Houzz

Whoever said the only two certainties in life are death and taxes didn’t have a 14-year-old. Indeed, teenage indifference is definitely third on this list, as any parent knows that shoulder shrugs, eye rolls, and sheer disregard for Mom and Dad’s existence are almost a constant.

And yet, when it comes to a teen’s private lair (i.e., their bedroom), there may be a chink in the armor. If you’re able to help transform it into a way-cool hangout, you just might gain some street cred around the house.

The trick? Enlist your teens in the project and try tapping in to their hobbies, sports teams, or other current obsessions for inspiration.

“Bring your teen into the design process, and then allow them to really reflect their style through bedding, accessories, and even paint colors,” suggests Drew Henry, the interior genius at Design Dudes.

Ana Cummings of the eponymous design firm is presently at work on a teen room. She has two of her own at home, so she’s well aware of the drama that can surround this type of project.

“Teen rooms should be styled so they can grow into them. They change so quickly, and what they’re into can suddenly shift to something else,” she says.

For some help, here are eight tips and fun bedroom decor products that just might earn you a nod of appreciation from your teen.

1. Pick a queen (or king)

This sleeper comes in four sizes and three different fabrics.

PB Teen

Your teen is growing like a weed, so a tiny twin bed won’t do.

“Twins say ‘little kid’ when you see them in a teen bedroom, so try to fit a queen or king into the space if you can,” says Cummings.

An attractive upholstered find like this one ($999, Pottery Barn Teen) should be appealing since it comes in a dusty blush shade and neutrals like linen white and charcoal.

And if you’re eco-conscious, you can feel good about the splurge—it’s met a high standard for indoor air quality thanks to testing for thousands of nasty chemicals and volatile organic compounds.

Another reason to skew bigger in terms of bed size? It’ll serve you for longer than your teen is in residence.

“Many teens are going off to college shortly, so this room will likely be used by guests later on,” says Henry.

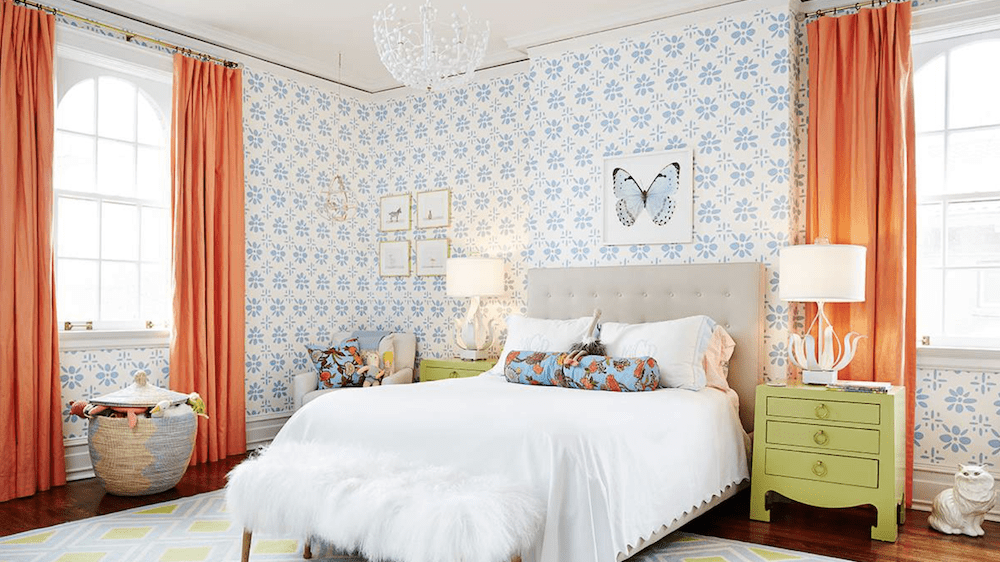
2. Choose soothing colors

Photo by Michael Robert Construction 

Tangerine orange may be all the rage with your kid, but bright hues aren’t always popular for long.

“Overly themed rooms get tired really fast, and crazy colors that don’t mesh well with the vibe of the home always seem out of place to me,” says Cummings.

And remember—it’s a bedroom, which means sleep is the goal at some point, even though your teen probably keeps late hours. Better color palettes include soothing blues, greens, and grays.

3. Add smart accents

A tufted back upgrades this teen perch.

Target

Cummings votes for comfortable accent chairs, beanbags, or even a small couch if the space allows. This cozy seat ($122, Target) comes in three shades and sports a soft, plush backing for hours of phone scrolling—we mean, um, homework.

4. Style the closet, too

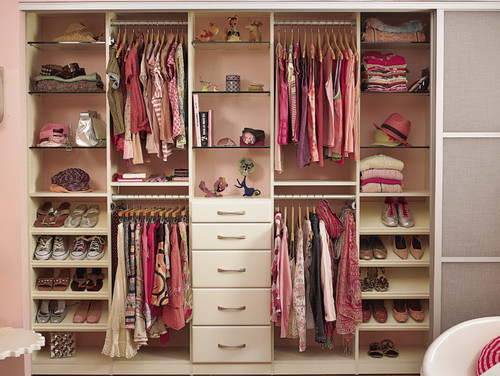
Photo by California Closets Connecticut 

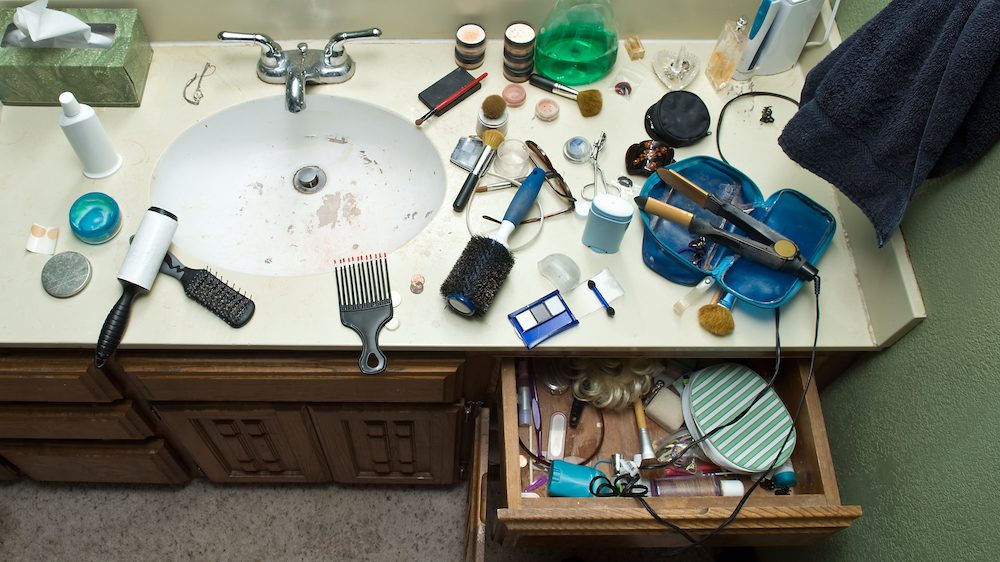
After all your hard work with decor, you’d hate to see it covered up with sweaty hockey gear and random T-shirts. The fix: Make the closet area a standout so your teen will actually want to pick up.

“Closet organization is key as well as a place to put dirty laundry, other than the floor,” says Cummings.

5. Build in a workspace

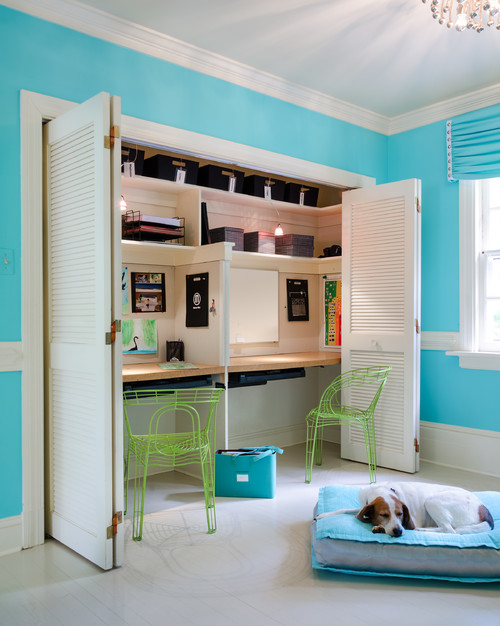
Photo by Kathy Corbet Interiors 

Folding doors, as shown here, hide desks and shelves when they’re not in use—and they help a teen stay on task since the built-ins are right in the bedroom.

“Anything you can do in a kid’s room should absolutely be geared toward setting themselves up for success on a daily basis,” says Cummings.

6. Install fun shelves

Let her display treasures overhead with this trio.

Wayfair

Curating your own bookshelves with favorite objects and pictures is a big part of the decor in a teen’s room. This affordable set of three floating shelves is easy to install and comes in black, dark walnut, and gray ($25, Wayfair).

7. Allow for primping

Even boys want to check out their look.

Wayfair

A simple full-length mirror is important for reviewing the #OOTD, so opt for a neutral style that’ll appeal to every kind of kid. The grayish white ($190, Wayfair) tones here will match nearly every color scheme in a teen’s bedroom, and this piece comes with all the hardware you need for quick hanging.

8. Try a mural

Photo by Dufner Heighes Inc 

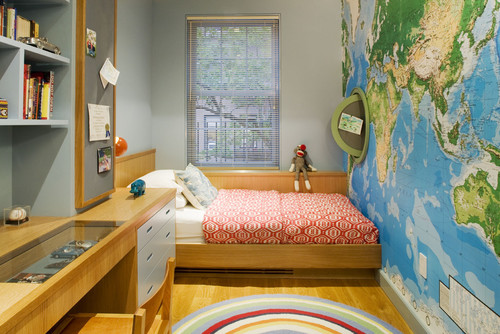
Decor that’s out, per Cummings: cutesy wallpaper, cartoon images, paper posters, flags, plastic cheap things, and anything pinned or taped to the wall.

As for what’s A-OK? “Cool original artwork or a mural on the wall,” she says.

Consider an abstract print or a world map, as seen here, especially if it’s of the peel-and-stick variety.

The post 8 Trendy Teen Bedroom Decorating Ideas That’ll Make Them Love You for at Least a Week appeared first on Real Estate News & Insights | realtor.com®.

‘Good Bones’ Is Back—With a Really Creepy House

HGTV

Season 6 of “Good Bones” has begun! And in the season premiere, Mina Starsiak Hawk and Karen Laine find something truly creepy within the walls of their house.

In “Scary to Chic in Old Southside,” this mother-daughter team have bought a house in Indianapolis. While the team is tearing out walls, it stumbles across an old shoe wrapped in nylon. The construction foreman explains that hiding shoes in the wall was once thought to ward off evil spirits. He also says that this shoe’s nylon wrapping was likely a Wiccan binding spell.

Starsiak Hawk and Laine decide to leave the shoe where it was found, hoping that its presence might bring them good luck—or at least ward off bad juju. Here’s how this renovation unfolds, which contains plenty of lessons you might be inspired to try in your own home.

Don’t let a tree ruin your curb appeal—or plumbing

house
With a twisty tree out front, this house looks spooky.

HGTV

This house not only has creepy vibes inside, but the exterior looks kind of scary, too, due to a twisty tree out front. Right away, Starsiak Hawk and Laine decide to remove this eyesore, particularly since it could mess with this property’s plumbing.

“It’s really important in a city to plant a city-friendly tree,” Laine explains. “You want something that’s not going to break through your drainage tile or break up your sidewalk. You want an appropriate size, and different trees have different behaviors, so you want one that behaves differently than this one is behaving.”

house
With new landscaping, including a small tree, this house now has great curb appeal.

HGTV

They replace the old tree with a small maple on the opposite side of the yard. The young tree is petite and perfect for a city yard.

Play up details that make a house special

fish scale
This fish scale gives the house extra character.

HGTV

This house may be partly hidden under an ugly tree, but Starsiak Hawk and Laine are still able to see the unique wood details on the exterior. The home has gingerbreading over the porch, plus some lovely fish scale siding near the roof. Both add character to the home.

To highlight these features, Starsiak Hawk and Laine give the fish scale a coat of dark paint, then they remove the ugly lattice railing on the porch and replace it with a piece designed to match the gingerbreading above.

porch
This new railing complements the original detailing.

HGTV

“It just really helps feature the craftsmanship and detail that we have in this house,” Starsiak Hawk says of the upgrades. “And I feel like buyers are really going to be impressed with it and just fall in love with the house.”

Add a bookshelf to a corner

living room
This living room was a wreck!

HGTV

Starsiak Hawk and Laine completely redo the layout of the ground floor, moving the kitchen and making it all much more open and welcoming. It’s a smart change; however, designer MJ Coyle notices an unused corner, so he suggests adding a library with chunky wood shelves.

“It’s kind of an awkward corner right there, so I think it’ll make it more functional,” Starsiak Hawk says, giving Coyle the green light.

These wood shelves not only enhance the interior’s natural aesthetic, but also add some smart storage. In the end, this addition turns an underused corner into an eye-catching feature.

living room
This bookshelf adds storage and style to this living room.

HGTV

A vaulted ceiling is worth the investment

kitchen
The vaulted ceiling is a big selling point.

HGTV

After a ton of demo, project manager Tad Starsiak (Starsiak Hawk’s younger brother) comes up with an idea to vault the ceiling in the kitchen. Starsiak Hawk isn’t sure about the $1,600 price tag, but agrees to the upgrade.

“It might make [a] cool enough focal point that might sell it a little bit quicker, which is great,” she explains.

When the kitchen is finished, it looks beautiful. But the true “wow” factor is the vaulted ceiling. It’s a feature rarely found in old homes like this, making it a true standout.

Brown counters can warm up a white kitchen

kitchen
Dark countertops look great in this kitchen.

HGTV

After agreeing to spend extra money to vault the ceiling, Starsiak Hawk wants to bring attention to that feature.

“In the kitchen, we’ve got those big vaulted ceilings, so that architectural feature is going to be really cool,” Starsiak Hawk says. “So I want to keep everything else kind of, like, white, clean, simple cabinets.”

However, she decides to do a brown matte countertop, explaining that it’ll warm up the otherwise very white kitchen.

When the kitchen is finished, the brown counters look perfect. They’re warmer than a white countertop, and not so stark as black would be. Brown counters are certainly uncommon, but perhaps Starsiak Hawk has just started a hot new trend.

Do this home’s good bones pay off?

Karen Laine
Karen Laine is excited to see this hidden treasure!

HGTV

This house takes a lot of work and a lot of demo, costing them $195,000. But in the end, this expensive renovation appears to pay off when Starsiak Hawk and Laine find a buyer for $257,000, leaving them with a $22,000 profit.

Looks like that shoe in the wall might have been a good luck charm after all!

The post ‘Good Bones’ Is Back—With a Really Creepy House appeared first on Real Estate News & Insights | realtor.com®.

3 Mini Makeovers for Guests /// Ideas for Entryways, Powder Rooms & Living Rooms

The Best Mess-Free Trees and Plants To Surround a Swimming Pool

Getty Images

Ahh—sinking into the cool water of a swimming pool on a hot summer day is heavenly. Diving into a tangle of slimy leaves and bugs? Not so much.

Welcome to pool ownership, which finds many folks hard at work skimming surface debris and sweeping decks to banish acorns and twigs before barbecue guests arrive.

But it doesn’t have to be that way. The types of trees, shrubs, and flowers you pick to surround your pool can spell the difference between a summer packed with pool cleaning, or one where you can recline in an inflatable swan in peace.

To that end, we’ve highlighted the best (and worst) poolside foliage to help you beautify your swimming area while keeping maintenance to a minimum.

The worst ‘high-litter’ trees to have around a pool

Prune this pretty pick as a hedge or tree.

FormLA Landscaping

Yup, this term is just what it sounds like—a tree that drops leaves, needles, pine cones, and berrylike fruits all the time. One in particular is the eucalyptus, which is notorious for making a mess near pools, decks, and patios.

“With this tree, even if it’s at a distance from the pool, you’ll be cleaning it every day,” says Oscar Ortega, maintenance care manager at FormLA Landscaping. In fact, FormLA worked with clients who actually gave up and removed their pool rather than continue facing the onslaught of a neighbor’s eucalyptus droppings.

Susan Brandt, the gardening pro at Blooming Secrets, warns against crepe myrtle and flowering cherry trees, as both drop flowers that are prone to clogging filters.

“And skip honeysuckle trees since both the vines and shrubs can become invasive and litter the yard with spent blooms,” she says.

Better picks, Brandt suggests, are the Australian willow or the catalina cherry (shown above), a California native that’s lovely to behold and produces low litter. Or consider palm trees for their tropical vibe, lovely shade, and minimal leaf drop.

Measure the crown—and roots

Photo by FormLA Landscaping

When you consider planting a sapling or two around your pool, “think about how large the crown will be when it’s fully grown and know that the roots will reach at least that far—and in a drought, they’ll extend even more,” says Cassy Aoyagi, president of FormLA.

Avoid aspens and the American elm tree, says Brandt, as their large root systems may impact your pool’s structure.

If you have space in your yard, a California live oak (above) or a sycamore may be fine. For small yards, try a western rosebud tree or blue Palo Verde.

Avoid prickly plants

Photo by Coastal Landscapes

Bare feet are the name of the game in summer—so when you’re poolside, this means that your shrub choice shouldn’t drop anything thorny (and, of course, no cactus—ever). The FormLA team always looks to install native plants in its garden designs, but shy away from bristles that could hurt swimmers’ toes.

One example is Fremontadendron (above), which sports large bright blossoms but also prickly exteriors. Instead, check out shrubs like western columbine or coyote mint for its gorgeous purple blossoms and heady scent.

Not a fan of creepy critters near your pool water? You’ll want to pass on peonies.

“They tend to attract bugs, especially ants,” says Brandt.

Keep your water type in mind

Cut this grass short or let it sprout out.

FormLA Landscaping

The kind of pool you own is also a factor, says Aoyagi.

Beach-native bushes are accustomed to constant salinity, making them ideal picks to surround a saltwater pool.

“But highly chlorinated splashing on certain foliage creates an inhospitable environment,” she adds.

The turf grass (above) is another smart option, as it can be kept short or allowed to drape longer; plus, it can withstand any poolside play from family and friends.

Try herbs or fruit trees

Photo by Spaces Landscape Architecture

Ahh, lavender! The delicious scent evokes Provence, and it’s easy to grow and tend.

“Not only are herbs pleasing to the the eye, but lavender by the pool can feel like a trip to the spa—and it’s low-maintenance,” says Brandt.

Consider containers to decorate

Photo by Elemental Construction Inc. 

Save time on weeding and deadheading as well as money on larger shrubs and trees by focusing on a minimalist approach, says Brandt.

“A few carefully placed container pots can look just as nice as a lush poolside garden,” she notes.

Another bonus with containers by the pool: They can be moved around, depending on the season or occasion.

“And if you plant dozens, you might spring for containers with a drip system set on a timer,” she says.

The post The Best Mess-Free Trees and Plants To Surround a Swimming Pool appeared first on Real Estate News & Insights | realtor.com®.

Decluttering for Dummies: How To Downsize Your Bathroom Junk

Getty Images

Decluttering is one of those things that’s easier said than done, especially when it comes to all the junk that accumulates in your bathroom. Of course, the goal is to achieve an organized, Marie Kondo–approved space. But when it comes time to get rid of our stuff and make it happen—well, you know how that goes.

If you’re having trouble getting motivated, you’ve come to the right place. In our latest installment of “Decluttering for Dummies,” we focus on tidying up the bathroom, from the medicine cabinet to the makeup drawers.

That countertop overflowing with half-used lotion bottles, 3-year-old shaving cream, and random cotton balls has been staring you in the face for far too long, but your piles of stuff are no match for our tips from professional organizers.

Ready to downsize your bathroom items to just the essentials? Here are five strategies to help you get organized now.

1. Gather all bathroom items

The first step in getting your bathroom items in order is to take inventory of everything you have. Get messy with it, and throw everything into a big pile; this step does not need to be done in an organized way!

“Gather everything [that belongs in the bathroom] from all over the home, inside cars, purses, etc.,” says Caroline Roberts of The Simplified Island. “By gathering the items from all locations, you’ll know exactly how many of something that you have. You may realize you have an abundance of something you rarely use, like Band-Aids, which can save you a trip to the pharmacy in the future.”

2. Divide items into categories

Once you have all of your bathroom stuff in one place, it’s time to start categorizing. There are a few ways to do this, and the method you pick will all depend on how many people you live with and what kinds of things you store in the bathroom.

Katy Winter of Katy’s Organized Home suggests organizing your items by use.

“Once everything is out, sort things into categories. Examples of categories are face, nails, lotions, hair, perfume, and makeup,” says Winter.

You might also consider categorizing by the owner of each item or by how often the item is used (e.g., daily, weekly, monthly).

3. Decide what to keep

Armed with a sense of your bathroom inventory, it’s time to decide what to keep and what to toss. For many people, this is the hardest part of decluttering. Getting rid of items, especially if you’re still holding on to them “just in case,” can be a real mental hurdle.

Professional organizer Danielle Della Pella, of Home Story, has her clients ask themselves the following questions: “Do I use this product? Has it expired? Is this a backstock item or an extra? Do I still like this item? If you bought it on sale, would you buy it again if you had the chance?”

Get your other household members involved in this step, and have them ask themselves these same questions.

“Anything that’s expired or hasn’t been used in a year is an automatic discard,” says Roberts. “For the other items that are being kept ‘just in case,’ weigh the cost of storing the item versus the cost of replacing it. This is especially important when space is at a premium.”

If the item is inexpensive and easy to replace, stick to this rule: When in doubt, toss it out.

4. Toss responsibly

Now that you know what stays and what goes, it’s time to start discarding the rejects. But when it comes to tossing medicines or other potentially harmful products, it’s important to do so responsibly.

To get started, grab a few garbage bags. One bag can be used for donations of unopened and nonexpired items—like samples or travel-size bottles—and the other bags can be for trash. Make a third pile for things that shouldn’t be thrown in the garbage—like expired medications.

“Many communities have medication drop events where prescription and nonprescription drugs can be taken,” says Roberts. “Walgreens has kiosks in many stores.”

If you don’t have a nearby drop-off and you’re unsure what to do with your old medications, familiarize yourself with these FDA guidelines. While some medications can be flushed down the toilet (as a last resort), others shouldn’t be. Do your part in keeping our water supply clean by learning how to get rid of your old medications and cosmetics the right way.

5. Organize your essentials

With all your bathroom clutter out of the picture, it’s time to organize everything you plan on keeping. If you don’t already own them, invest in a few baskets, boxes, jars, and drawer organizers.

The organizing products you use depend on the items you have, but some of our favorites are wicker baskets ($34.99-plus, Amazon), acrylic boxes ($20, Target), glass jars ($8.99-plus, Amazon), and plastic organizers ($12.99, The Container Store).

“For bathrooms with multiple users, I try to give each person a drawer and then have a communal space for shared items,” says Roberts.

The post Decluttering for Dummies: How To Downsize Your Bathroom Junk appeared first on Real Estate News & Insights | realtor.com®.

Christina Haack Breaks a Huge Design Rule: Should You Try It, Too?

HGTV

Christina Haack has done some memorable makeovers on “Christina on the Coast”—so it’s no surprise when some of her old clients contact her to renovate more of their house.

In the Season 4 episode “Boho Industrial Bathroom,” Haack meets up with past clients Miguel and Sabrina. In Season 3, Haack had renovated their kitchen and living room with such great results that the couple now want her to redo their master suite.

Sabrina describes their style as “modern, earthy, minimalist”; but above all, they want their master suite to match the kitchen so the house looks like it was renovated all at once, rather than piece by piece.

Here’s how Haack puts her $70,000 budget to good use—and, along the way, commits a design crime in the loo that might catch on big-time. Check out what she’s done if you’re looking for some daring inspiration on what to do around your own home, too.

Make your bathroom tile complement the kitchen

kitchen
Christina Haack designed this boho kitchen in Season 3.

HGTV

From the beginning, Miguel and Sabrina know that they want their master suite to complement the kitchen, so when it comes time to pick out a shower tile, they home in on selections that echo the kitchen backsplash. Eventually, they narrow it down to two options: a distressed subway tile, and a square tile with varying colors that Haack describes as being “not too perfect.”

shower tile
This square shower tile looks chic and unique.

HGTV

Both tiles have the same feel as the kitchen backsplash, but they’re certainly different looks. In the end, the couple pick the square.

“I really like the square tile, and I like the variation of color,” Sabrina says.

Once the tile is installed, Sabrina and Miguel love how it complements the kitchen.

“It has the same vibe but not the same look,” Miguel says of the tile.

Kitchen cabinets can work for a bathroom vanity

bathroom
This bathroom certainly needed an update.

HGTV

Sabrina and Miguel want to continue taking inspiration from the kitchen, so Haack offers to install the same cabinets she used in the kitchen for the bathroom vanity.

“I know how much you love those beautiful custom cabinets in the kitchen, so we have this,” Haack says, presenting the cabinet sample. “It’s a very classic look.”

This new vanity ends up looking just as lovely in the bathroom as it does in the kitchen. “Again, it carries downstairs and it doesn’t look like a separate home,” Sabrina says.

vanity
The new vanity looks the same as the kitchen cabinets.

HGTV

A wood floor in the bathroom is actually possible

flooring
Sabrina and Miguel couldn’t decide on a new flooring, so they never replaced their carpet.

HGTV

To finish this renovation, Miguel insists on using the same wood floor as downstairs. While the flooring would be consistent, Haack points out that in general, a wood floor in a bathroom is a bad idea.

“That flooring, there is always a risk of water damage,” Haack explains. “There’s a reason why a lot of people don’t do that is you have to be careful with the water.” 

Yet in this instance, Haack decides to break this cardinal design rule once her contractor Mike Rose points out that this flooring can be safely installed, as long as they use a special glue that provides a vapor barrier to resist water.

“The glue itself will stop any water that’s going to come through it,” Rose says.

flooring
Wood isn’t the typical choice for a bathroom, but it looks great.

HGTV

Sabrina and Miguel agree to the wood and, in fact, they love it so much that they decide to run the flooring all through the second story. This costs a few thousand dollars extra, but the couple decide it’s worth it—and Haack agrees.

“I like how everything’s matching now,” Haack says. “Your house has become very cohesive; before it was mismatched.”

Who knows? Maybe Haack’s unconventional design move could start a new trend of wood floors in many more bathrooms than this one.

Add texture to your plain closet doors

closet
These mirrored closet doors were dated.

HGTV

Haack knows that when it comes to bathroom design, it’s all about the details, so she pays special attention to the closet doors, where she cleverly adds some basket weave material to the front.

“Adding a basket-weave front is a really great way to incorporate Sabrina’s earthy boho style to what would normally be just a basic closet door,” Haack says.

It’s a smart upgrade that doesn’t cost a lot, and it can add a bit of texture to a clean, modern bathroom like this one.

closet
Haack gave this closet a big upgrade on the cheap.

HGTV

Don’t settle for a typical barn door

bathroom door
The master suite desperately needed a bathroom door.

HGTV

To finish the suite, Haack suggests installing a barn door to separate the newly painted bedroom from the elegant new bathroom.

“We should do a barn door right here so you guys have some privacy,” Haack says. “Something that’s not your typical barn door, but has the style of the bathroom.”

Sabrina and Miguel like this idea, so they meet with Haack’s farm door fabricator to create something unique. They decide on a diamond design in a medium-tone wood that won’t blend in with the light wood flooring.

Once the door is installed, it gives Sabrina and Miguel some privacy while adding a punch of style to their fabulous new boho bedroom.

“It’s the best barn door I’ve ever seen—ever, ever, ever,” Haack says.

bathroom door
This is the “best” barn door Haack has ever seen.

HGTV

The post Christina Haack Breaks a Huge Design Rule: Should You Try It, Too? appeared first on Real Estate News & Insights | realtor.com®.

10 Best Ways To Get Your Pest Control in Check This Summer

Getty Images

There’s no denying it: Summer is the season of pests. Flies, mosquitoes, and rodents are all way more active during long, hot days—in search of food, moisture, and respite from the sun. The bad news for you? They’re likely to take their search inside your home.

And although you can never fully guarantee your house is 100% pest-free, there are two main tactics you can take to control pests: prevent bugs from getting inside your home and deal with them when they arrive.

To help you take on this summer bummer, we asked experts to weigh in with their best tips for pest-proofing a home in summer. They delivered a bunch of recommendations, which we sorted by the amount of time they would take to execute. Whether you have five minutes to take a quick, preventive measure or an entire weekend to devote to dealing with your bug problem, check out the advice below.

If you have 5 minutes

If you can spare just a few minutes, you can assess what kinds of pests are in your home.

“Put sticky traps in every room to determine what kinds of pests you have,” says Diana Ludwiczak, a certified bedbug specialist and CEO of Doctor Sniffs Bed Bug Dogs in New York City. “Knowing exactly what you’re dealing with will help you come up with a treatment plan.”

Cost: $12-plus for sticky traps for insects and small rodents

—————

One sneaky entry route for insects is through sink drains.

“A sink and floor drain can accumulate a lot of debris,” says Jordan Foster, a pest control expert and writer based in Southend-on-Sea, England. “This attracts pests and offers an ideal breeding site, especially for small flies. You should regularly clean all of your drains, including those in the laundry room and basement.”

Cost: Free

—————

If you have 30 minutes

You know what bugs love? Moisture.

Most insects need a certain amount of humidity to survive, and pipe-filled basements are a popular hangout for these creatures, because of the humidity that can often be found on pipes.

“Put a dehumidifier in your basement crawl space,” advises Jeff King, president of the Pest Rangers in Wilkes-Barre, PA. “Removing excess moisture from your home will keep bugs away and force current bugs to find more hospitable quarters.”

Cost: $36-plus for a dehumidifier

—————

Now, about your garbage.

Even if you can’t smell or see the garbage caking the sides of your garbage can or recycling bin, the bugs can. Lining each with a plastic bag at all times is a good start, but your bins still need regular scrub-downs.

“Take 30 minutes to scrub your cans and recycling bins with soap and water to eliminate buildup and trace food and liquid waste,” says Zachary Smith, president of Smith’s Pest Management in San Jose, CA.

Cost: Free

—————

If you have 1 hour

With an hour’s worth of time, you can launch a true combat plan. When it comes to the war on bugs, most people are either staunchly for or staunchly against deploying chemicals, so we have included options for both methods.

For the chemical proponents, Smith’s Pest Management recommends applying a granular insecticide bait around the perimeter of your home and “spraying a residual insecticide under all the eaves, foundations, window and door entries.”

For those seeking a more organic approach, Ryan Smith of Ant & Garden Pest Control in Beaverton, OR, recommends making solutions to deter pests from items you likely already have in your home.

“For ants, mix equal parts water and vinegar and spray on surfaces like doorways and windowsills,” Smith advises. “For insects, mix a few drops of essential oils, such as peppermint, lavender, eucalyptus, or citronella, with two cups of water and spray surfaces.”

Cost: 12-plus for insecticide

—————

Do you have a fireplace or fire pit? You may want to reconsider your wood storage because another sneaky place where insects burrow is wood.

“If you have an indoor fireplace or outdoor fire pit, remove all wood from inside your house immediately,” advises Megan Cavanaugh of Done Right Pest Solutions in St. Paul, MN. “If the wood is already outside, keep it as far away from your home as possible, and don’t stack it against your house. Wood piles are havens for carpenter ants, termites, wood-boring beetles, and other insect pests. They can also harbor mouse nests, rat nests, or squirrel nests.”

Cost: Free

—————

If you have 3 hours

With three hours, you can do a lot of critical maintenance on your home that will make it far less easy for pests to slip inside.

“Start by sealing your window, door frames, and screens,” says Cavanaugh. “Gnats, flies, ants, and other insects can crawl or fly into openings in screens and the frames of windows and doors. Hornets, wasps, and other stinging pests love to make homes in the wall voids; they enter them often through small gaps in doors and windows.”

Next, use wood putty or caulk to fill in any gaps in the wood frame. Use a metal mesh cover to take care of any openings and tears in screens.

Cost: $4-plus for putty and caulk; $6-plus for screen repair kits

—————

It’s a well-known fact that standing water attracts insects. But few homeowners consider just how much standing water they have in their gutters and around their downspouts.

Take a few hours to thoroughly clean your gutters and remove debris. Also, clear out the area around your downspouts, ensuring nothing is clogging them and that water is being diverted efficiently away from your home.

Cost: Free if you DIY, $100-plus if you hire a professional

—————

If you have a weekend

There’s something magical about a home surrounded by greenery. Unfortunately, if vines, trees, or shrubs are touching or creeping up your house, you may as well be rolling out the red carpet for insects and rodents.

“Trimming trees and other plants touching your house is essential,” says Cavanaugh. “Mice, rats, squirrels, chipmunks, raccoons, and other rodent pests can use trees as a way to climb up to your roof. If you have any opening in the roof, soffit, facia, or gutter area, these pests will find a way inside. Keep in mind that only a quarter-inch gap between soffit plates is needed for a mouse to get inside.”

Cost: Free if you DIY, $100-plus if you hire a professional

—————

Another less obvious culprit for infestations can be mulch.

“I recommend removing all of the mulch surrounding your home and touching the foundation,” says King. “It retains moisture and can provide food, water, and shelter for all insects, including termites and other wood-destroying pests. Replace the mulch with stone.”

Cost: $150-plus to replace mulch with river rock stone

The post 10 Best Ways To Get Your Pest Control in Check This Summer appeared first on Real Estate News & Insights | realtor.com®.

Can the Property Brothers Keep Up With the Kardashians? An Unforgettable ‘Celebrity IOU’

HGTV

“Property Brothers” stars Drew and Jonathan Scott are back for Season 3 of their show “Celebrity IOU,” and this time, they’re keeping up with the Kardashians!

In the episode “Kris Jenner’s Backyard Retreat,” Kris Jenner (with the help of daughters Kim Kardashian West and Kendall Jenner) surprises close family friend Lisa with a brand-new back and front yard for her Hidden Hills, CA, home.

Lisa had just moved into this house after tragically losing her husband, and she doesn’t have the funds to redo the exteriors. Luckily, the Kardashian-Jenner bunch wants to give their friend a yard she can relax in so she can make a fresh start.

Here’s how the Scott brothers turn this property into a California oasis, which might inspire some changes around your own yard this summer, too.

When it comes to tree size, you have options

front walkway
This house had no curb appeal.

HGTV

To make Lisa’s front yard look more welcoming, the Scott brothers add a new walkway and plant some olive trees beside the path. However, they’re careful about what kind of olive trees they plant.

“Because we wanted these trees to be a specific height to complement the landscaping, we’ve selected mature trees over saplings,” Drew explains. “These are about 60 years old, and with each one weighing in at about 5,000 pounds, it’s a delicate process that requires patience and a ton of people power.”

Kris Jenner
Kris Jenner, Kendall Jenner, Kim Kardashian West, and the Scott brothers surprise Lisa.

HGTV

The brothers plant a total of 11 trees in the back and front yards, bringing not only beauty but also shade to the property. These mature trees may be more difficult to plant, but in the end they’re well worth the effort.

front walkway
These trees make all the difference.

HGTV

Lay brick in a unique pattern

Kris Jenner
Kris and Kendall put some sweat equity into the backyard.

HGTV

An outdoor fireplace is a must-have on cool California nights, so Drew and Jonathan are sure to add a stylish fire feature to the new sitting area. They give this structure a clean look and finish it with a subtle but unique brick detail in the firebox.

“I find sometimes the regular running brick just feels played out,” Jonathan says. “So Drew and I always try to do a herringbone pattern with the stone. That subtle little textural change actually has a pretty big impact.”

fireplace
This dark firebox looks chic.

HGTV

They paint the brick a charcoal shade to give it a modern look and, when the fireplace is done, it looks great. The herringbone detail gives this upgrade an extra bit of style.

Think beyond the barbecue

outdoor kitchen
This outdoor kitchen is as functional as the kitchen inside!

HGTV

Drew and Jonathan want to make this backyard the ultimate entertaining spot, so while they already have plans to build a new pool and fire pit, they want to top it all off with an outdoor kitchen. 

They go all-out, adding a double fridge, burners, sintered stone counters, and a large island with stools. When the kitchen is done, it looks a lot like a kitchen one would find inside the home.

“When you have all the same features outdoors that you would expect to have inside, especially with this L.A. weather, well, then you’ve truly got the best of both worlds,” Jonathan says.

Don’t forget about shade

pergola
This pergola is a great addition to this kitchen space.

HGTV

To top off this gorgeous kitchen space, the brothers add a custom pergola. 

“It’s a stunning design element that will not only define the kitchen from the dining and sitting areas, but it will add even more texture with its height and clean lines,” Jonathan says of the pergola. “And it will tie in all the other design features we’ve created in this backyard paradise.”

Plus, this pergola provides a bit of shade for the cook.

“It’s not going to provide total shade,” Jonathan says. “But it’s definitely going to provide a total statement.”

White on white marble will give your pool a spa feel

shed
This yard space was underused.

HGTV

Drew and Jonathan come up with a plan to rip out Lisa’s small, dated pool and build a new, more luxurious pool in a different spot. They want this pool to be elegant and chic, so they pick light, bright materials that will match Lisa’s style.

“Lisa obviously loves white,” Jonathan says, referring to her white farmhouse-style home. “She loves that clean aesthetic. I think that’s how she wants to bring modern into the ranch house feel.”

pool
This white marble elevates the space.

HGTV

The team goes with a white marble color for both the walkway and the area around the pool, giving the entire space a uniform, spa feel.

In the end, this pool looks much more luxurious than the old one thanks to the clean, chic marble. It’s the perfect addition to this marvelous backyard that impresses Lisa as well as the Kardashian-Jenner bunch—setting the stage for many amazing summer parties here for years to come.

The post Can the Property Brothers Keep Up With the Kardashians? An Unforgettable ‘Celebrity IOU’ appeared first on Real Estate News & Insights | realtor.com®.

8 Houseplant Myths Most People Think Are True—Debunked

Getty Images

Houseplants are wildly popular these days. And why shouldn’t they be? Even if you live in a tiny downtown studio surrounded by skyscrapers, you can still bring a little nature indoors with a few houseplants here and there.

But be forewarned: Your friends and family members will give you tons of unsolicited houseplant advice—and they won’t always be right. Unfortunately, misconceptions about houseplants are all too common.

To help you do what’s best for your plant babies, we investigated some of the most popular houseplant myths—and dug deep to figure out the truth about each one.

1. Houseplants purify the air indoors

Reality: You may have heard about scientific studies showing that houseplants remove toxins from the air. But it’s important to remember that these studies were conducted in controlled laboratory environments, not in an actual house or office.

Researchers at Drexel University found that you’d need approximately 5,000 plants in a tiny 500-square-foot apartment to really reap any of the often-touted air-purifying benefits of houseplants. It would feel like a jungle! (Where would you sleep?)

On top of that, not all plants are created equal when it comes to purifying the air, says Laura Smith, owner of All Star Cleaning Services.

The areca palm, also known as the butterfly palm, for example, is one of the best plants for cleaning the air, she says.

Pothos, aka devil’s ivy, is another good choice. And while aloe vera doesn’t clean the air, it can serve as a low-tech alarm system, turning brown if there are too many toxins in the room.

2. I don’t have enough sunlight to grow houseplants

Reality: Sure, many houseplants prefer some amount of light, whether indirect or direct. But don’t give up so easily.

Just as there are outdoor plants that prefer shade over sun, there are several types of houseplants that can thrive on little to no sunlight, including snake plants, philodendrons, pothos vines, and plantain lilies, says Susan Brandt, co-founder of Blooming Secrets, a gardening website and shop.

___

Watch: How Does Your Vegetable Garden Grow? Indoors

___

3. Houseplants need to be watered every day

Reality: Slow down there!

If you water your plants every single day, you’re going to cause some serious problems. In most cases, this is just too much water. Each plant is different, but generally speaking, the soil should be allowed to dry out completely between waterings.

One sign that you’re overwatering your houseplants is the arrival of fungus gnats, tiny little bugs that feast on the rotting roots of your plants. Chances are, you’ll need to create a watering schedule for your houseplants—and this may include watering them on different days and with varying frequencies. Drought-tolerant plants, like cacti and succulents, hardly need any water at all.

4. Houseplants need big pots to grow

Reality: If you think your plant is starting to outgrow its home, your first instinct might be to rush out and buy a larger pot. Not so fast.

You can actually harm and, in some cases, kill houseplants if you move them into a pot that’s too large. Why?

Because large pots hold lots of soil, which can retain too much moisture for the plant. This can cause dreaded root rot, which is bad news for your formerly healthy plants.

5. Houseplants, if ingested, could harm my dog or cat

Reality: Yes, there are some houseplants that are toxic to pets if ingested. But there are also hundreds of nontoxic varieties to choose from if you’re worried about your four-legged friend feasting on your plants. Some examples include the African violet, begonia, and Christmas cactus. Plus, many pets simply leave houseplants alone anyway, says Brandt.

6. You can’t grow vegetables indoors

Reality: While you might typically wait until spring and summer to plant your vegetable garden in the backyard, did you know you can grow yummy edible plants all year long, inside your home?

Potted herbs are a great addition to your windowsill. You can also regrow green onions, lettuce, and celery from scraps indoors in a cup with a little water!

7. Houseplants are expensive

Reality: You don’t have to dump your entire life savings into your houseplants. Sure, some houseplants are expensive—because they take years and years to grow. But others are incredibly affordable, starting at just a few dollars apiece. Even better? You can often get houseplants for free on sites like Facebook Marketplace and Nextdoor.

Tell your friends and neighbors that you’re a houseplant lover and you’ll be amazed by how many of them respond by offering to give you starts or pups from their own beloved plants. And if a big, beautiful, expensive plant catches your eye at the garden store, ask if they have any younger versions of that same plant. Yes, it will be small to start, but it will also be more affordable. And with the right love and care, it will grow into the mature, adult version you first spotted.

8. I wasn’t born with a green thumb, so I’m doomed to kill houseplants

Reality: This is just plain false, not to mention a defeatist attitude! All gardeners make mistakes, and they spend a lot of time doing research and educating themselves on the best ways to care for their plants.

All Star Cleaning Services’ Smith, for example, says she used to accidentally kill every houseplant she touched. Eventually, though, she wrote specific care instructions for every plant in her home, then stuck the notes directly into each pot. She also grouped plants together based on their characteristics, such as how often they needed to be watered. It worked!

Now, Smith says she’s a houseplant pro.

The post 8 Houseplant Myths Most People Think Are True—Debunked appeared first on Real Estate News & Insights | realtor.com®.