You don't need to spend a fortune to fix up your kitchen cabinets. Check out these simple upgrades that'll take your cook space from ordinary to outstanding.
Parents, don't throw away your dreams of enviable interiors just yet. We share pointers for creating a stylish living room that is also a kids' play space.
In a city like Los Angeles, where square footage is incredibly valuable, Drew and Jonathan Scott of “Property Brothers” know that plenty of people are transforming their garages into living spaces. So, it’s no surprise when their latest “Celebrity IOU” client wants to turn a dumpy garage into an office/guest space.
In the episode “Darren Criss Garage Makeover,” Darren Criss (best known for his role on “Glee”) wants to give back to his friend-turned-manager, Ricky.
The Scott brothers have just three weeks to upgrade Ricky’s detached garage, and also turn his ho-hum backyard into an L.A. oasis. Here’s how they pull it off, with plenty of take-home lessons you might be inspired to try around your own place.
Add cabinets for plenty of storage in a garage
Before: Ricky was storing all kinds of things in his detached garage.
HGTV
Drew, Jonathan, and Criss are planning to surprise Ricky by giving his ugly garage a full face-lift.
That way, Ricky will no longer be forced to use his daughter’s room as a part-time office. Instead, he’ll have a comfortable office space that can double as a guest space.
However, there’s just one problem: Where will all the stuff in the garage go?
Ricky keeps everything from his drums to his surfboards in the garage. This poses a problem, because the Property Brothers need to make sure there’s enough storage not only for his garage stuff, but for Ricky’s home office items and guest room must-haves, too.
After: The brothers knew Ricky would still need the storage space, so they added lots of cabinets.
HGTV
“When you think of how important storage is in a house, well, it’s even more important in a space like this, because we don’t have a lot of room to work with,” Jonathan says.
___
Watch: Nothing Gets Between the Property Brothers—They’re Now Neighbors!
___
Drew and Jonathan install custom cabinets throughout, including cabinetry that doubles as a kitchenette. A sink built into one cabinet and a microwave and fridge hidden in others help to streamline the whole place and make it more efficient.
This flex space even stores the microwave and fridge in these cabinets!
HGTV
An extra bathroom adds convenience
The brothers give the shower a whole new look.
HGTV
To make the garage guest space/office more functional, the brothers add a small restroom. For decor, they play it safe, with a white artisanal tile.
As they work on installing the tile, Jonathan admires the look, saying, “These are all handmade—and you can tell, too. I love that imperfect finish.”
Criss agrees, and even admits, “It’s nicer than any bathroom in the house!”
This shower is simple but elegant.
HGTV
Synthetic turf can look as good as real grass
This backyard was roomy but underutilized.
HGTV
When Jonathan and Criss are planning the backyard design, Jonathan suggests using synthetic grass and light-colored pavers.
“I wanted to go grand with all of our pavers throughout the yard, so I was thinking this scale,” Jonathan says, pointing to a large rectangular sample.
Jonathan Scott and Darren Criss discuss finishes.
HGTV
Next, Jonathan chooses a durable turf that looks just like real grass, which Drew says happens to be the exact turf he has in his yard.
“We want to get just the right artificial turf for this yard, because we want zero maintenance,” Jonathan says. “But we want something that’s going to be beautiful.”
In the end, the turf brightens up the yard and makes the whole space feel much more welcoming.
With turf and pavers, this yard is now perfect for entertaining.
HGTV
Turn an awkward corner of the yard into a hot tub paradise
The brothers knew this empty space was full of potential.
HGTV
Before renovation begins, Criss points out that there’s an unused strip of yard behind the garage. As is, this narrow area isn’t exactly welcoming, but Criss loves the idea of putting in either a fire pit or a hot tub.
Jonathan suggests a hot tub, saying, “This is such a cool, private, intimate area. How cool would it be for there to be a hot tub?”
When the brothers finally install a hot tub, it turns the space into a small oasis. With greenery behind the spa and seating in front, it’s an ideal spot to hang out.
Jonathan Scott puts the finishing touches on this spa oasis.
HGTV
A horizontal fence adds beauty as well as privacy
This new fence adds privacy (and style) to the backyard.
HGTV
The brothers finish off the renovation by tearing out the mismatched fencing and replacing it with decking timber.
“The fence line in this yard before was terrible,” Jonathan says. “They had chain link, they had a pink fence, they had purple, they had gray, they had everything you can imagine. And none of it looked good. Now this beautiful, horizontal, clean-line fence going all the way around is going to give them privacy and style.”
This fence is Drew and Jonathan Scott approved!
HGTV
The fence is an elegant addition to the yard, with the added bonus that it won’t require any maintenance. Decking timber is a synthetic material that has the look of real wood, but doesn’t require staining or sanding, and will last a long time.
Chip and Joanna Gaines of “Fixer Upper” are famed for their epic home makeovers and large brood of five kids, but the hosts of a new show on their Magnolia Network have them beat on both fronts.
On “Home Work,” Candis and Andy Meredith renovate homes across Utah, including their own property—a 1907 schoolhouse. It’s a huge space, but then they have six boys and one girl. As you can imagine, chaos often ensues as they struggle to juggle work and family.
In the latest episode, “Old Schoolhouse Guest Suite,” Candis and Andy renovate a bedroom in their home that will be used as a guest suite. Plus, Candis takes on a job redoing a nursery for clients Ryan and Chelsea.
Here’s how they make both of these sleeping spaces feel cozy and stylish, with plenty of lessons you might be inspired to follow in your own sleeping quarters, or beyond.
Use fabric as wallpaper for a unique look
This simple paneling didn’t have enough personality.
Magnolia Network
When Candis first sees Ryan and Chelsea‘s nursery, she’s not impressed. The home is a new build so the room looks fresh, but it lacks personality. She suggests replacing the board and batten paneling with something that will stand out a little more.
“It might seem a little crazy that we’re kind of demoing brand-new board and batten in a brand-new house,” Candis says. “But, every single bedroom in this whole house is identical. I just want to infuse some personality into the nursery.”
She puts in much larger paneling, paints the whole room a soft, tannish pink, and adds fabric to the panels.
This paneling is a beautiful addition to the nursery.
Magnolia Network
As Candis measures the fabric and carefully staples it to the wall, she explains that it’s actually a duvet cover. Since it’s patterned on both sides, you get much better value than buying fabric by the yard.
The fabric acts as a unique, textured wallpaper, adding softness and personality.
“I love it,” Candis says when this feature wall is done. “It adds so much detail to the room.”
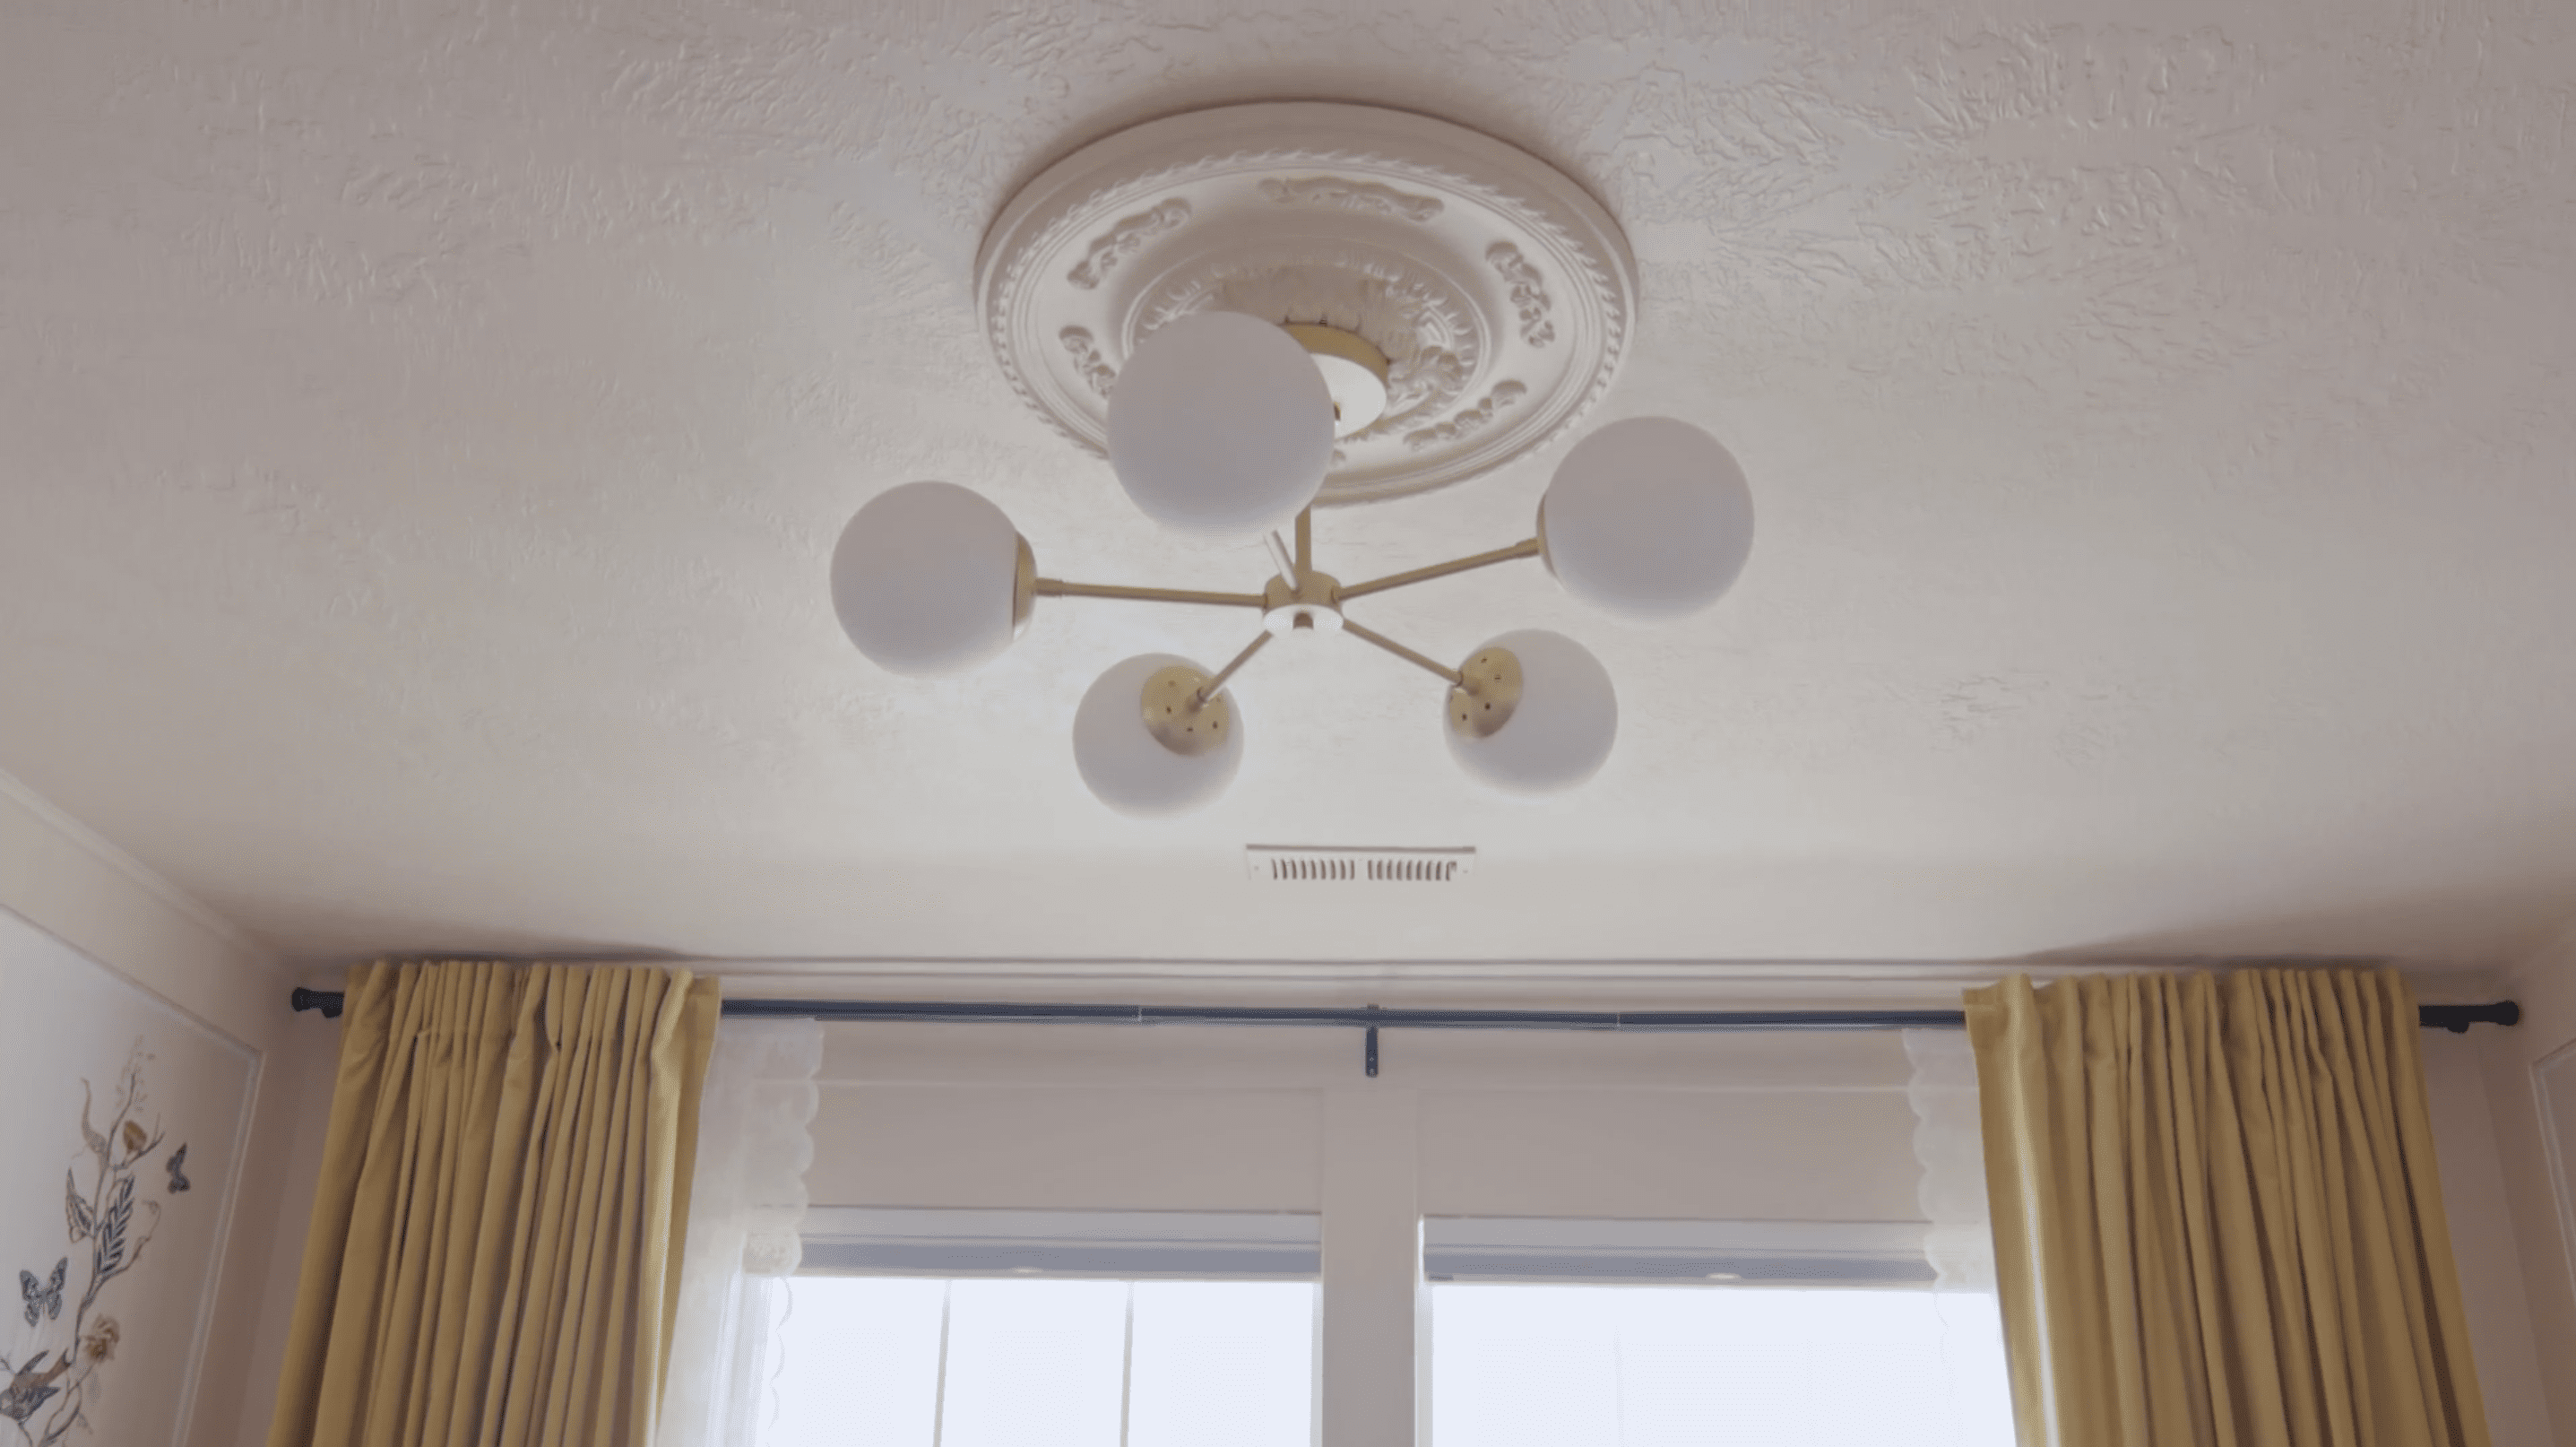
Add a classic ceiling medallion to a modern light
This modern light fixture looks great with a classic ceiling medallion.
Magnolia Network
Candis knows lights can bring bling to any space, so she decides to install a modern chandelier, plus a ceiling medallion to finish the look—but matching its color to the ceiling can be tricky.
“I love ceiling medallions so much, but I don’t love painting them with a brush because it’s really hard to get all of the details,” she says. “And it starts to get a little bit messy.”
Her fix? She orders the same ceiling paint color in a small spray bottle to make painting the medallion’s nooks and crannies easier.
“You can get this done at your local paint store. It costs about $20, and it’s the exact color as the ceiling and the walls,” Candis says.
Use new picture frames in an old-fashioned way
Candis Meredith makes average picture frames look like antiques.
Magnolia Network
To finish this nursery, Candis thoughtfully hangs up baby pictures of both Ryan and Chelsea. However, she doesn’t just hang up these photos with a hammer and nail.
“I will take new, modern frames, but then I’ll add a chain and hang it from the top of the molding here,” Candis says. “And it looks like you have a picture hanging rail, and it looks like these are antique frames.”
It’s a great tip for easily adding an extra touch of character to a room.
“This looks very new and old, which is my favorite,” Candis says.
While family photos are always a welcome addition, these now fit the theme of the room.
Magnolia Network
Can’t find the right paint color? Mix your own
With a new color, this beadboard looks great.
Magnolia Network
Back home, Candis and Andy find old pieces of tongue-and-groove beadboard in the ceiling. These boards, they realize, were part of the historical 1884 schoolhouse that was torn down when this 1907 schoolhouse was built in its place. Candis and Andy want to use these old boards in the bedroom, painting them the same blue/gray/green color as the original 1800s schoolhouse.
Of course, hardware stores don’t sell this exact paint color anymore, so Candis decides to try mixing the shade herself.
“The reason this has such great coloring is because it’s milk paint, first of all, and then dirt, and patina,” Candis explains. “So you can’t get the patina of time, apparently, with paint colors.”
“That doesn’t come in a can?” Andy jokes.
They end up concocting a color that is close enough—the painted beadboard gives a nod to this home’s history and looks elegant to boot.
Use antique furniture as a bathroom vanity
This guest room includes an en suite bathroom, so Andy creates a bathroom with the same old-fashioned charm by including an old table under the sink.
“One of our favorite ways to add character into a bathroom is by using antique furniture as a vanity,” Andy explains. “It’s just a little table that we paid maybe $30, $40 for. And normally we would not advocate drilling holes in antique pieces of furniture, but we’ve decided this is a way to kind of give new life and purpose to an antique.”
He adds a traditional vessel sink on top, creating a lovely vanity that helps emphasize this bathroom’s classic look.
This classic vanity works great in this schoolhouse-inspired bathroom.
If you have a lawn, probably one of the biggest downers to your weekend is to turn the ignition and discover that your riding lawn mower won’t start. What gives?
Lawn mowers often fail to start because they’ve been languishing unused for months (like during winter), which, on battery-driven models, can cause the power system to go dead. At this point, you might presume you have to buy a new battery, or get your mower to a repair center for servicing.
But what many people don’t know is that there’s a third option: You can jump-start many lawn mowers with your car.
I have personal experience with this, and it works. Last year, my mom’s riding mower wouldn’t start, so she wanted to try jump-starting it with her Honda. I told her she was insane, until I did a Google search.
So, with some YouTube tutorials under my belt, I headed to her garage to try it, hoping that my epitaph wouldn’t end up reading, “She exited the world in a flash of electricity on a grass cutter.” Thankfully, it was easy to figure out, even for a city girl, and I’m still here to tell the tale.
In case this happens to you, here are the steps to jump-starting a lawn mower with a car, along with some expert advice on safety precautions to take and pitfalls to avoid so you’re back to picture-perfect grass in no time.
Tools you need to jump-start a lawn mower
Jumper cables
12-volt vehicle battery, or a battery charger
Work gloves/eye protection
Wrench
Jump-starting your riding lawn mower with your car should always be done on a flat surface.
lawnmowerfixed.com/YouTube
Step 1: Do a lawn mower brake and battery check
Before you do anything, make sure your riding mower is on a flat surface and it is turned off with the park brake on. No one needs a runaway riding mower!
Next, locate your mower’s battery.
“Most riding mowers hide the battery under the hood or seat, but depending on the brand, you might also find it beneath the drink holder, behind the wheel, and in other hard-to-find places,” says John Cunningham, founder of lawnmowerfixed.com.
If you cannot find the battery just by poking around, check your user manual.
Once you’ve located the battery, make sure it’s a 12-volt.
“Most modern riding mowers do utilize this type of small-engine battery, but if yours happens to have a 6-volt battery and you try to jump-start it with the car, you’ll blow the battery,” warns Cunningham.
So let’s emphasize this: Since most push lawn mowers have smaller engines of 6 volts or less, you should not attempt to jump-start a push mower, as you could blow the engine. For a 6-volt model, you can use only a battery charger.
___
Watch: It’s Time to Tune Up That Lawn Mower: Here’s How
___
Not sure what voltage you have? The voltage should be stated on the battery label, but if you can’t find it, you can also search Google for this information if you know the brand of the battery.
You’ll also want to make sure the battery is secure and isn’t wet, since leaking battery acid will burn your skin.
“Keep in mind batteries are inherently dangerous because of acid and the fact they can also generate explosive gasses,” says Cunningham.
If you determine that the battery is leaking, you’ll need to replace it, not jump-start it.
Step 2: Examine the battery terminals
Dirty, corroded, or loose battery terminals can inhibit the flow of power such that even if you do all the steps right, the battery won’t receive a charge.
“Battery connections often shake loose because of the vibration and bouncing that accompanies lawn mowing, so you’re going to want to check to make sure the cables are attached securely,” says Duston Maynes, technical team leader for RepairSmith.
You also want to make sure that your connections are clean.
“Corroded terminals can be spiffed up by sprinkling baking soda powder directly on the terminals, then go ahead and add a spoonful of plain water, and after about a minute the acid will be neutralized,” says Cunningham. “Next, wire-brush the terminals and add a coat of grease or Vaseline to help prevent additional corrosion.”
Finally, this is a good time to identify which battery terminal is positive (+) and which one is negative (-). The battery poles will typically be red for positive and black for negative. This is important to know for future steps.
Make sure your battery terminals are clean and tight, and locate the positive and negative.
lawnmowerfixed.com/YouTube
Step 3: Turn off your car and pop the hood
Park your car close to your riding lawn mower, and turn it off. Keep it off for the whole process!
Pop the hood, prop it up securely, and locate your car’s battery. It should also be a 12-volt.
“You want to make sure that the vehicle’s system is the same voltage as the lawn mower,” says Maynes. “Some large trucks use multiple batteries and have components that run on a 24-volt system, which would be too much.”
Make sure both your lawn mower and car battery are 12-volts before trying a jump-start.
lawnmowerfixed.com/YouTube
Keep in mind, you may have to remove a plastic shield to access your car’s battery terminals. Once you have found the battery and terminals in your vehicle, again take the time to identify which battery pole is positive and which is negative.
Step 4: Connect the cables in the correct order
How you do this step is important: Order matters.
“Going terminal to terminal will make that vehicle part of the other’s electrical system,” says Maynes. “Precisely following these steps will reduce the chances of a spike, which would damage the charging system during a jump-start.”
Make sure you have a safe work area with no tripping hazards, and check that your cables are long enough to reach from the riding mower to the vehicle. Remembering that you will connect the same color cable to the corresponding battery pole, attach the jumper cables as follows:
Connect one end of the red jumper cable to the positive battery pole on the battery in the lawn mower.
Connect the red cable to the positive terminal on the lawn mower battery.
SearsPartsDirect/YouTube
Connect the other end of the red jumper cable to the positive battery pole on your car’s battery. Don’t let this end touch any metal on the car, or you could see a lot of sparks and potentially damage your car’s battery.
Attach the other end of the red cable to the car’s positive battery terminal.
SearsPartsDirect/YouTube
Connect one end of the black cable to the car’s negative battery terminal. The negative cable is more forgiving, so you don’t have to worry as much about it touching metal, as long as you don’t hook it to the positive cable.
Clamp one end of the black cable to the car’s negative battery terminal.
SearsPartsDirect/YouTube
Connect the other end of the black jumper cable to the metal mower frame away from the fuel tank and battery.
“The final negative jumper cable is connected away from the battery, because when connected, it creates a small spark or arc,” says Cunningham. “In theory, this could ignite battery acid vapors if it’s too close.”
Attach the final black cable clamp to metal on the body of the mower.
SearsPartsDirect/YouTube
Step 5: Turn the ignition key
Once everything is connected, turn the ignition key to start the mower. If the battery isn’t totally fried (meaning it needs to be replaced), this jolt should be enough to bring your riding lawn mower sputtering back to life.
“If you get the engine to turn over, go ahead and allow it to run for a few minutes while still connected in order to juice the battery up,” says Cunningham.
Step 6: Remove the cables in reverse order
With the lawn mower engine still running, remove the cables in the exact opposite order of how you connected them. In other words, disconnect the black cable from the mower frame first, and then disconnect the black cable from the car’s battery. Next, disconnect the red cable from the vehicle’s battery, then disconnect the red cable from the mower’s battery.
“This decreases the risk of damaging electrical components as you break the connection,” says Maynes.
Step 7: Fully charge or replace the battery as soon as possible
Once you’ve got the riding lawn mower going, you’ll probably have enough power to drive it for a bit. But in order to keep this from happening again, it’s wise to fully charge the battery with a battery charger as soon as possible.
Fully charge your battery as soon as possible after you’ve jump-started it.
SearsPartsDirect/YouTube
“If the battery refuses to start even after you’ve attempted jumping it, you’ll need to test the battery with a volt meter,” says Cunningham. “You may have to buy a new battery, or there may be another issue like a faulty starter, which will require service to fix.”
Christina Haack sees plenty of houses that feel too small, but in the latest “Christina on the Coast,” this is a bigger problem than usual since her clients are tall.
In the episode “Tall Family, Big Reno,” Haack helps her former labor and delivery nurse, Kristin, renovate her home in Huntington Beach, CA. Kristin adores a farmhouse style, while her husband, Eric, prefers a sleeker, modern look. However, combining styles isn’t the hardest part of this renovation.
Kristin is 6-foot-2 and Eric is around 6-foot-4—so everything in their home feels too low, from the kitchen counters to the archways connecting the rooms. Haack needs to make this place feel more height-friendly and fashionable—all with a mere $70,000 renovation budget.
This renovation ends up costing more than anticipated—with Haack spending $85,000—but the splurges seem worth every penny. Check out how Haack makes this home feel more functional and spacious (which is important no matter your height), with some lessons you might be inspired to apply to your own abode.
Remove arches to open up spaces
These two arches make the room feel closed off.
HGTV
Arches can be a beautiful addition to a home, giving any space a classic feel and a touch of old-world charm. However, archways can make an otherwise large doorway less accessible, especially for tall homeowners. Even Haack has a problem with these arches: When she first tours the house, she bumps her head on her way into the living room!
So Haack squares off the passage between the front door and living room, then completely removes the second archway leading into the kitchen and dining room.
Without the arches, this living room looks and feels much bigger.
HGTV
“We got rid of that big archway,” Haack points out at the final reveal. “It felt so enclosed, and now it’s just wide-open.”
Choose the perfect counter height
These kitchen cabinets were dated, and the counters were too low for Kristin and Eric.
HGTV
While Eric first says he likes light and bright designs, he votes against white cabinetry, choosing gray ones instead. They feel more modern and look great with the distressed subway tile backsplash Kristin has picked.
But to make this kitchen extra special for Kristin and Eric, Haack decides to try a design move she says she’s never done before.
“Since they’re so tall, I want to raise the counters from the typical 36 inches to around 40 inches,” Haack explains.
It’s a subtle change, but it makes a huge difference in how comfortable Kristin and Eric are as they prep their food.
“If you have a custom kitchen, you might as well get the height of counters that you want,” Haack says.
These gray counters are a little taller than ones found in a typical kitchen.
HGTV
Make sure the fridge is in the right place
With the fridge in a new spot, this living space has a better flow.
HGTV
In her kitchen design for Kristin and Eric, Haack places the fridge near the living room, and the pantry near the stairs. However, Kristin asks Haack to switch the pantry and fridge.
Haack agrees with the change, realizing her original spot for the fridge would have been too far away to be functional. With its new spot, “it’ll create a nice workspace between the range, the sink, and the fridge,” she says.
Eric agrees, saying that a fridge near the living room would have made these two spaces feel too connected. The new location “separates it a little bit more,” he says.
A brick or stone fireplace looks dated
This fireplace was a dated eyesore.
HGTV
Haack’s clients often ask for a fireplace makeover, complaining about dated brick or stone. However, Kristin has a truly unique complaint.
Since she’s a labor and delivery nurse, Kristin explains, she sees something in the mantel molding that others might not notice.
“This looks like a uterus and ovaries on the side,” she says.
Kristin says this mantel reminds her of a uterus.
HGTV
While Haack may not instantly see body parts on this mantel, she agrees that it’s high time for a fireplace face-lift. She says they can replace the mantel and paint the stone, giving the feature a more modern look, or they could cover the fireplace with a dark tile that will complement the new kitchen.
The price difference is significant: $300 for paint and $3,000 for tile. Kristin decides the tile is worth the cost. The gray tile gives it a much more modern look, which works perfectly next to the kitchen. Sometimes it pays to splurge!
This fireplace complements the kitchen.
HGTV
A barn door is an easy way to add farmhouse style
This room was due for an update.
HGTV
Kristin and Eric decide to finish this renovation with a DIY powder room, and while Haack is impressed with their handiwork, she suggests finishing it with a new hallway door.
“Something I was thinking is doing a nice barn door here, that way you have some separation to this room,” Haack says. So she replaces the old hallway door with a rustic wood barn door, which complements the farmhouse kitchen and proves that a good kitchen design can be carried throughout the house for a cohesive look.
“We carried the farmhouse vibe through the entire space,” Haack explains.
This barn door extends the farmhouse aesthetic into the dining space.
After last year’s record-setting wildfires, which burned over 10 million acres, experts predict this year’s wildfire season will be just as dangerous. Scorching temperatures and drought conditions make it nearly impossible to prevent some fires, but if you live in a place that’s considered at risk for wildfires, you’re probably concerned about how to protect your home.
While there are many obvious ways to help stop the spread of wildfires (mainly, by respecting fire bans), there are also some steps you should take to mitigate the risk of fires.
We spoke to wildfire and fire mitigation experts to pinpoint the actions you can take to protect your home and your neighborhood going up in flames this season. Here’s what they had to say.
What is fire mitigation?
“The goal of fire mitigation is to alter how a fire burns throughout a property and to reduce the likelihood of that fire negatively impacting lives, structures, and even the forest,” says wildfire expert Charlie Landsman, of the Wildfire Adapted Partnership.
In other words, fire mitigation doesn’t necessarily seek to stop a wildfire (although it is preventive by nature), but rather to control how and what it might burn. Since the vast majority of wildfires are started accidentally by people (as many as 90%, according to the U.S. Department of the Interior), having a well-mitigated neighborhood and property could make the difference between losing your home to a fire and having it spared.
Mitigation isn’t just good for preventing damage to your property, it also helps firefighters stop fires that are underway. By removing and disposing of flammable organic matter (extra sticks, pine needles, leaves, even low-lying scrub), you’re taking away a lot of the fuel that allows wildfires to consume millions of acres.
Wildfire mitigation techniques
Mitigating your property and neighborhood might sound complicated, but it’s really not. Here are three steps to get your home and property properly mitigated this fire season.
1. Create defensible space: The first step in mitigating your property is to create defensible space around your home.
“Defensible space is the area surrounding your home that can help protect it from loss or damage in a wildfire,” says Erin Johnson, wildfire programs manager for the Theodore Payne Foundation. “Depending on your location, proximity to neighbors, terrain type, and habitat, defensible space is typically defined as a radius of 100 feet surrounding a structure.”
To create a defensible space around your property, you’ll want to remove any fuel within that perimeter.
“Clear grasses and shrubs below larger trees, and trim trees up to reduce the chances of fire carrying from the ground into the tops of trees,” says Landsman.
Don’t stack firewood on a deck or next to the home since embers can gather in the firewood stack, ignite it, and then ignite the deck or home itself.
Don’t forget to clean out pine needles accumulating in your gutter or on your roof, or even the tree branches growing over your deck. Anything that could help a fire spread from your property to your home has to go if you plan on having a truly defensible space.
2. Landscape wisely: Another key step to keeping your home safe is choosing wisely when it comes to landscaping.
“California native plants have remarkable characteristics that provide protective services to homes and structures during and after a fire,” says Johnson. “The massive canopy of a coast live oak can act as a shield for your home, extinguishing embers that travel miles ahead of a fire. Likewise, an evergreen ground cover such as coyote brush can help diffuse embers rolling toward your home. The deep roots of many species such as toyon can help stabilize slopes, preventing mudslides after a fire.”
What makes native plants so robust?
“Native plants can hold their hydration and health better than non-native plants,” says Cassy Aoyagi, president of FormLA Landscaping. “This makes them better at resisting high, dry heat. Non-natives, by contrast, can escape our gardens and become fuel for fire.”
3. Help out your neighbors: An important aspect of fire mitigation that many people forget, is that it should be a collaborative effort among neighbors.
“Landscaping for wildfire resilience is one small action we can take as individuals to prepare for wildfire,” says Johnson. “But to achieve true wildfire resiliency, our actions need to take place on the community scale.”
So go ahead and coordinate a group fire mitigation cleanup for that neglected park, or contact your elderly neighbors to see if they need help clearing some brush. After all, it takes a village to reduce wildfire risk.
Think TikTok is solely a social media platform for dance challenges? The platform is actually teeming with amazing household hacks that will make your life easier. Plus, we guarantee you’ll have fun trying out these user-generated ideas in your home.
So check out these amazing time-saving (and largely effortless) hacks. Posthack choreography optional.
Are your plants constantly thirsty but you don’t have time to serve them a leisurely drink every day? Put them on ice. Or rather, follow this hack from @alidomus, who throws ice cubes into her basil plant when she doesn’t have time to water. Another score for ice in the household hack column.
Where is the best place to clean your icky, drippy toilet bowl brush? Why, in the bowl of the toilet you just cleaned, naturally! Try @acleanbee‘s tip of soaking the brush in cleaning fluid in the toilet bowl and using the lid to keep the brush in place as it drip-dries.
Electric kettles are brilliant for heating up hot water quickly. But all that boiling (and boiling) means you’ll end up with a buildup of minerals in the bottom of your machine.
Take a tip from @carolina.mccauley to banish limescale from your kettle simply by boiling cola inside of it. (Just don’t drink it afterward!)
5. Remove dust from your ceiling fan with a pillowcase
Fan blades are one of the most annoying things to clean in most homes. There is something about big chunks of dust falling on your head, or in your eyes, that makes the job seem like more trouble than it’s worth.
Except if you have an old pillowcase and follow @cleanthatup‘s genius hack of slipping the case over the blade. Bonus: This video also includes shortcuts for cleaning a hairbrush and AirPods.
Perhaps no other ingredient goes with hacks more than the OG cleaning staple, vinegar. But what if you can’t hack the sharp smell of your vinegar? Psst, you can make it smell less pungent.
Do like @nowitsclean and simply save the peel from anything citrus (oranges, lemons, or limes) and put them in a jar with the vinegar. Your next cleaning hacks will be not only a breeze, but also sublimely scented.
There is something about plastic food storage containers that makes them want to hold on to grease and stains for dear life. Now your containers will once again be clean, thanks to a genius hack by @tanyahomeinspo. All you need is soap, water, and a paper towel.
Who among us hasn’t fought a roll of plastic wrap and lost? The plastic sticks together, and doesn’t cling right. Rest easy, your battle against plastic wrap is finally over thanks to @officialtiktoknurse, who discovered that cling film should be kept in the freezer if you want it to actually cling!
If you have drapery you can never get to fall just so, @rightguysaldireviews will change your life. Simply take old toilet paper tubes, place them on the rack between the drapes’ grommets—and enjoy perfectly spaced drapes forevermore.
You just bought a pretty bouquet of flowers that somehow look meh in your vase. Scotch tape to the rescue! As @adrienedavidson demonstrates in her genius hack, you can use clear tape to create a grid to hold your flowers in place. Having support and structure for your posies means they look fuller and prettier.
Drew and Jonathan Scott have seen plenty of weird houses, but in the latest “Property Brothers: Forever Home,” they encounter an all-too-common design problem that can completely undermine a home’s ambiance.
In the Season 5 episode “Bringing the Dream to Life,” the brothers head to Boulder City, NV, to meet up with homeowner Debbie. While Debbie has four kids, her youngest, Christina, is the only one still living at home. So Debbie wants to make this home feel special for her daughter, with a bedroom makeover and a new kitchen where Christina can flex her love of baking.
The brothers have a $140,000 budget to turn this house into the perfect blend of Christina’s youthful flair and Debbie’s traditional style. Here’s how they pull it off, with plenty of lessons you might be inspired to try in your own abode.
Sunken seating is too ’70s to work today
This brick fireplace in a sunken area was dated and dark.
HGTV
In the living room, the brothers quickly see a throwback from the 1970s: a sunken seating space—aka a conversation pit.
Drew and Jonathan are so horrified, they decide to fill in this pit and pretend it never happened. In doing so, they create a level floor that’s far easier to navigate.
Now, all this living space needs is a more modern fireplace, rather than the brick, wood-burning monstrosity in one corner. They move the fireplace to a feature wall, and make it electric so that these homeowners can easily “build” a fire with the flick of a switch.
“They didn’t need that old wood-burning fireplace,” Jonathan explains. “It was really dark and heavy and, being tucked off in the corner, didn’t work, either. Now, giving them a feature wall with a beautiful electric fireplace, this is going to be a statement.”
The Scott brothers start filling in the weird sunken living room.
HGTV
This new fireplace is a big upgrade, but the best part just might be the mantel. Jonathan helps sand, torch, and finish this mantel so it’s a truly one-of-a-kind piece.
While this fireplace is much more modern than the old one, the mantel has that old-fashioned look Debbie wants.
“This is that bit of rustic feel, that traditional feel that I know Debbie’s going to love,” Jonathan explains
This mantel even ties in with the wood beams on the ceiling.
HGTV
Vinyl flooring can look just like wood, but is more durable
This looks like hardwood, but it’s much more durable.
HGTV
Debbie plans to have lots of company, including her other kids and two grandchildren. So, while she likes the look of traditional wood flooring, the brothers suggest a luxury vinyl flooring instead.
“We can definitely do something with the floors that feels very natural,” Drew says. “Something that’s more durable than an actual hardwood. We could do a luxury vinyl, but we can do it in natural wood tones.”
Debbie likes the idea, and the brothers choose a medium-tone vinyl flooring that has the traditional look Debbie likes. It has a hardwood appearance, but is much more kid-friendly.
“These are going to be great for high traffic,” Jonathan explains. “So if you do have people coming and visiting or anything, you’re not going to scuff them or scratch them.”
A low ceiling can destroy the mood
Before: With a low ceiling, this kitchen felt small and dark.
HGTV
This house has a big living area but a modest kitchen. The space feels even smaller with the low, 7-foot ceiling.
“When you have a space that’s a little bit tighter, having a low ceiling kills the mood,” Jonathan explains.
So the Scott brothers open up the ceiling and add white cabinets all the way up. This, in turn, draws the eye upward and makes the kitchen feel bigger; plus it provides lots of extra storage.
After: These tall cabinets provides lots of storage!
HGTV
“We wanted to also squeeze in as much extra storage as possible,” Jonathan says when the work is done. “So, yes, you’ll need a little step stool to get up to the upper cabinets, but that’s the stuff that you’re going to store to only bring out a few times a year.”
These cabinets, combined with a new white backsplash and quartz counters, make the kitchen look lighter, brighter, and much more modern.
The right lighting makes a huge difference
This light is contemporary and eye-catching.
HGTV
While Christina has a youthful style and Debbie usually wants the home to have a traditional feel, the brothers are happy Debbie is not necessarily interested in a traditional chandelier for the dining room, or old-fashioned lights in the kitchen.
“There’s so many great options for pendant lights, and I really love that Debbie is willing to play a bit with that,” Drew says.
They end up installing beautiful pendant lights over the kitchen peninsula and a chic chandelier made of circles. These lights make a huge difference in the space, adding a modern, contemporary aesthetic.
A painted mural is an easy way to add personality
Light colors are perfect for an ocean-inspired space.
HGTV
While the bulk of the renovation takes place in the living room, Debbie wants to make sure Christina feels comfortable in her bedroom. Since Christina loves marine life (and works at an aquarium), the brothers decide to give this room an ocean theme, complete with a beach mural.
“Murals are a great option,” Jonathan says. “Just like wallpaper as well, it depends on the space, but I can get beautiful aesthetics.”
Paired with light, water-inspired colors for the decor and soft textures, this bedroom is an oasis!