Saturday, February 27, 2021
Friday, February 26, 2021
5 Kitchen Decor Trends From Instagram That’ll Look Like You Hired a Designer

Rene Scott/Houzz
If you’re anything like us, you’ve looked around your home more than a few times over the past year and wished you could hire a designer to instantly elevate your space. But alas, for whatever reason—you don’t have the budget, or you’re lying low during the COVID-19 pandemic—professional design help just isn’t in the cards right now.
Don’t despair! We’ve got the next best thing: Instead of shelling out for an expert, we turned to Instagram (as we always do) to bring you design inspiration, with an eye particularly on the kitchen. We scrolled through the most liked posts to ID the biggest trends that you can replicate yourself.
These looks are guaranteed to bring some soul back into your kitchen and convince everybody you know that a pro pulled it all together.
1. Dusty blue cabinets
We’re all about the bright springtime vibes of these blue cabinets from @acorn_cottage_.
“It has been determined that more people favor blue more than any other color,” says John Starck Jr., president and CEO of Showcase Kitchens. “The design community no longer relies on bland hues as neutrals. Today, muted shades serve as neutrals that work well with a variety of tones and don’t compete with stronger shades. Dusty blue is an obvious go-to color.”
Get the look: Revamp your kitchen cabinets with a can of Faded Flaxflower.
2. Paneled appliances
If you’re hoping to give your kitchen a more polished look with one change, look no further than these paneled appliances featured by @buildwithdavies.
“Although kitchen appliances have become sleeker and much more refined and luxurious, they are still a rather sizable part of kitchen decor,” says Kobi Karp of Kobi Karp Architecture & Interior Design. “The use of paneling allows a homeowner to maintain the functionality of the space without interfering with the visual harmony. It also has the added benefit of giving your kitchen a more high-end, custom feel.”
Get the look: Shop this selection of paneled appliances from Lowe’s.
3. Carriage house pendant lights
These carriage house chandeliers featured by @andrea.wiele are a dreamy way to upgrade your kitchen lighting.
“A carriage chandelier, with its sleek silhouette and its straight lines, can add a level of sophistication to any room,” says Karp. “They serve as an eye-catching focal point or as an accent piece to highlight a room’s design aesthetic. These chandeliers add a dash of industrial chic and are surprisingly versatile as well.”
Get the look: Shop this lantern rectangle chandelier from Wayfair.
4. Low-back stools
Old kitchen stools got you down? Then it’s probably time for a sleek upgrade, like these low-back stools from @mylightingsource.
Not only will these stools lend some modern chic to your kitchen, but they also boast a low profile—meaning you can use them when you need them and otherwise store them away.
“Low-back stools are an amazing addition to any kitchen island, and come in many different designs and fabrics,” says Karp. “You’ll want to find a style that’s functional and provides a good level of back support, while still being low-profile enough to easily stow away under a counter.”
Get the look: Get some minimalist chic going in your kitchen with these Lachapelle swivel counter stools from Wayfair.
5. 360-degree wall hooks
A line of wall hooks running around the entire room, as shown by @zioandsons, is the epitome of function meets style.
“Wall hooks have moved beyond pure utilitarianism and can now add a decorative zest to a space,” says Karp. “They allow for functionality as additional storage space without the need to add excessively bulky cabinetry. Hooks also come in a variety of styles and finishes, which allow them to be easily integrated in any kitchen.”
Get the look: Shop this variety of bronze wall hooks from Etsy.
The post 5 Kitchen Decor Trends From Instagram That’ll Look Like You Hired a Designer appeared first on Real Estate News & Insights | realtor.com®.
Thursday, February 25, 2021
5 Clues You May Have a Wi-Fi Squatter Causing Your Slow Internet

Getty Images, AntonioGuillem/Ankudi
Strong Wi-Fi is not just a perk; it’s an essential service these days, now that remote work and school are the norm. Unfortunately, many of us have learned there’s nothing more frustrating than experiencing internet problems just as it’s your turn to speak on a Zoom call.
Those glitches in your service, however, could mean that someone is piggybacking on your Wi-Fi. After all, in the worst-case scenario, your systems could be hacked, and someone could gain access to your personal information.
“The first thing everyone should do to safeguard their in-home Wi-Fi network is to password-protect it. A strong password will help keep the Wi-Fi door locked to hackers,” says Todd Smith, a spokesperson for Cox Communications in Atlanta.
Not everyone who piggybacks on Wi-Fi is a criminal; some may just not be able to afford high-speed internet for their own needs. But as unfortunate as that is, you need to make sure your network is not vulnerable to malicious attacks, and that you’re able to get the speedy internet service that you’re paying for.
Penalties for stealing Wi-Fi are still being developed, so it’s best to be proactive. In the meantime, here are some clues that a Wi-Fi squatter is in your midst.
1. Slow internet speed
If your previously blazing-fast internet has slowed to a snail’s pace, that may be a clue that something is amiss.
“If your internet speed has decreased, and you are starting to notice an increase in buffering, this could be a sign that someone is using your Wi-Fi,” says Paige Hanson, chief of cyber safety education at NortonLifeLock.
Noopur Davis, executive vice president and chief product and information security officer for Comcast, says that for peace of mind, “Users may want to periodically change their Wi-Fi passwords, which will help to keep unauthorized people or devices from joining.”
Always use a password that is not obvious, with a combination of letters, numbers, and symbols.
2. A sudden change in ads
These days, we’re all used to online ads that are strangely tailored to our tastes. If, instead, you’re suddenly seeing ads for products or services you’ve never heard of, it may be time to change your Wi-Fi password.
“Ads are typically tailored to you and your internet activity, so if you see a noticeable uptick in ads that don’t resemble your search or activity at all, this could be a sign of a Wi-Fi squatter,” says Hanson.
3. A higher-than-normal internet bill
Some internet plans allow you to pay a set rate each month, but with other plans, you pay based on how much data you use or when you exceed a certain amount of data in a month. If you have the latter and you notice a higher-than-normal bill, something may be amiss.
“When reviewing your bills, if you’re seeing an unusual spike in data usage and costs, this could mean someone else is using the Wi-Fi network,” says Hanson.
4. Spam notifications
Notice any spam notifications in your email inbox? If you’re sending emails and they’re getting flagged as spam, someone could be participating in illegal online activity on your Wi-Fi.
“If a Wi-Fi squatter is present, they could be causing your home IP address to get flagged by spam engines that filter into major email services and network security providers,” says Hanson. “This will create issues for you in the long run, as emails sent from home Wi-Fi networks could begin to get blocked and filtered into spam folders.”
5. New devices logged in
Regularly check your router by logging in to see all the devices connected to your network. Many network routers come with mobile apps that let you monitor and control your network from your phone. If someone you don’t recognize is on there, you’ve got a squatter.
To find out who is using your Wi-Fi, log in to your router and look to the “Client List” or “Attached Devices” tab.
“After identifying the squatters, change the password for your router,” says Hanson.
She recommends making sure to choose WPA2 as the password type, a kind of encryption used to secure Wi-Fi networks. Turn off the Wi-Fi Protected Setup, or WPS, as she says this makes it easier for people to crack your Wi-Fi password.
“Once you’ve changed your password, restart your router, and this will kick off the squatters,” she adds.
The post 5 Clues You May Have a Wi-Fi Squatter Causing Your Slow Internet appeared first on Real Estate News & Insights | realtor.com®.
Meet the Next Generation of HGTV Royalty on ‘Design Star: Next Gen’

Discovery+
After seven years off the air, HGTV’s popular competition “Design Star” is making a comeback on Discovery+ with “Design Star: Next Gen.”
The show, which is hosted by Allison Holker Boss from “So You Think You Can Dance,” features eight designers working hard to impress judges—all in the hopes of winning the $50,000 grand prize, plus a shot at their own HGTV show.
In the first episode, “Welcome to the Hub,” the eight contestants arrive to the design campus to find eight ugly rooms filled with gaudy furniture and dated paint colors. Yikes! Their task is to turn these spaces into stunning living and dining rooms that reflect their signature styles.
At the end of the show, judges Jonathan Adler and Lauren Makk, along with guest judge of the week Jasmine Roth, will pick the winning room—and kick one designer off the show. Check out which upgrades they love—and hate—which might inspire some changes to your own abode.
Slat walls add sophisticated room separation

Discovery+
Each competitor is given a long, rectangular room to design, and one designer from Colorado Springs, CO, Arianna Danielson, decides that while she doesn’t want to close off any part of the space, she needs to create a little separation between the living and dining spaces. So she decides to install slat walls.
“It’s just going to filter all the light through, but still just keep some separation,” Danielson says of the walls.

Discovery+
Danielson describes her style as “grandma chic,” but once the judges view the results, Adler describes it as “kind of ugly.”
While the judges may not love Danielson’s vintage vision, the slat walls do work wonders. They give the two rooms some separation without blocking sightlines.
Arches are in

Discovery+
Contestant Carmeon Hamilton, from Memphis, TN, has a bohemian style that’s modern and unique, so it’s no surprise when the judges praise her living and dining rooms for their stylish look. She gives her space a dark, moody color and finishes off her design with a feature bookshelf in the center of the room.
While some designers might prefer to keep a space clear in the middle to keep a room feeling wide and open, this bookcase acts as a beautiful focal point. It’s a risk, but the placement of this bookcase pays off. Plus, the judges are impressed with the arched top.

Discovery+
“I love the way there’s, like, this arch theme happening, and it’s also very on trend,” Adler says.

Discovery+
To finish off the look, Hamilton gives a table an arch-shaped detail as well.
“It’s actually one of the cutouts from the arches. The pieces were just lying in scraps,” Hamilton says.
This creative addition looks great in the space, and it pulls the arch design together.
Open concept can be overrated

Discovery+
Meanwhile, competitor Chris Goddard, who hails from Springdale, AR, decides to separate his living and dining spaces with a wall. But to give it some personality, he creates a squared-off arch and adds a glimmer of gold paint.

Discovery+
The judges love this feature wall, and Roth points out that the gold paint on the frame is a nice touch. It adds some color to the large entryway.
Subtle changes in paint color make a big difference

Discovery+
When the judges see Pittsburgh designer Tony Allgeier‘s fun design, they’re unimpressed with the colors.
“When I see pink and gray, I see the ’80s and it looks a little sad,” Adler says.
However, when they step into Denver designer Eli Hariton’s room, they notice the same general color combination but praise the slightly different hues.
“The other pink and gray was sad, and this pink and gray is happy,” Adler says.

Discovery+
The brighter pink does indeed look better, proving that even a slight change in color can make a world of difference.
Darker colors make a space feel cozy

Discovery+
While both Allgeier and Hariton are focused on mixing light and dark colors, Peti Lau of Los Angeles is separating colors by room. In her space, she gives the family room a light-green wall color while the dining room is a darker shade.
“What I want to do is really focus on the dining room being cozy and intimate and the living room being very open and expansive,” she says.
Lau uses a partial wall to separate the spaces, and then uses light paint to make the sitting room seem larger and dark paint to make the dining space seem smaller. It’s a good trick of the eye that adds dimension to what would otherwise be just a large rectangle. These two rooms are connected, and yet they feel distinct.
‘Design Star: Next Gen’: Who’s this week’s winner?
In the end, the judges choose Goddard’s fabulous room, complete with the wonderful feature wall, as the best of the bunch.
Meanwhile, the judges say goodbye to Marisa Molinaro from Los Angeles, whose styles are a little too wild for these judges. Now, this competition is down to seven designers who will duke it out next week.

Discovery+
The post Meet the Next Generation of HGTV Royalty on ‘Design Star: Next Gen’ appeared first on Real Estate News & Insights | realtor.com®.
Wednesday, February 24, 2021
Don’t Get Zapped by These Electrical Risks Inside and Outside the Home

Getty Images
Pretty much everyone over the age of 5 knows never to stick their fingers in an outlet or poke a fork into a toaster, but beyond that, most of us don’t really expect to suffer a serious electrical shock at home. But there’s no doubt those risks exist, and it’s important to be aware of electrical hazards both indoors and outside.
Each year, more than 300 Americans die by electrocution, while thousands more experience nonfatal electric shock and burn injuries, according to the Electrical Safety Foundation International, a nonprofit organization in Rosslyn, VA, that promotes electrical safety at home and in the workplace.
Here are some of the most common electrical hazards and how to prevent them.
Understand electrical shock versus electrocution
It’s common to use these terms interchangeably, but there is a life-and-death difference between them, says ESFI President Brett Brenner.
“When you say ‘electrocuted,’ that means it’s fatal,” explains Brenner. “But you can be shocked or burned in many ways. People don’t realize that electricity is uniquely dangerous; it can really hurt you.”
Levels of shock depend on the energy power, he adds. For instance, 120-volt outlets are the norm in North America. If you touch a wire, it will cause a tingling sensation in your hand, but it probably won’t hurt you. But with 240 volts or higher, the situation can become more dangerous.
“Depending on how much energy is in the environment or the device you’re touching, that will cause some people’s bodies to lock up,” Brenner says. “Electricity can stop your heart or mess with signals to your brain. You can’t let go, because you can’t control your muscles anymore. That’s usually when you get electrocuted.”
Don’t overload or overuse extension cords
Extension cords are convenient, but many homeowners use them improperly, says Brenner.
“People think they last forever—they plug them in and forget them. But extension cords are only intended for temporary use, which means under 30 days,” cautions Brenner.
Depending on the amount of energy used, extension cords can heat up and deteriorate, he adds, so avoid running them behind sofas, underneath beds, or, worse, inside walls—which can be a fire hazard if you drive a nail through drywall and accidentally pierce that wire.
Power strips, on the other hand, don’t typically have a long cord and are more robust, says Brenner. But that doesn’t mean you can run multiple extension cords off a power strip and leave that plugged in, he warns.
Bradley Beck, owner of Alto Home Inspection in Buffalo, NY, recently found three 20-foot extension cords strung together and hard-wired to an electric garage door opener.
“They’d mounted it to the ceiling and plugged into an outlet. Another homeowner did the same thing for a wood-burning stove with a fan built in,” says Beck.
Bottom line: If you need another outlet, call a licensed electrician and get one permanently wired and installed properly.
Know the difference between grounded and ungrounded outlets
One of the most common electrical hazards Beck sees are ungrounded outlets. Grounding wires protects us from getting shocked.
“Ungrounded outlets pose a big risk, because certain equipment such as lamps can have wiring problems. If they do, the human body acts as a path for electricity instead of the grounding wire,” he explains.
Beck also finds three-prong outlets that aren’t actually grounded—a modern electrical plate hides the old setup behind the wall. He suggests spending a few dollars on an outlet tester, which can be found at most home centers.
“They have indicators that tell you if the outlet is wired correctly, and if there’s an open ground or missing ground,” says Beck.
You may have noticed that your bathroom or kitchen outlets near the sink have ground-fault circuit interrupters, or GFCIs. These outlets detect and prevent excess voltage by shutting themselves down. GFCIs can wear out over time, and Beck notes that most outlet testers also have a GFCI testing function.
Save your DIY skills for something else
Beck has seen lots of shoddy electrical repairs—often done by DIYers or local handymen—including reverse outlet wiring, where red and black wires were crossed instead of being paired.
“That could lead to metal objects or lamps being electrified, which is super dangerous,” says Beck.
Or you might think you’re being safe when installing a ceiling fan, but accidents can happen. If you switch off a breaker, tell everyone in your household so that nobody turns it back on, which can lead to your getting shocked.
And if you live in an older home with two-prong electrical outlets, don’t assume you can snap off the grounding pin from a three-prong plug.
“People assume that because you can plug it in, you should, and that’s just not the case,” says Brenner.
That’s true even if you’ve done it before.
“If you plug something into the wall and nothing’s ever happened, don’t assume that the next time you do it, nothing’s going to happen again,” he says.
One chore you can (and should) handle: replacing missing covers on electrical panels, outlets, and switches.
“When covers are missing, that invites little fingers to get in there, and that’s a big problem. It’s an easy and cheap fix to replace them,” says Beck.
Be extra careful around overhead power lines outside
Overhead power lines might be out of sight, but keep them top of mind so you don’t accidentally pull one down.
“When carrying things like ladders, people could run into power lines,” explains Brenner. “If you do, you’re dealing with a lot of energy and, usually, it’s a fatal electrocution.”
If you hear a loud noise outside and smell smoke, or you suspect wires have fallen down on your property, don’t investigate yourself; call the utility or fire department. Simply walking through your lawn near a live wire can be deadly, says Brenner.
“With power lines, if you are within 10 feet or so, the electricity can actually jump to you. Electricity is looking for the easiest path to ground possible, and you become the conduit,” he explains.
Even touching someone while they’re in contact with a live wire can electrocute you, he adds. “Electricity is unique because you can’t smell it, taste it, or see it, so it’s typical for one person to unfortunately get killed, and then the second person coming into help also gets hurt or killed.”
And don’t ever handle the fat service entrance cable that goes from your electric meter to the utility, cautions Beck.
“Those were used for homes built in the 1960s and early ’70s, and were made of cloth,” he explains. “Cables of that era wear down, and I’ve seen the conductors inside of the cable exposed and visible. If someone were to grab it, they could potentially be shocked.”
Use common sense with outdoor electrical use
Often when the weather is nice, people want to be able to use electricity outside, for lighting and other amenities. But if anything, there are more risks.
“If you run an extension cord outside that comes in contact with the water, you can get what’s called ‘electrical shock drowning.’ There’s a current in the water, so when you jump in, your body locks up. You can’t swim, and you can drown,” says Brenner.
Beck cautions against another huge no-no.
“I’ve seen very long chains of extension cords for decorative lights on patios and decks—even over a pool or hot tub, which is megadangerous,” he says.
Just as you would indoors, make sure to have a licensed electrician set up proper electrical outlets for your outdoor needs.
Be on the lookout for abandoned wiring
Beck has seen live wires sticking out of a house that were still connected to a breaker, or forgotten wires sticking out of the ground from a dismantled hot tub or outdoor lights.
Take a look around the perimeter of your home, and if you see any abandoned wiring, call in an electrician to take care of it. Never touch it yourself, says Beck.
Many electrical injuries and deaths can be prevented by following basic safety practices. The ESFI has many helpful resources and checklists that will help homeowners understand how to use electricity properly.
The post Don’t Get Zapped by These Electrical Risks Inside and Outside the Home appeared first on Real Estate News & Insights | realtor.com®.
Ty Pennington’s Top Secrets To Make a Small Space Feel Huge and ‘Full of Life’

HGTV
Ty Pennington knows that nearly all homeowners wish they had more square footage—but in the latest “Ty Breaker,” he shows that even a small house can feel spacious if you design it right.
In the episode “A Boxed-In Box of Boxes,” Pennington meets Janki and Sean, a couple with two kids who live in a small cottage in Atlanta. This house is tiny and the layout is cramped and closed off, but the couple want to stay and try to make their place work.
With a $130,000 budget and the help of “Windy City Rehab” star Alison Victoria, Pennington needs to find clever solutions to this little house’s big problems. Here are their clever space-saving solutions, which might inspire some upgrades around your own abode so you can stretch your legs.
Stain can help make different floors look the same

HGTV
Pennington and Victoria know they’ll need to take down some walls in order to give this home the sense of openness that Janki and Sean want. However, with the walls removed, they realize that they have a different problem: the floors.
The flooring in these different rooms wasn’t uniform, so while Pennington and Victoria can keep the maple floor in some parts of the house, they need to add some engineered hardwood in others. This means Pennington will need to find a stain that makes the old and new floors look the same.
He finds that the only stain that will do that is a whitewashed gray. Luckily, Victoria likes the look a lot.
“I love all the gray tones, and I think they tie in,” Victoria says.
The gray floors look light, modern, and, best of all, uniform. Plus, the pale tones make the small house look larger.
Two-tone cabinets are great, but the hardware should match

HGTV
Pennington knows, right away, that the kitchen will need to be opened up. But that’s not the only change that needs to be done in this space. They’ll need to replace the appliances, counters, and cabinets.
“Would you be open to doing, like, two-tone, where those are the base and then we do the uppers and keep it light on top?” Victoria asks when it comes time to choose cabinets.
Pennington loves the idea of using white and gray cabinets, but initially he says that if they’re going to use two different-colored cabinets, they’ll need two different styles of hardware as well.

HGTV
But in the end, Pennington and Victoria decide that different-colored cabinets were enough mix-and-match for this kitchen, and they go with pole handles throughout.
Use bold artwork to add some color

HGTV
When it comes to the bedroom, Pennington wants to do something wild: add stripes.
“I’m thinking, just on one side, we do, like, these thick stripes and thin stripes,” Pennington says. “These different-colored stripes will make it feel like you’re really in a room that’s full of life.”
But Victoria hates the idea, saying that a striped feature wall will be too much. So instead they go with clean, white walls all around, plus a blue area rug with yellow accents.

HGTV
Still, Pennington wants to bring in some stripes, so he paints some colors on a canvas to hang in this room. When the painting, and the room, is finished, Victoria is impressed with the extra color. While these stripes would be too much all over the wall, a smaller dose of these colors is perfect for this space.
“It brings the eye up, it brings the colors in that you love, and it’s a win-win,” Victoria says.
Patterned tile doesn’t need to be loud

HGTV
In the bathroom, Pennington and Victoria want to get away from the typical white subway tile look—but they don’t want to go too bold, either. They end up choosing a shower tile that’s filled with patterns but is still mostly white, making it seem like a typical tile—until you get up close.
“What I love about this is that it’s subtle but it brings in, like, all these fun shapes, and it gives it that sort of faded worldly vibe,” Victoria says.
A sliding mirror may help you keep a window

HGTV
While windows are usually seen as an asset, the window in the master bathroom creates some issues for Pennington and Victoria. The window is right above the vanity, so these two renovators will need to either get rid of the window or sacrifice a vanity mirror.
“My snap judgment mind would go: Get rid of the window,” Victoria says.
However, Pennington gets a brilliant idea. He suggests installing a sliding mirror, which could go back and forth like a barn door. This way, Janki and Sean could use both the mirror and the window whenever they needed them.
“Leaving the window, you get natural light,” Pennington says. “You also get fresh air.”
This secret window is a big hit with Janki and Sean. They love the ability to keep the function of the window while still getting a big vanity mirror.

HGTV
The post Ty Pennington’s Top Secrets To Make a Small Space Feel Huge and ‘Full of Life’ appeared first on Real Estate News & Insights | realtor.com®.
10 Practical Kitchen Improvement Projects Based on How Much Time You Have

Getty Images,Bootzilla/Anna Erastova
Whether you’re a professional-level home cook or a take-out fanatic who uses the oven to store shoes, the design and function of your kitchen is very important. No matter its square footage or number of built-in features, the kitchen plays a big part in how you live at home.
That’s why time spent beautifying your kitchen is always time well-spent—especially if you plan on selling your home someday. And while “kitchen renovation” may set off alarm bells for a big-budget project, there are some simple DIY upgrades that can improve the functionality and appearance of your kitchen—as long as you have the time.
To find out what kind of kitchen refresh might be doable in the time you have, we reached out to a variety of design and home improvement experts. We found 10 projects that homeowners can execute themselves (or with the help of a professional) no matter how much free time they have. Have only 5 minutes to commit to cleaning up your kitchen? There’s a project for you. Ready to get your DIY on for an entire weekend? Grab your tool belt and get to work!
If you have 5 minutes
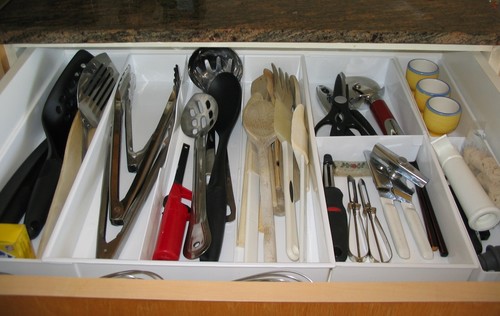
Photo by All Things Home Organizing™ by Gayle Grace
There are several low-cost projects that can be accomplished in a few minutes, tops. However, one that will make a world of difference quickly is removing dark scuff and dirt marks from surfaces, cabinets, and walls with a Magic Eraser, says Julie Bennett, the founder of Renovator’s Toolkit, a guide to making home renovations simple, in Seattle.
Cost: Around $7
———
You can also take 5 minutes to organize a junk drawer or cooking utensil drawer. Remove all of the items from the drawer, and purge anything you don’t use. Add in wooden or plastic dividers, group your items by type or use, and place them back in the drawers.
Cost: Dividers range from $5 to $30.
———
If you have 30 minutes
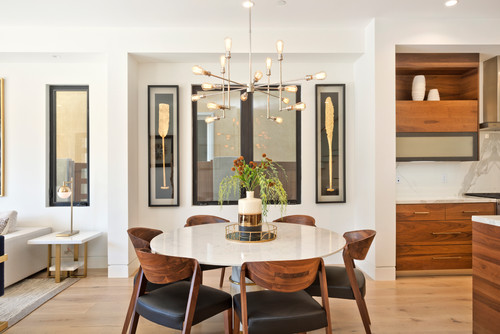
Photo by Lisa Bell Design Group
In well under an hour, you can transform the look and feel of your kitchen with simple cosmetic upgrades.
Outdated pendant lights or fixtures should go, says Lanna Ali-Hassan, co-owner and principal designer of Beyond the Box Interiors in Washington, DC.
If you’re feeling confident in your DIY skills, you can easily replace a funky old ceiling light with a more tasteful one. The installation instructions are fairly straightforward, but if you have any reservations about dealing with electricity in your home, go the safe route and hire an electrician.
Opt for a timeless, sleek brass and glass pendant ($79+, West Elm) or something geometric and modern ($219, Shades of Light).
Cost: $50-plus for the light(s) and hardware; $150 to $300 for an electrician.
———
Looking for a more low-key project? Ali-Hassan recommends swapping out cabinet hardware like drawer pulls and cabinet handles for an updated, clean look.
Cost: Depends on the number of cabinets and/or drawers. Hardware starts around $5 per item.
———
If you have 1 hour
An investment of just an hour can lead to instantly noticeable, significant changes. Faucets are easy to swap if you follow directions, and can make a huge difference in the appearance of your kitchen.
“Faucets are like the garnish of the kitchen,” says Jake Romano, who works for John the Plumber in Ottawa. “A beautiful faucet can modernize the room, or make it look classic. Plus, new functions that are touch-activated keep the kitchen more sanitary.”
Cost: Supplies are $50 to $500. A professional will install it for about $150.
———
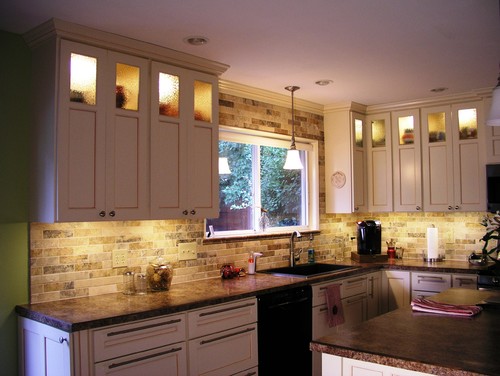
An under-the-radar quick fix is adding LED lighting strips ($15.99, Amazon) under cabinets, which brighten up and modernize kitchens quickly, according to Anastasia Hartmann, an agent with Re/Max Professionals in Cottage Grove, MN.
Cost: $15-plus for lighting that can be hard-wired, plugged in, or battery-operated. A professional will install it for $150 and up.
———
If you have 3 hours

Three hours gives you enough time to take on projects that will reap serious aesthetic rewards. One option that may not occur to many sellers—but will have broad universal appeal—is a reorganized pantry with matching storage containers, says Nick Drewe, a home improvement expert for Wethrift, headquartered in Melbourne, Australia.
The bulk of your time will be spent pulling all items out of your pantry, throwing away expired or unused food, and decanting your dry goods into plastic or glass containers. Use woven rattan or metal baskets to hold chips, crackers, cookies, and other bagged snacks.
“Use a 10- to 20-piece set to organize dry foods, and modernize the overall look of the kitchen and pantry,” Drewe says.
Cost: $50 to $199
———
If you have some extra wall space, floating shelves will give the kitchen an open, airier feel and add room for storage, says Hartmann.
Your local hardware store should have a number of prefab floating shelf options in a variety of finishes.
Cost: $20-plus for a single shelf, depending on size and material
———
If you have a weekend
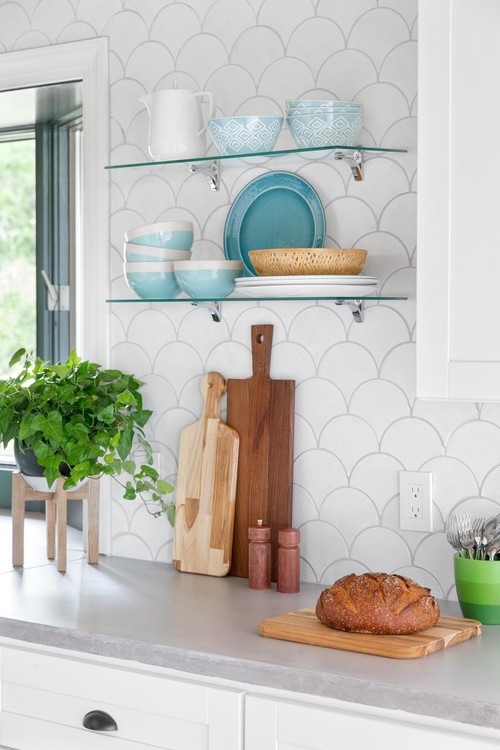
Photo by Mercury Mosaics and Tile
Giving yourself a full weekend means you can tackle a larger project like installing a new tile backsplash. Of course, novice DIYers should proceed with caution—but if your home improvement abilities are above average, you’ll be more than capable of completing this in a couple of days. If you need some extra help, pull up a tutorial on YouTube, or you can hire a pro.
Cost: Supplies will range from about $200 to $1,000, depending on the tiles and the size of your backsplash.
———
You can also give your kitchen a face-lift with a few fresh coats of paint. Either repaint using your existing color or go for something bold and new.
Cost: Supplies for a 150-square-foot kitchen will be about $150, and if you want a professional painter, the total project will run from $300 to $1,000.
The post 10 Practical Kitchen Improvement Projects Based on How Much Time You Have appeared first on Real Estate News & Insights | realtor.com®.
Tuesday, February 23, 2021
‘Home Town’: Ben and Erin Napier Reveal a Common Design Detail They ‘Hate’

HGTV
“Home Town” stars Erin and Ben Napier know that sometimes a little goes a long way. In fact, that’s how they approach the renovation of their latest midcentury build. They want to modernize it, but not too much.
On the Season 5 episode “Closer to Mom,” the Napiers meet Brach and Ashley Robinson. These two live in New Orleans but started shopping for a home in Laurel, MS, so that they’d have a comfortable place to stay when they visit Ashley’s mom.
The pair end up buying a beautiful 1961 home for $165,000. Erin and Ben know this old house needs some work, but they don’t want to update it so much that it loses that great retro vibe. So Erin works hard to find design solutions that will repair and update the house, without changing its midcentury style too much or spending over their $100,000 renovation budget. Here’s how they pull it off, which might inspire some changes around your own abode, too.
Replace orate ironwork with clean paneling

HGTV
When Brach and Ashley first see the house, they’re impressed with the exterior, which is rare. Many of Erin and Ben’s renovation projects include an extensive exterior renovation, but this house has been well-maintained.
Still, Ashley and Brach want to replace one thing: the dated ironwork.

Discovery+
Erin supports this choice, saying the ironwork looks out of place.
“I just hate the overly ornate wrought iron, on a house that is specifically all about straight lines,” Erin says. So the team rips out the ironwork and replaces it with a midcentury-inspired slatted wood wall.
The dark wood looks great on this brick house, bringing in some much needed color contrast.
Add some color to the kitchen

Discovery+
Ashley and Brach want everything, including their kitchen, to be clean and white—but the Napiers know better.
“White is classic,” Erin explains, “but if you have all white, it can fall flat. It feels cold, it feels sterile.”
Erin and Ben decide to paint the old island (and a second new island) light blue to add some color to this kitchen, and to match a new blue backsplash. However, it’s the original brick floor that really adds some warmth to this white kitchen.

Discovery+
The team reseals the brick floors to make the colors more consistent, and when they’re finished, it’s clear that both the blue accents and the old brick give this kitchen some character. They soften the modern white features to make the space feel more homey. It just goes to show that color can be key, and some unexpected flooring could make a kitchen feel extra special.
Know which way to lay wood floors

Discovery+
When Ben goes to install the wood flooring in the den, he realizes that he might run into some trouble depending on the direction he lays the floors.
He thinks this room was an addition, so he suspects the walls may not be perfectly parallel with the fireplace. To avoid any problems with angled floorboards, Ben decides to run the flooring perpendicular to the fireplace.

Discovery+
“If you’re building a house, you can make that fireplace perfectly square, but we’re pretty sure this was a carport at one point that was then converted into a den, so we’re not sure how square that would be,” Ben says.
In the end, it seems the wood was laid in the right direction. Not only do the boards look even, but they also make the room seem longer and larger.
Use wood paneling in the right spots

Discovery+
Wood paneling on walls was a popular midcentury design, so Erin wants to create some paneling in the den—but she wants to make sure this retro feature looks fresh.
“Think of houses in the ’60s and ’70s, they would have that, like, pine paneling. This is like a nod to that but a little different, a little more modern,” Erin says.
They cover the brick on the wall behind the fireplace with wide wood paneling, but leave some exposed brick around the firebox for safety. Then they paint the whole wall white. Meanwhile, they remove the wallpaper from the other walls and give the rest of the room a fresh coat of paint.
While midcentury homes often had wood paneling on all four walls, this one accent wall gives the space the right amount of midcentury charm, while still letting the room look contemporary.
Don’t try to match old brick

HGTV
Erin and Ben had good luck when it came to the brick on the kitchen floor, but they run into problems when they work on the outdoor kitchen. They have a plan to build off of the existing brick oven, but they can’t find an exact color match for the 1960s brick.
“The problem with the brick that we found is we can’t get this exact brick that was used on the house in the ’60s,” Erin explains. “So we just used a modern brick but we stuccoed over all of it.”
With the stucco, this outdoor kitchen has a great two-tone effect that looks modern but still midcentury-inspired. It’s a great outdoor kitchen that Ashley and Brach will love using in the summer.

HGTV
The post ‘Home Town’: Ben and Erin Napier Reveal a Common Design Detail They ‘Hate’ appeared first on Real Estate News & Insights | realtor.com®.
Monday, February 22, 2021
6 Ways To Insulate Your Drafty Windows (When New Ones Aren’t in the Budget)
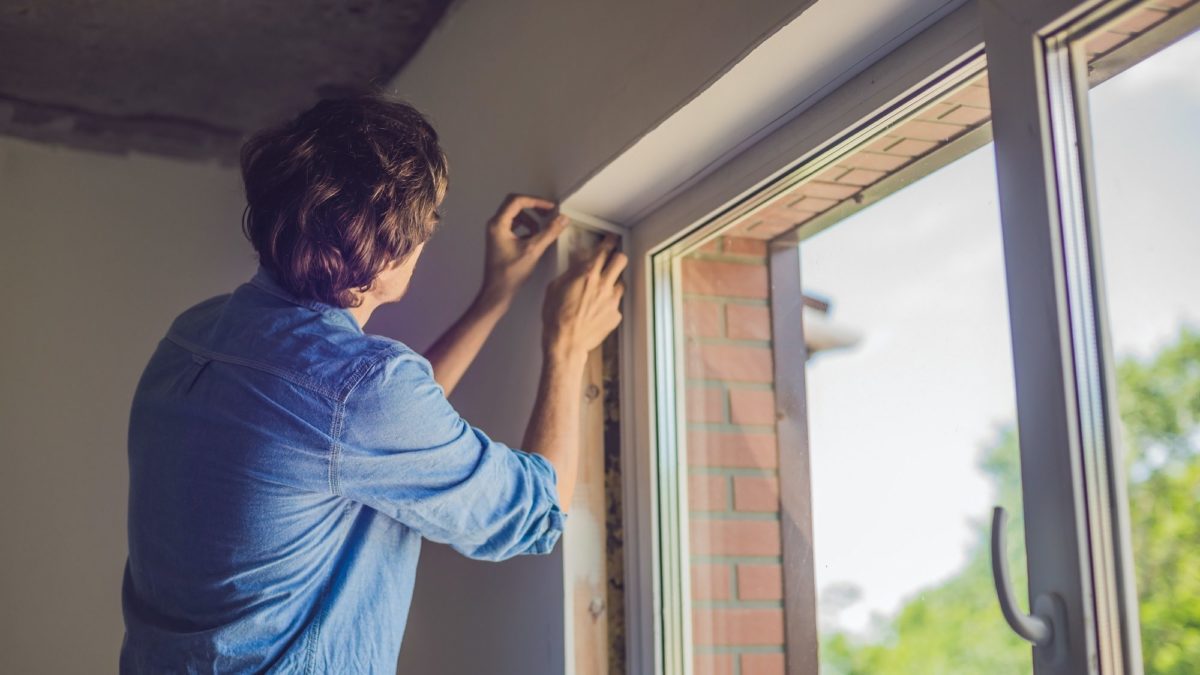
galitskaya/Getty Images
Stop us if this sounds familiar: Your thermostat is hiked up to 74 degrees, you’re covered in blankets, you’ve donned your fuzziest socks—and your house still feels cold.
The likely culprit: Drafty windows. Whether they’re old as dirt or just not energy-efficient, windows that let in cold air not only bring down your home’s temperature but also raise your heating bills because your furnace is working overtime.
First, take your windows’ temperature
Do you even have drafty windows? Before you get industrious by sealing cracks, you’ll want to figure out just how cold it is near the window. If you own one of the infrared thermometers we’ve become so familiar with during the coronavirus pandemic, you might be able to get a decent temperature reading and detect cold air leaking in from old windows.
“What these instruments do is capture what the eye cannot see, and that could be the radiant heat around the object,” says Matt Swann, a general contractor and president at Brawn Construction. “They can also help detect air leaks by measuring the ambient temperature in an area where cold air is leaking in.”
You can also look for visible cracks and gaps around the window frame, or try the old-school trick of shutting your window on a dollar bill. If you can pull the bill out easily, you have drafty windows.
If your bank account is a little lean these days, then replacement windows are probably out of the question. So you have two options: You could keep layering on socks and sweaters, or you could make your windows a lot more energy-efficient by trying these tips from the pros.
1. Caulk carefully
Caulking is good for sealing cracks, gaps, and joints less than a quarter of an inch. On the inside, keep bitter drafts out by caulking between the interior window trim and the wall. You can also apply caulk to the exterior perimeter of the window. Just be sure not to caulk weep holes, the small rectangular holes found on the bottom of the exterior side of the window frame.
“Caulking over weep holes is a big mistake,” warns Kevin Busch, vice president of operations at Mr. Handyman, a Neighborly Company. “Weep holes allow moisture to escape the window frame. Clogged weep holes can’t do their job properly, and your windows can rot, collect mold, or rust.”
Also avoid caulking the moving parts of the window and the ledge above the window frame, Busch says. Click here for complete instructions and tips for applying caulk.
Do note that the caulk aisle is massive. Be sure to read the labels, and buy caulk that is explicitly labeled for windows. Be sure to purchase exterior caulk for around the window outside, and interior caulk for inside. There are also caulks for humid spaces and masonry uses.
2. Weatherstrip for a temporary fix
When it comes to winter home maintenance, weatherstripping is a cheap and effective way to dodge bone-chilling drafts. Unlike caulk, which lasts around five years, weatherstripping is easy to apply and remove. It comes in a variety of materials and thicknesses and is used on doors, too. Foam weatherstripping is good for the top and bottom of window sashes, and tension seal (or V strip) is ideal for the side of sliding and double-hung windows.
The trick is to seal the gap without layering it on too thick. Apply weatherstripping to the sash and frame. Make sure you can still open and close the windows with the weatherstripping in place. Find more information on choosing the right weatherstripping and instructions here.
3. Seal your windows with plastic
Maybe the idea of covering your window with shrink-to-fit plastic wrap seems a bit tacky, but when done correctly, it provides an airtight seal and is virtually invisible. Not only does it help your house feel warmer, but it also reduces moisture buildup on the window due to condensation.
It’s an easy DIY project, especially if you have a partner to help with larger windows. In a nutshell, you’re securing the shrink plastic by placing an adhesive strip around the perimeter of the window, on the window frame. This stops air leaks that may be sneaking through. Once the plastic is in place, use a hairdryer to shrink and tighten the seal for a snug fit.
Be sure to measure your windows before heading to the store because the kits come in many sizes. Click here to learn more on how to do this, but follow the manufacturer’s specific directions on the box kit.
4. Hang thermal drapes
Thermal drapes are more stylish today than the drab ones our parents had, and, according to the EPA, pulling thermal drapes over your windows can reduce heat loss by around 25%.
If you still feel chilly, install a cornice at the top of the drapes. Then to better block those bitter drafts, make sure the drapes overlap in the center. Then use Velcro or magnetic tape to attach the sides of the drapes to the wall and bottom. An interior decorator may not approve, but it’s a good option especially for windows that don’t let in warm sunshine during the day.
5. Install cellular shades
You can reduce heat loss by as much as 40% when you install cellular shades (also known as honeycomb shades), according to the EPA. They can be pricey but, according to Swann, they’re considered one of the best ways to insulate your windows.
“They significantly reduce the temperature that transfers between the window and the room by creating a barrier through its hexagonal pocket shapes,” says Swann.
The price ranges from $30 to $200 depending on the size of your window and if you want a more deluxe version. If you’re fighting COVID-19 cabin fever or just want to connect with the outside world, you might want to spring for the top-down, bottom-up variety.
6. Install storm window inserts
Storm window inserts are clear inserts that look just like a traditional window but are installed inside the window jamb, and over older, single-pane windows to reduce heat loss. They’re light and easy to install and require no nails or screws. Just snap them in place, and your rooms will feel significantly warmer in the winter. Once the weather warms up, pop them back out and store.
Depending on the size, they run about $200 per window. That’s still a good alternative if new energy-efficient windows aren’t in the budget. Look for Energy Star–certified (low-e) inserts, and you could save $350 on your annual heating bill, the EPA says.
The post 6 Ways To Insulate Your Drafty Windows (When New Ones Aren’t in the Budget) appeared first on Real Estate News & Insights | realtor.com®.