Friday, October 2, 2020

Tarek El Moussa Reveals 2 Renovations That Are a Huge Waste of Cash

Tarek El Moussa

HGTV

Tarek El Moussa of “Flip or Flop” has helped many aspiring house flippers make a profit on his new show, “Flipping 101 With Tarek El Moussa.” But as the latest episode makes clear, they’re not all success stories.

In the episode “Style vs. Substance,” El Moussa helps Kenny and Somer with their house in Pasadena, CA. It’s a beautiful home they’d bought for $1,250,000, but it’s an overwhelming amount of work for these first-time flippers. Kenny and Somer’s subcontractors are disorganized, and with an unexpected change in the market, this flip could turn into a money pit.

Read on to learn El Moussa’s best money-saving renovation tips—plus two upgrades that often aren’t worth the expense.

Smooth stucco gives a home’s exterior a sleek look

house
Tarek El Moussa likes the exterior of this home, but there’s room for improvement.

HGTV

When Kenny and Somer first show El Moussa the house, he’s impressed by the exterior. He likes the shape of the home and even mentions that the stucco is in good shape. However, Somer and Kenny say that they’re planning on replacing the textured stucco with smooth stucco.

“Smooth stucco would be a lot nicer,” El Moussa says in agreement.

house
After: This new stucco gives the home a cleaner look.

HGTV

In the end, Somer and Kenny give the exterior a fresh look with new stucco and a lighter color. It’s a great choice, making the home look more modern.

El Moussa may have liked the exterior before, but now it’s even better.

Embrace your home’s unique style

living room
El Moussa recognizes that this house has a midcentury modern feel.

HGTV

El Moussa may approve of this home’s exterior, but he’s a little more hesitant when it comes to the layout of the living area. The large room has big windows and a dual-sided fireplace.

El Moussa knows it won’t suit everyone’s taste, but he encourages these flippers to embrace the home’s unique style.

“When you’re dealing with midcentury- or funkier-style houses like this, it can alienate a lot of buyers because of the way it’s laid out,” he says. “But at the same time, if you nail the design and you find that buyer that likes that style, you can hit a home run.”

It’s a good lesson in knowing what to change in a house and what to embrace. This house has a midcentury modern look, and as El Moussa suggests, it’s probably best if Somer and Kenny focus on that style.

A flashy staircase can be a waste of cash

stairs
El Moussa says this staircase needs only a few updates.

HGTV

Kenny and Somer have big plans for this house. For one thing, they want to take out one wall, push the stairs out, and put a glass case around them. However, El Moussa says they shouldn’t waste money on such a flashy feature.

“Big stuff like that, it’s just really hard to get a return,” he explains, “but if you did a really killer stairwell in this area, it would look really, really nice.”

El Moussa reminds these flippers that it’s important for a homeowner to always think about resale value before starting a project. While they might be interested in a trendy, custom feature, it will probably be better in the long run if they stick with a well-made, tasteful, and timeless design.

Moving the kitchen can be a money pit, too

kitchen
This kitchen layout is fine as is, but Somer and Kenny want to change it.

HGTV

While El Moussa is able to talk Kenny and Somer out of an expensive staircase renovation, they decide to go against his advice and start an expensive kitchen renovation. This project involves an addition, and requires moving the kitchen to another part of the house.

As El Moussa points out, the idea to make the kitchen bigger is fun and creative, but it’s not a necessity.

kitchen
The plans for the new kitchen look beautiful, but they are also expensive.

HGTV

“It sounds pretty neat,” El Moussa says about Somer and Kenny’s vision, “but if I were flipping the house, I’d probably just leave the existing floor plan.”

Despite El Moussa’s advice, these flippers go on with their new plans for the kitchen renovation, embarking on a long and expensive journey.

A high-end house deserves high-end materials

Tarek El Moussa
El Moussa shops for the right tiles.

HGTV

Somer and Kenny don’t take El Moussa’s advice when it comes to the location of the kitchen, but they’re ready to listen to his tips when it comes to choosing materials.

When it comes time to choose a backsplash, Somer explains that Kenny wants to install white subway tiles, while she wants a more expensive marble herringbone.

El Moussa says they should go with the more expensive tile.

“I’m OK with them spending more money on material, because it’s a $2 million flip,” he says. “Buyers expect the best, they expect quality, and they’re going to be looking at every detail.”

Is this ‘Flipping 101’ tutorial a success?

When El Moussa first sees this house, he says it will be a very risky flip. He warns Somer and Kenny that if everything doesn’t go as planned, it could mean big problems.

Unfortunately, it seems nothing goes as planned with this project. Kenny and Somer have a disorganized renovation team, work goes slowly, and the market plunges.

By the end of this episode, Kenny and Somer are still working on the project with no end in sight. With a purchase price of $1,250,000, a rehab budget of $150,000, and interest and closing costs estimated at $140,000, El Moussa calculates that these flippers would break even at $1,540,000.

With comps in the area coming in around $1,800,000 to $1,900,000, they expected big profits.

However, after seven months, El Moussa admits that these two are 10 weeks behind schedule and $90,000 over budget. Still, he says he’s going to continue working with them—and hopefully all their renovation work will be worth it in the end!

The post Tarek El Moussa Reveals 2 Renovations That Are a Huge Waste of Cash appeared first on Real Estate News & Insights | realtor.com®.

Lessons From Listing Photos: This Successfully Flipped Spanish-Style Mansion Has Our Full Attention

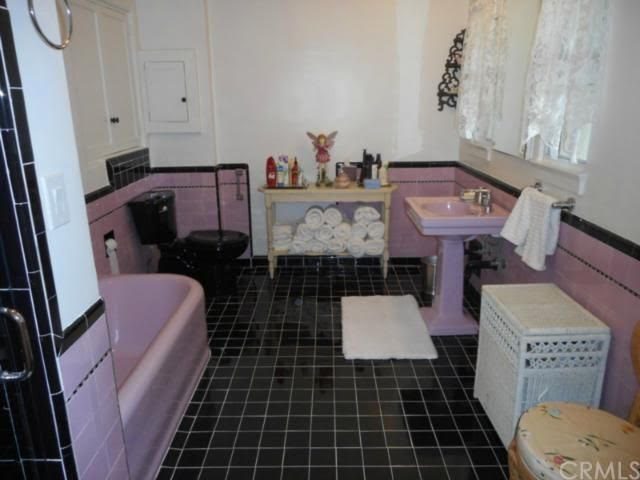
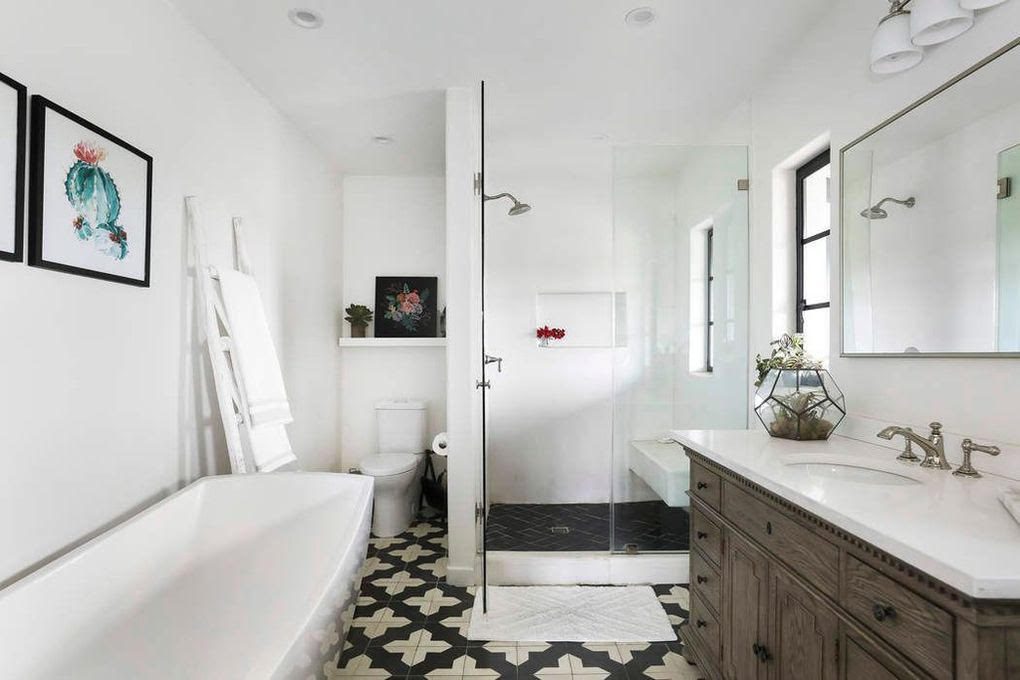
la mansion before and after

realtor.com

It doesn’t matter how perfect your home is—if your listing photos don’t stand out, potential buyers won’t come by to take a look. In our series “Lessons From Listing Photos,” we dissect the smart updates sellers have made to their homes, and how their listing pictures highlight the home’s best assets.

Home buyers everywhere want houses with up-to-date interiors, but there’s probably no place on Earth where trendiness matters more than Los Angeles.

That’s probably why this massive four-bedroom, four-bathroom home in the notoriously hip neighborhood of Eagle Rock was such a success when it hit the market for the second time in just a few short years.

The sellers picked it up in January 2017 for $1,730,625, and by 2018 the renovations were underway. Once construction was complete, it hit the market again and was sold in June 2020 (during a pandemic, no less) for $2,600,000. You read that right—that’s a difference of nearly a million dollars.

So how does that happen? How do you buy a slightly outdated house and sell it for a million dollars more than you paid in just a few years? That’s exactly what we’re here to find out.

Our experts in real estate and design enlighten us about the most productive design moves the sellers made and, most of all, how you can apply them to your own home.

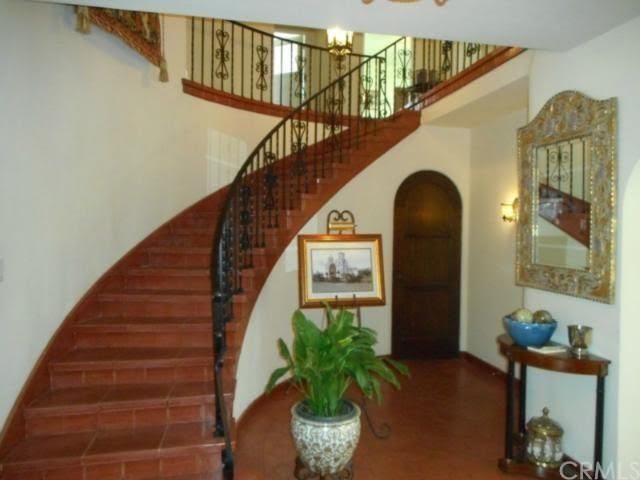
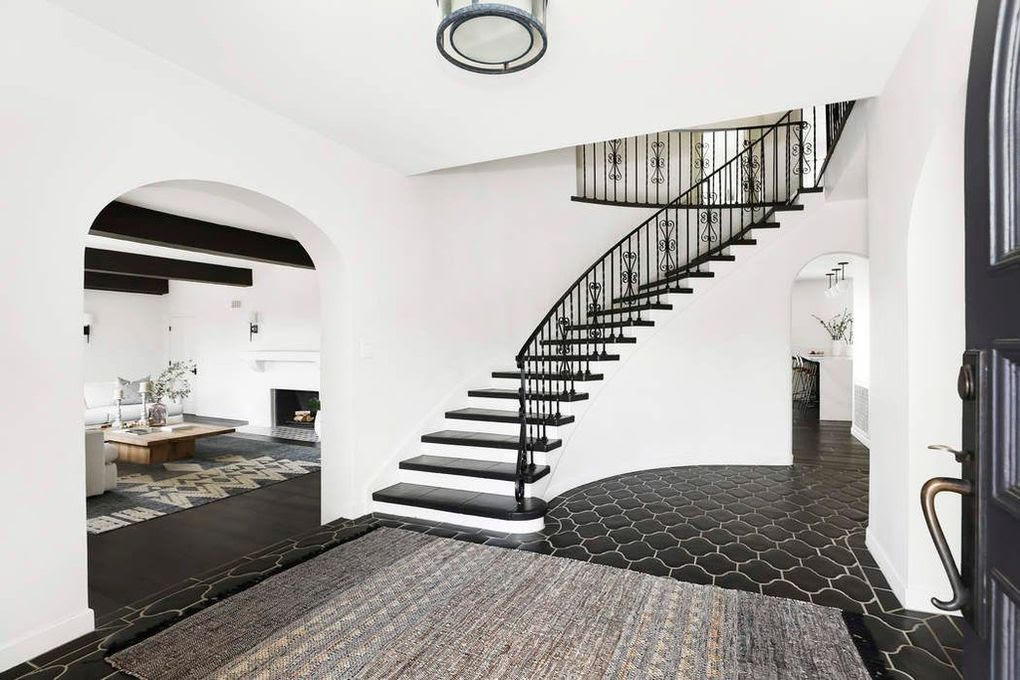
Entry

Hello, big change! There’s no need to walk outside and back in again—you’re in the same home. You’d never know it, though. And our experts are in love with all the upgrades this entry received.

“The entrance can make or break how a buyer will feel walking through your home,” says real estate agent Aislynn Radley, of Crosstown Marketing Group, who explains that if buyers walk into a home that doesn’t immediately appear outdated, they can focus on the home itself and not the updates it needs.

“Curved staircases are no longer popular and can date a home, but thanks to the choice of a more modern Spanish tile, the space is respectful of the home’s original architecture while also carrying a sophisticated look,” says Radley.

But retiling your entry isn’t the only takeaway here. Interior designer John McCulley, of McCulley Design Lab, says the space looks much bigger because the homeowner “simply removed the previous wall mirror, side table, plant, and art easel.” And when you’re buying a home, bigger is always better.

Designer Megan Dufresne, of the MC Design Shop, agrees. “In the before photo, all of the clutter drowns out the inherent architectural drama of this entryway. The after photo brings it all back,” she says. “This is an amazing first impression for a home buyer.”

Living room

Every room in this house was drastically improved by the renovations, but perhaps the greatest improvement happened in the living room.

In fact, the only clue that you’re in the same room in these before and after shots is the ceiling beams, a key element that real estate agent Hayden Prentice, of JBGoodwin Realtors, zeroed in on.

“Ditching the stone fireplace invites home buyers to gawk up at the exposed beams,” she explains. “They visually lengthen the space, making it feel much less cramped.”

Dufresne doesn’t miss the fireplace, either.

“What’s great is all of these changes make the home feel more, not less, like its original architecture. Now the fireplace truly feels Spanish, as do the sconces. They’re totally era-appropriate,” she says.

She also applauds the furniture changes in this room.

“Flipping the sectional around welcomes you to this room instead of cutting you off from it. The room feels twice as big with just that change,” Dufresne says.

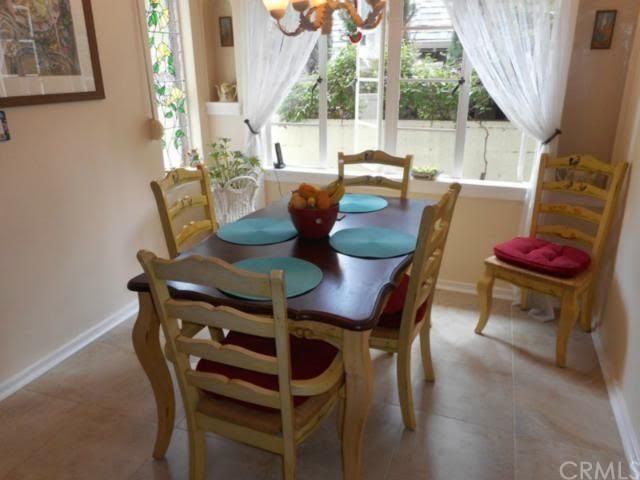
Breakfast nook

This breakfast nook may look totally different after its glow-up, but there’s one perfect feature they didn’t touch.

“The stained-glass window is celebrated in the revamped space and sets a beautiful, serene tone,” Radley notes.

But that wasn’t the only major positive move that happened here.

“Adding the new windows and taking away the overhead lighting fixture made all the difference here. It just opened up this space,” says Dufresne. “Also, peach walls are never going to help sell a home.”

McCulley explains how just repositioning a piece of furniture can make a huge difference.

“The new table’s horizontal orientation feels much more efficient and connects well to the exterior window,” he says. “This layout also provides a flexible function for dining and provides a nice worktable during the day.”

According to Prentice, the changes to the breakfast nook make this house much more appealing to buyers.

“Adding sleek furniture that complements the space, increasing natural light by removing drapery from windows, and adding sightlines to the kitchen or other areas of the home all increase the likelihood your buyers will visualize themselves spending their morning there before rushing off to work,” she explains.

And isn’t that exactly what they were trying to achieve?

Bathroom

This pink paradise may appeal to the vintage crowd, but it’s hard to argue against the new, renovated space—and the experts agree.

“This isn’t a huge bathroom, but the redesign makes it feel so much bigger,” says Dufresne, who adds the color just had to change for this house to sell quickly.

“The before pink is extremely specific,” she explains. “The after color palette is so much more appealing to a broader range of home buyers.”

Prentice was also not a fan of the pink.

“If the original state of this bathroom is giving you indigestion, you’re not alone,” she jokes. “Adding new fixtures and light colors will leave prospective buyers feeling squeaky-clean.”

Radley is also impressed by the changes.

“This space still has the same components but has been remastered to allow a larger shower and more storage, which appeals to today’s buyers,” she says. “And, once again, the dark and light Spanish tile choice offers a cohesive style upgrade while matching the home’s architectural style.”

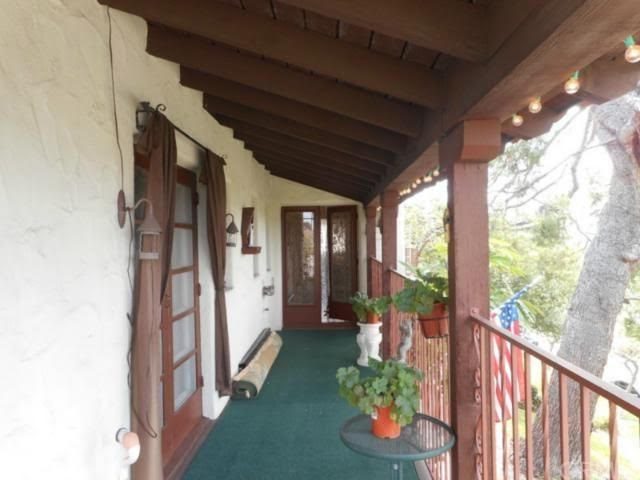
Patio

A properly done exterior space extends the living area in a home, and according to Prentice, that’s exactly what happened here.

“By removing drapery and adding lounge chairs, this patio has been transformed from a walkway to an actual living space,” she says.

“Using a dark color for all of the trim to contrast against the existing light walls elongates the patio and creates a more open space,” says Radley, who also likes the new additions to the space. “The furniture choices match the era of the home perfectly. Everything fits, and there is nothing left to do but relax in the space.”

The post Lessons From Listing Photos: This Successfully Flipped Spanish-Style Mansion Has Our Full Attention appeared first on Real Estate News & Insights | realtor.com®.
Thursday, October 1, 2020

Halloween Decor Fails To Never, Ever Try at Home—During a Pandemic or Otherwise

halloween decor fails

cglade / Getty Images

This Halloween, trick-or-treating may seem a whole lot scarier than in the past, given that you could snag some coronavirus along with all that candy corn. Still, though, if there’s one thing we all can do to celebrate Halloween that maintains a healthy social distance, it’s decorate our house!

Yet be warned: Halloween decorations often run the risk of being tacky or over the top (inflatable zombie babies, we’re glaring at you), and when you throw a pandemic into the mix, it gets even trickier to get right.

To help you navigate this strange new world, we’ve pulled together some Halloween decorating fails to avoid during a pandemic, or anytime really—plus some smarter alternatives that probably won’t offend your neighbors.

Don’t: Thank front-line workers with skeletons

Although we appreciate people showing their support for front-line workers such as doctors and nurses, mixing this gratitude with skeletons hits a bit too close to home.

Do: Make trick-or-treating safe for everyone involved

Our 6' candy chute is ready to be attached to the handrail! Come on, Halloween!!! πŸŽƒπŸ‘»πŸ§™#fucovid19…

Posted by Andrew Beattie on Saturday, September 12, 2020

It’s so sad to think of trick-or-treaters not getting any candy this year—which may explain why Andrew Beattie invented a 6-foot candy chute to create a “touch-free” trick-or-treating experience.

Here’s how it works: A costumed child stands at the bottom of the stair railing and holds his or her candy bucket under the chute. Beattie, wearing gloves and a mask, will deposit a piece of factory-sealed candy into the chute and, voila, trick-or-treat is complete!

He posted a photo of his creation on Facebook, writing that he hopes the device will make parents and kids feel more comfortable trick-or-treating this year. Some commenters called the device “overkill,” but Beattie wasn’t deterred.

“If this candy chute makes things easier or safer, AND gives those with mobility challenges more of a chance to participate, then what’s the harm?” he wrote. “An ounce of prevention is worth a pound of cure, ya’ know.”

Don’t: Make corny coronavirus jokes.

Gene just couldn’t figure out why people were hoarding toilet paper! COVID was supposed to make your throat cough…not…

Posted by Keeping up with the Bones on Thursday, March 19, 2020

We understand the desire to make corny coronavirus jokes this year, but please resist the urge. If you’ve ever experienced a toilet paper shortage, you know it’s no joking matter.

Do: Encourage social distancing for trick-or-treaters

We’ve all seen those signs ordering us to stay 6 feet away from others, and such reminders will be needed more than ever on Halloween. So, it’s refreshing and cute to see this stern warning reimagined as the length of a coffin. Granted, coffins might be a bit longer than 6 feet, but it’s close enough.

Don’t: Throw a huge Halloween party with candles

At first glance, this Etsy candle seems harmless—Halloween in quarantine seems to promote social distancing. But take a closer look and you’ll see the cheeky phrase “Infused with partying anyway.” Mixed messages!

This Halloween, resist the urge to throw a huge party and potentially spread COVID-19. Don’t invite people into your home, then light a candle that makes fun of the fact that you’re not doing your part to help keep this pandemic under control.

Do: Make relevant pop culture references.

Halloween door mat

Etsy

Unless you’ve been living under a rock, you’ve probably heard Lizzo‘s catchy song “Truth Hurts,” which includes the lyrics: “I just took a DNA test, turns out I’m 100% that b–ch.” That might be a bit of a rough welcome for certain visitors (what would grandma think?), but this Halloween-themed doormat parodying those crass lyrics is a lot gentler.

Don’t: Buy a realistic corpse decoration

This corpse decoration may be too much.

Amazon

If your goal is to scare the pants off your neighborhood kids, then sure, by all means, buy this realistic corpse decoration on Amazon. Otherwise, steer clear of this one, which is just a little too scary, during a pandemic or otherwise.

Do: Keep your house stocked with cheeky toilet paper

Halloween toilet paper

Etsy

Tasteful bathroom humor is almost always funny, especially when it’s seasonally relevant. This clever “spooky” toilet paper set from Etsy will make your family smile while they freshen up in the bathroom and get them into the Halloween spirit at the same time. It’s a win-win!

Don’t: Wear a coronavirus-themed costume

halloween fail
This coronavirus mask is too much.

Amazon

Greeting trick-or-treaters with a coronavirus-themed Halloween mask like this one on Amazon might seem very timely right now, but to the thousands of people who have been affected by the disease, it’s downright offensive. And wearing this mask without a shirt just makes it so much worse.

Do: Wear a Halloween-themed mask

halloween fail
Scary face masks are fine for Halloween.

Red Bubble

While coronavirus-themed costumes may be dicy territory, you should absolutely mask up—and scary masks like this one from Red Bubble are the perfect way to inject a bit of Halloween into your routine.

The post Halloween Decor Fails To Never, Ever Try at Home—During a Pandemic or Otherwise appeared first on Real Estate News & Insights | realtor.com®.
Which Property Brother’s Bedroom Is Better? Take a Look

Property Brothers

Ethan Miller / Staff / Getty Images

“Property Brothers” stars Drew and Jonathan Scott have been working hard this season on “Brother vs. Brother.”

The Los Angeles homes they’re renovating are old buildings that need a lot of help (and repairs) before they can go on the market. Facing lead paint, asbestos, and structural issues at just about every turn, these brothers have to work hard to turn these homes into luxury mansions.

In the latest episode, titled “Brother Bedroom Battle,” Drew and Jonathan design luxurious master suites in the hopes of impressing guest judge Jasmine Roth from the HGTV show “Help! I Wrecked My House.”

So which brother’s bedroom steals the show? Find out the high-end features the brothers include—and which suite is the winner.

Take inspiration from luxury hotels

bedroom
This looks like a glamorous hotel.

HGTV

Drew wants his master suite to really stand out, so he comes up with the idea to connect the bathroom and bedroom with a pass-through, along with sliding doors.

“This cutout in the wall, between the bedroom and bathroom, is a unique feature that I’ve seen in the high-end hotels,” Drew explains. “I want to bring that luxurious feel to my house.”

Once the renovation is finished, the sliding doors are one of the best features of the master suite. When the doors are open, they make both the bathroom and bedroom feel bigger and give the whole space an elegant flow.

Don’t be afraid to go dark in a closet

closet
Drew Scott designed an epic closet.

HGTV

Most designers will warn against using dark colors in a small space, but Drew embraces deep-shaded tones when creating his walk-in closet.

With dark wood cabinets, dark floors, and even a dark ceiling, this space is moody and masculine.

To add dimension to the room, Drew adds a white sintered stone countertop with a waterfall edge.

While Roth admits that she probably wouldn’t have chosen these colors for the space, she says, “I like the darker tones; it feels really rich.”

Go big with a sitting space

sitting room
This sitting room is so elegant.

HGTV

Drew decides to give his master bedroom a fun extra feature: a mini library.

He sets up cozy chairs in a corner nook and installs built-ins for books. This little reading space is charming, and it gets even better when Drew adds storage behind the bookshelf, giving the bookcase a secret compartment.

When Roth finds the hidden storage, she’s impressed.

“Who doesn’t dream of a secret bookcase?” Roth says. “This is good.”

Turn a plain hallway into book storage

library
With a little creativity, Jonathan Scott turns this hallway into a library.

HGTV

While Drew is designing a stylish reading nook, Jonathan has visions for a mini library in the hallway outside the master suite.

He designs the space with deep tones and lots of storage. But he isn’t including this feature just for the sake of book organization.

“I’m using the library hall to separate the main bedroom suite from the rest of the house to make it feel like a private, palatial-like wing,” Jonathan explains.

The library makes the place feel more regal, and it’s a great spot to sit with a good book.

Faux beams make high ceilings even more impressive

beams
Jonathan’s beams make the bedroom ceiling seem even higher.

HGTV

Jonathan has installed faux ceiling beams in the kitchen and living room, so he sticks to the pattern when it comes to the master bedroom.

This time, however, he makes one big change by lowering the beams a bit, rather than installing them flush to the ceiling. This gives the room a grand look.

When Roth sees the space, she’s definitely impressed.

“That just looks incredible, like, I would love to wake up and see this every single morning,” she says.

So, which brother wins this challenge?

Drew and Jonathan both do a great job when it comes to design and budget. Drew sets aside $310,000 for his master suite and ends up saving money by choosing sintered stone counters instead of marble. He ends up spending just $298,000 on the suite, coming in a hefty $12,000 under budget.

Meanwhile, Jonathan budgets $285,000 for his master suite. He runs into trouble when his cabinetmakers fall through, and he has to find someone else to build his custom closet. This costs a little extra, but he doesn’t go too far over budget, finishing his suite at $290,000.

Roth is impressed by both houses—but there can be only one winner! She decides that Drew’s bedroom is the superior space, making him the winner two weeks in a row.

After this challenge, Drew and Jonathan are tied with two wins each, which means they’re neck and neck for the next challenge. Tune in next week to find out what happens!

The post Which Property Brother’s Bedroom Is Better? Take a Look appeared first on Real Estate News & Insights | realtor.com®.

How to Restore a Lawn Plagued by Weeds or Brown Patches

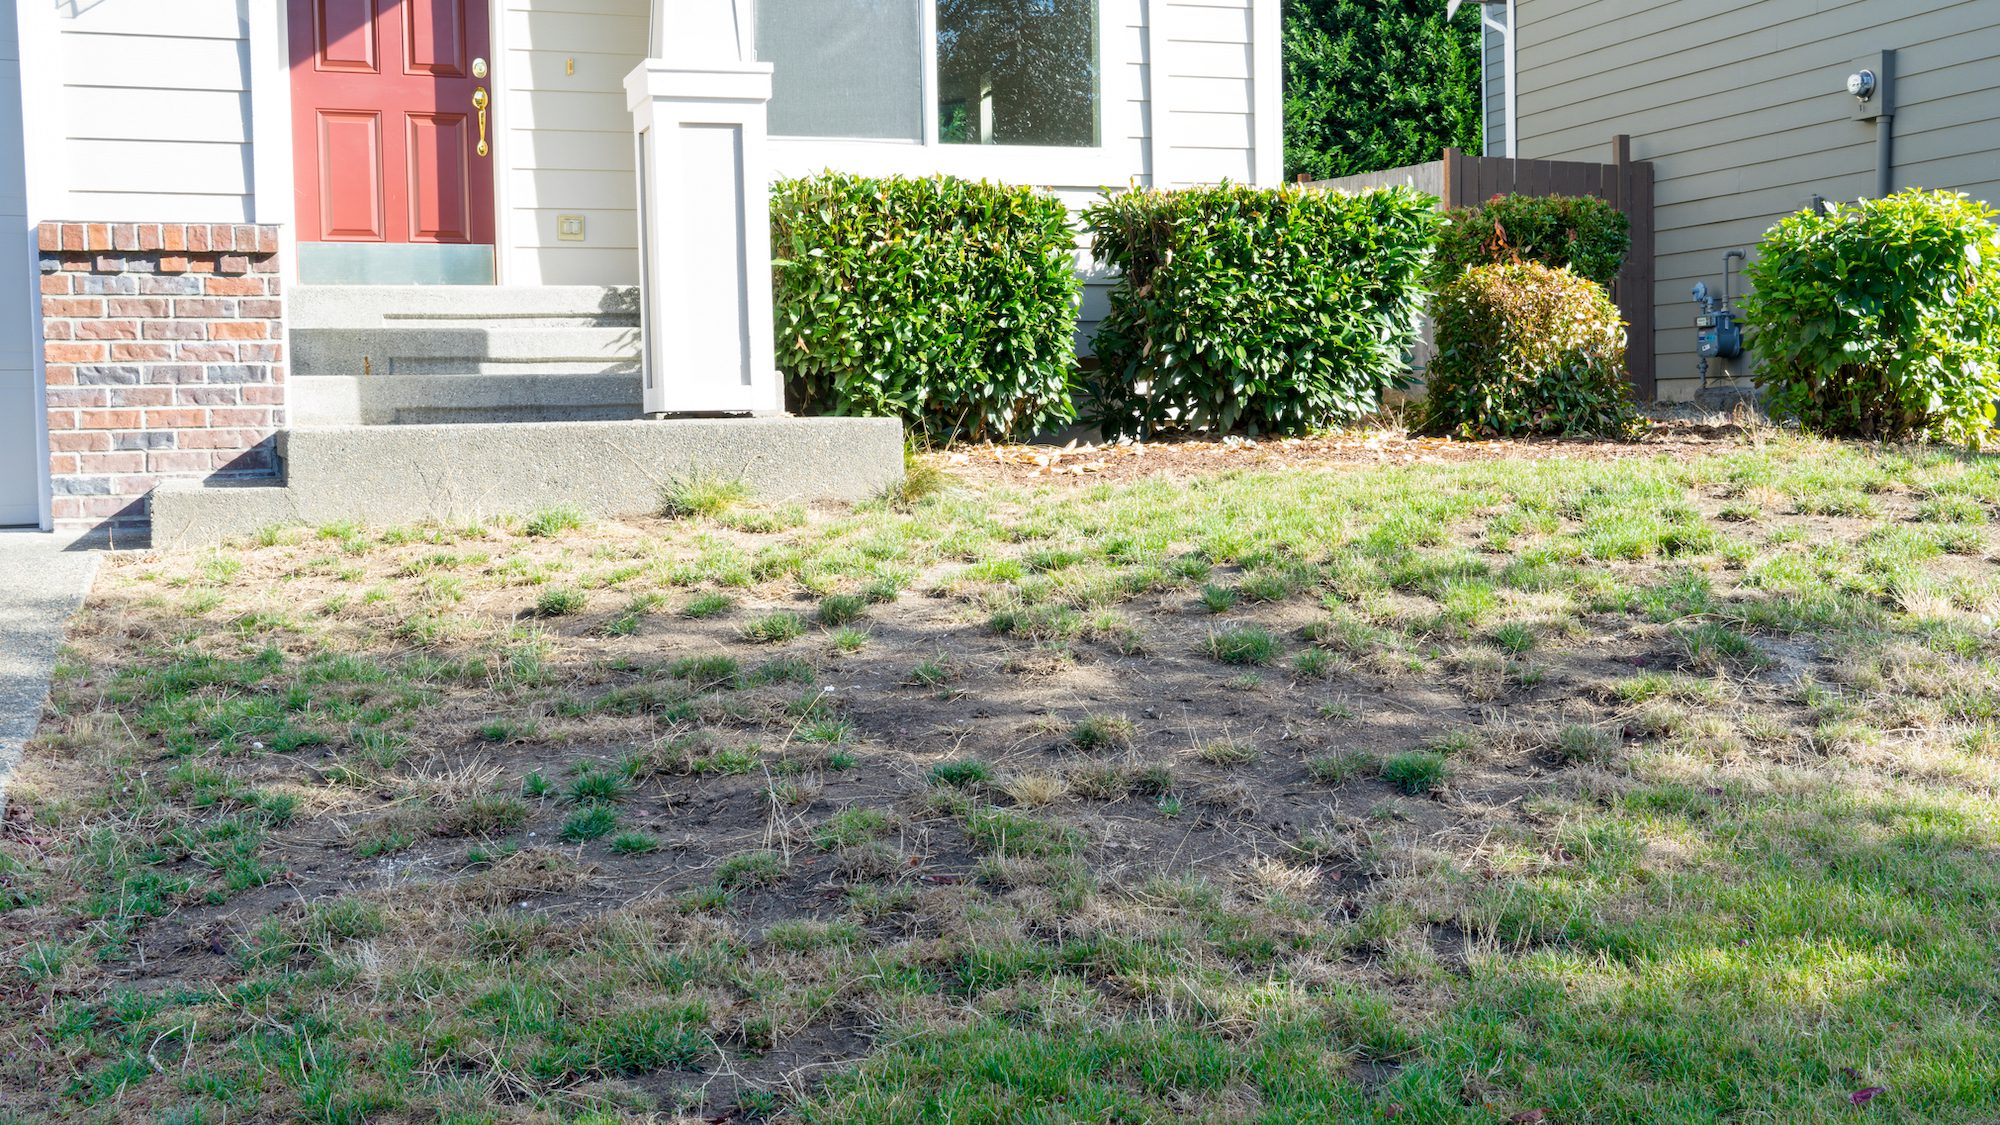
dead lawn

MarkHatfield/Getty Images

Fertilizing, watering, and mowing are the usual steps to take for a healthy lawn, but sometimes things can go awry. Unsightly weedy and brown patches can show up on your lawn and seriously undermine your home’s curb appeal.

Dealing with a damaged lawn can be a frustrating experience for homeowners. No matter how much water or fertilizer you apply, it can seem nearly impossible to get your lawn back to its thick, green splendor.

But it’s not just you! If it’s any consolation, you have plenty of company with your lawn care woes. A lawn care survey this year found that a majority of surveyed homeowners with lawns don’t have a handle on proper lawn care or how to get rid of weeds.

So if your lawn is looking a little worse for wear, get it back into shape with these expert tips.

Get rid of weeds ASAP to stop the spread

If you see a weed, pull it out by hand, making sure to remove the root.

“A regular weeding routine for the garden prevents weeds from multiplying and reseeding,” says Gladys Mbofung-Curtis, plant scientist for Garden Safe. “Applying a layer of mulch also helps stop weeds from growing in the garden. Make sure the mulch is seed-free in order not to introduce new weeds into the garden.”

If you’re unable to get a good grip on weeds, you can also use a wide range of specially formulated weed killers like Spectracide Weed Stop ($10, Home Depot).

Do a pull test on brown patches of grass

Brown patches on your lawn could mean you’re dealing with drought stress, or more serious problems like pests or fungus. Pull out a few blades of grass, and examine the roots for signs of insect root eaters or whitish branchlike structures, which can point to fungi growth.

“The most common garden and turf grass diseases are caused by fungi. Examples are powdery mildews, dollar spot, leaf spots, and rust,” says Ryan Eilermann, senior director of marketing at Spectrum Brands. “If the lawn or garden is well watered, fertilized, and drained, these diseases should be rare.”

He also recommends using insect killer ($7.48, Home Depot) for lawns and landscapes to control any pest outbreaks that could be tainting your grass.

Perform a soil test using a DIY kit

A good way to gauge what you’re dealing with is to get a DIY kit to test the pH level of your soil. This test is available at most garden centers.

“It is important to determine nutrient and pH state of your soil regularly, because grasses do not fare well in acidic soil conditions,” says Mbofung-Curtis.

If soil is acidic, with a pH of less than 7, lime can be added to the soil following the manufacturer’s instructions.

“Apply extra-fine limestone to neutralize the acidic patches of soil. Water the area to help disperse, and let it sit for a week,” says Mbofung-Curtis.

Reseed bare smaller areas of the lawn

Notice any patches on your lawn? They’re likely due to heavy traffic or insect or disease problems. The good news is those small spots of bare lawn can be reseeded.

“Before repairing patches, aerate the lawn wherever there is compaction and apply compost or starter fertilizers to help lawn growth,” says Mbofung-Curtis. “When covering patches with topsoil and seed, gently water the area with a garden hose, taking care not to wash off the seeds.”

Larger patches on your lawn should be covered with new pieces of sod.

Water reseeded or sodded areas

To maintain adequate moisture until grass seedlings germinate and are well rooted, it’s important to water reseeded or sodded areas.

“Water your lawn adequately early in the morning or evening to avoid dry spells or wet spells,” says Mbofung-Curtis. This will help it grow healthy and improve resiliency to pests and future damage.

The top inch of soil of a newly seeded lawn should be kept consistently moist—but not soggy. Once you see grass sprouts, keep the top 2 inches of soil moist until the grass grows high enough to mow. Then return to your regular watering schedule, making sure to soak the soil about 6 to 8 inches so the roots will grow deep and strong.

Fertilize patchy areas with a slow-release fertilizer

Those yellow or brown patches could mean you’re overfertilizing your lawn. Too much fertilizer salt can draw water away from plant roots and deprive the grass of moisture. And when your lawn can’t get the water it needs, it dries out.

To avoid fertilizer burn, experts recommend sowing patchy areas with a slow-release fertilizer that will give your lawn a limited amount of nutrients over time.

“Cool-season grasses should be fertilized in the fall, when they have optimum conditions for growth,” says Mbofung-Curtis. “Warm-season grasses are fertilized in spring, when the grasses grow best. You can also rake leaf litter or mow into lawn for added fertility.”

The post How to Restore a Lawn Plagued by Weeds or Brown Patches appeared first on Real Estate News & Insights | realtor.com®.

Your Essential Fall Maintenance Checklist: 8 Things You Really Should Do Before the First Frost

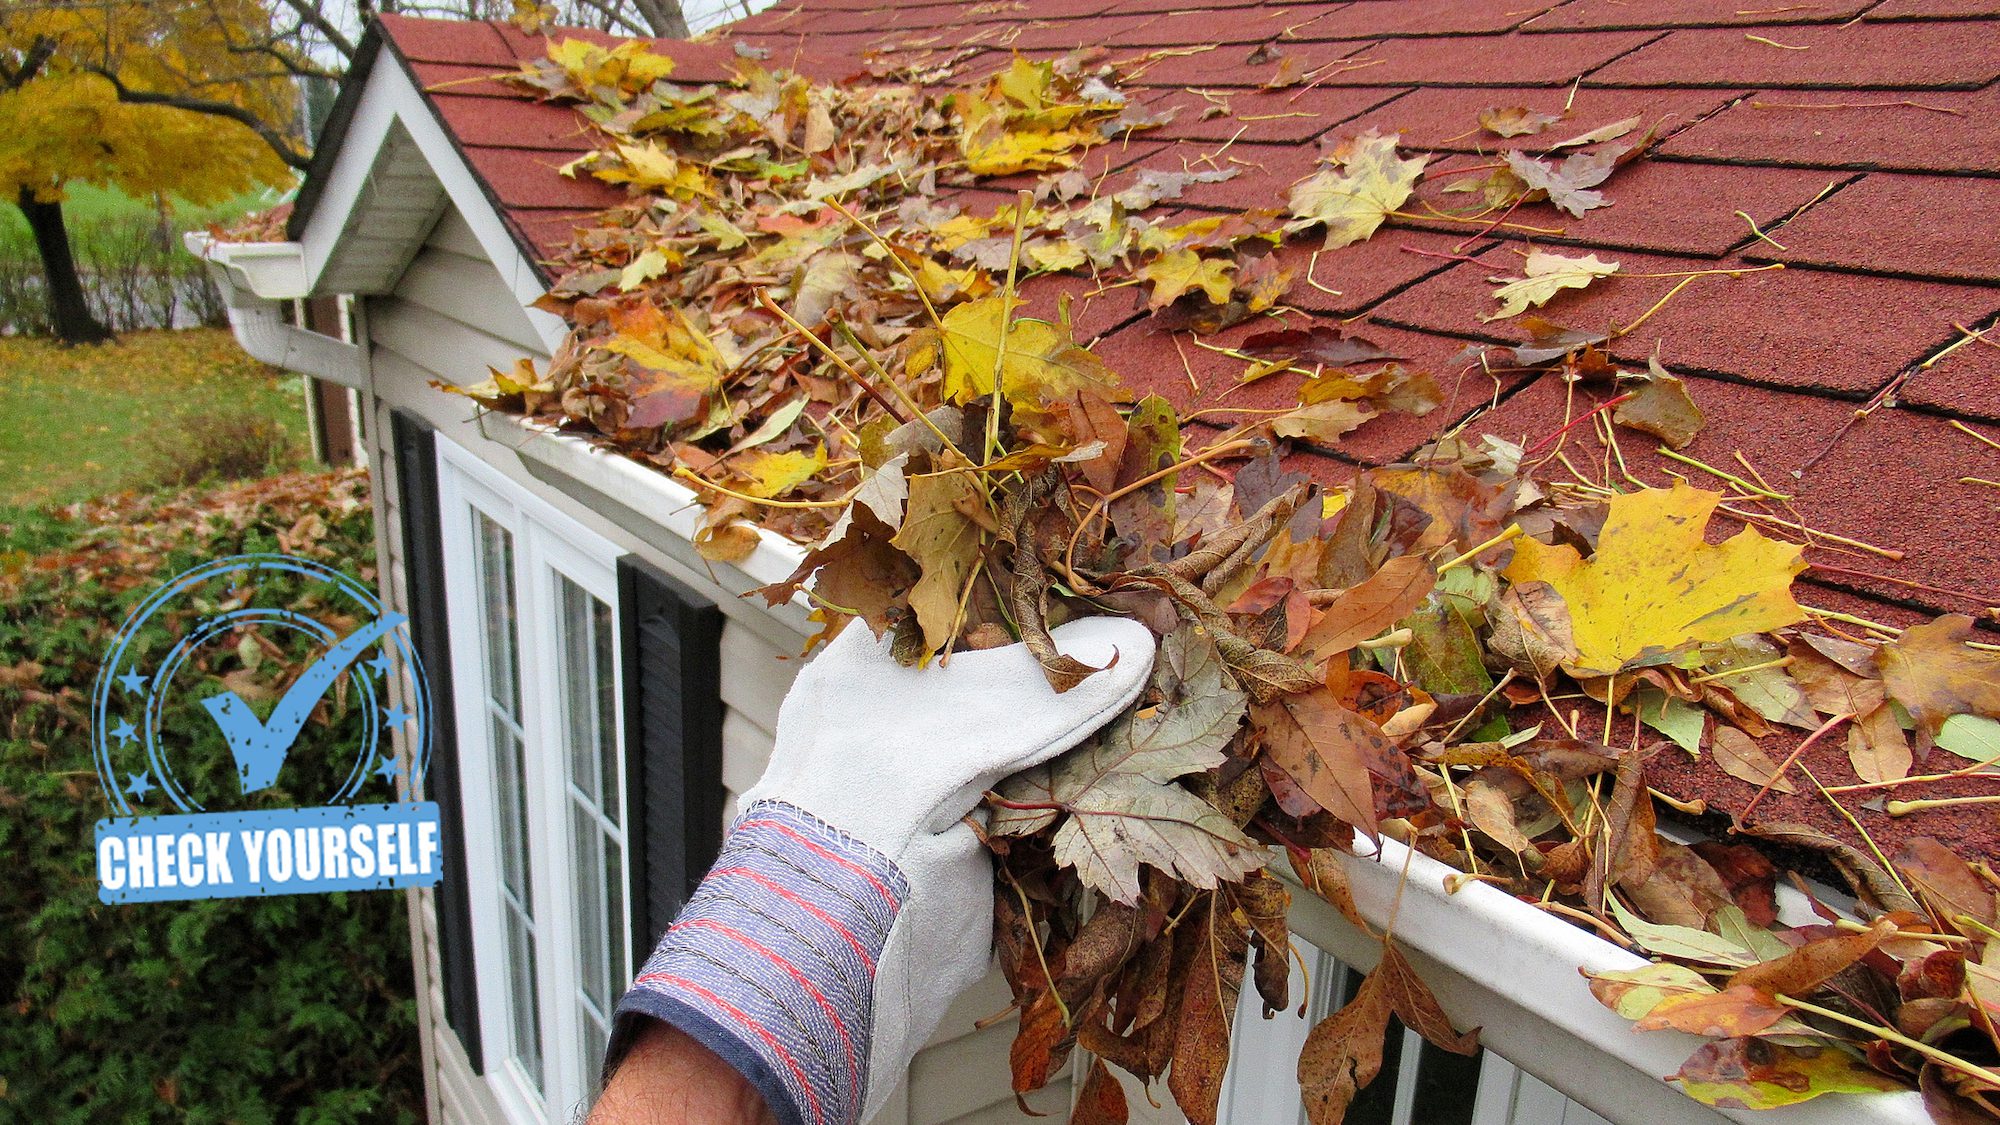
gutter cleaning and maintenance

ziggy1/Getty Images

Ah, fall: The nip of the first chill in the air. The colorful foliage. The pumpkin spice lattes. The pumpkin spice everything.

Oh yeah, and the long list of home maintenance tasks awaiting you at the start of the season.

We hate to intrude on your fall bliss, but the postsummer months are a critical time for knocking out routine home maintenance to keep your household running smoothly into winter. Luckily, many of these tasks are easy DIY projects, with options to call in the pros if you prefer.

We asked home experts which items should be at the top of your to-do list this fall. Here are the musts to tackle before the falling leaves turn to ice and snow.

1. Check windows and doors for air leaks

Lower temperatures mean higher thermostat settings, and anyone in a cold climate knows the pain of opening a gas bill in the dead of winter.

To keep cold air out and utility bills in check, Mike Bidwell, president and CEO of Neighborly, suggests checking all of your windows and doors for air leaks.

DIY: If your issues are minor, a few low-budget options to fix leaky doors and windows include caulking around gaps, adding or updating the weatherstripping, and using foam sealant.

Call in the pros: If you have major gaps or just want peace of mind that leaks are sealed properly, call an expert.

“Depending on the size of the leak and the number of leaks identified, the cost will vary from a minimum-charge service call to something more if more extensive work is called for,” Bidwell says.

Window seal repairs can run between $70 and $120—still a bargain compared with the cost of replacing an entire window or door.

2. Clean the chimney

If you have a fireplace, fall is a great time to give it a thorough cleaning and inspection, says Craig Gjelsten, vice president of Rainbow International Restoration.

Maintaining a clean fireplace is the simplest and best way to remove creosote, a byproduct of wood combustion that contains tar and toxins.

“Eliminating this from the chimney liner and the smoke box reduces the risk of a fire,” he says.

DIY: If you’ve been keeping up with cleaning your chimney on a yearly basis, you can handle this task on your own, “as long as [you] feel capable of using an extension ladder to get to the roof and scrub the chimney,” Gjelsten says.

Call in the pros: “If you haven’t cleaned the chimney in a long time, it is recommended that you call an expert to do a thorough clean,” Gjelsten says.

You can expect to spend anywhere from the low $100s to upward of $300, depending on where you live (and how fouled the chimney has become).

3. Schedule a furnace tuneup

Don’t wait until the first bitterly cold day to finally turn on your furnace. If you have any issues, you’ll want to know before the mercury drops and you find yourself shivering indoors.

“Homeowners should listen for strange noises, such as booming, clicking, and squealing, when they turn on their furnace for the fall season,” Bidwell adds. “They should also pay attention to odd odors coming from the furnace.”

If you notice anything unusual, call an HVAC professional right away.

DIY: Change your filter regularly and often.

“Every season, homeowners should replace the furnace filter,” Bidwell says. “They can also vacuum dust and debris from and around the furnace to help it operate like new.”

Call in the pros: Even if you change your filter regularly, it’s a good idea to schedule a furnace tuneup, Bidwell says.

HVAC pros can inspect and clean the air ducts, check and adjust the pilot light, lubricate the furnace bearings, and inspect and tighten fan belts and pulleys.

“The typical price for fall heating tuneups ranges from $89 to $159, but prices can vary by services needed and by region,” Bidwell says.

4. Test smoke and carbon monoxide detectors

It’s easy to forget about smoke and carbon monoxide detectors (unless a cooking disaster sets off the alarm—we’ve all been there).

“That’s why as we approach this time of year, it’s important to test these alarms and detectors, as well as replace those that are 10 or more years old,” Gjelsten says.

DIY: This is a quick and easy project most homeowners can handle on their own. Simply press and hold down the “test” button for a few seconds on each of your detectors.

“If working properly, these detectors will emit a loud ping or siren,” Gjelsten says. “Should the sound be weak or not there at all, you should replace the batteries and test the detector once more to ensure it’s working properly.”

5. Run ceiling fans in reverse

The hot, humid days of summer are officially in the rear-view mirror (in most parts of the country, at least).

“That’s why now is the perfect time to start thinking about reversing the direction [of] fans in the home to make the space warmer,” Gjelsten says.

Reversing the direction of your ceiling fans helps circulate warm air near the ceiling back into your living space. (Heat rises, remember!) This can cut your heating costs by as much as 10%, Gjelsten says.

DIY: All you need is a ladder or stool for this task—and make sure the fan is off. Then simply flip the switch that is commonly found on the side of the motor to change the fan’s direction.

6. Winterize your sprinkler system

It’s a good idea to winterize your outdoor irrigation system to prevent damage from freezing water. This process clears leftover water from the pipes in your irrigation system.

DIY: “Due to the need for high pressure to clear water out of the lines, winterizing sprinkler systems is not a typical DIY project,” Bidwell says.

But if you’re handy and you have the right equipment—including an air compressor—it’s possible to tackle this project on your own.

Call in the pros: In warmer climates, sprinkler winterization service averages between $50 and $70, Bidwell says. In areas where temperatures dip below freezing, the process is more intensive, so you can expect to pay more—generally between $70 and $140.

7. Disconnect and empty your garden hoses

Speaking of freezing water, “a frozen hose can cause the water inside the wall to freeze and burst,” Bidwell says.

Don’t let this happen to you, homeowner!

DIY: Disconnect your hose and let it drain on an angle. Once the hose is empty, coil it up and pack it away for the season.

8. Clean the gutters

Throughout the year, your gutters fill up with leaves, sticks, and other debris. Failing to clear this gunk from your gutters can mean rain and melting snow won’t be able to drain easily—potentially causing seepage and leaks into your home.

DIY: If you’re comfortable climbing on a ladder to clean your gutters, this is a DIY-friendly task,

“Using a bucket, gutter scoop, and heavy-duty gloves, you can remove any debris found in your gutters,” Gjelsten says.

Use a hose to wash away any remaining debris and to make sure the downspouts are working properly.

Call in the pros: If you’re not keen on climbing, you can call in a professional. The national average cost for gutter cleaning is around $157.

The post Your Essential Fall Maintenance Checklist: 8 Things You Really Should Do Before the First Frost appeared first on Real Estate News & Insights | realtor.com®.
Wednesday, September 30, 2020

Alison Victoria Reveals the ‘Future of Kitchens’: Will It Catch On?

windy city rehab

HGTV

Alison Victoria of “Windy City Rehab” is in some serious trouble. After getting sucked into legal scandals involving her former partner, Donovan Eckhardt, she’s parted ways with him and is trying to move on.

But can she? In the episode “Going Big on Berenice,” Victoria has begun working on a huge house on Berenice Street in Chicago, but soon runs into problems. Since Eckhardt was involved in this deal early on, and had allegedly bungled paperwork along the way, a stop-work order was placed on the building. This causes an expensive nine-month delay, and eventually Victoria realizes that she may not turn a profit on this house.

To make up for lost time, she decides to add features that are so amazing, the house could fetch a high price—all without making her spend a ton more money. Read on to find out the special upgrades Victoria adds that make this house stand out, and might work well in your own home, too.

Curb appeal matters a lot

house
Before: The old exterior was very plain.

HGTV

When Victoria starts work on this house, she’s disappointed with the exterior. With faux stone on the faΓ§ade and a brown door, it looks dated and dull.

“Curb appeal in this neighborhood is just like any other neighborhood: very important,” she explains, and makes plans to completely reimagine the exterior.

house
After: With new paint and wood accents, this home looks modern and inviting.

HGTV

She gives the house a modern look by painting the exterior black and white. For some character, she adds cedar shingles as an architectural accent. This mix of colors and materials adds dimension to the house—it’s a far cry from the boring stone exterior that was there before.

When Victoria’s real estate agent, Vince, stops by to see the property, he loves the choices she’s made.

“The wood you put on the ceiling there, the entryway, really warms it up,” he says.

Add a mantel to this surprising spot

kitchen
Alison Victoria makes this kitchen feel more homey.

HGTV

These days, people use their kitchens as a gathering space. It’s like a second living room.

So, for this kitchen, Victoria embraces the idea of a combined living room and kitchen by adding a traditional living room feature: a mantel.

Carpenter Ari Smejkal makes the mantel out of a beam from the home’s original structure. For added style, he cuts out corbels from extra pieces of the wood.

The finished mantel looks perfect in the kitchen, bringing a rustic, earthy vibe to the space that makes it feel extra homey.

“It’s almost like this is the future of kitchens, right?” Victoria says. “That it’s a kitchen but you can’t tell.”

Brass shelves add some bling

shelves
The brass shelves add a little flair to this kitchen.

HGTV

The mantel over the range is already the showstopper in this kitchen, but Victoria isn’t done yet.

She wants to give the kitchen lots of character, so she installs floating shelves made of brass. These shelves add a little glam to the space without looking too flashy.

“It complements the kitchen,” Victoria says.

Once these shelves are staged with some plants and artwork, they really stand out as one of the most beautiful storage solutions in the house.

Install an island in the walk-in closet

island
This island is a great storage solution.

HGTV

Victoria’s kitchen storage may look great, but it’s not as creative as the storage she creates for the walk-in closet.

She buys a red antique cabinet with tons of small drawers, knowing this will be perfect for storing accessories. Before putting it in the closet, she fixes it up to make it look more modern.

“I knew that with a beautiful coat, or three coats, of paint, and some new cabinet hardware and a new top, that this could look like a million bucks,” she says.

Sure enough, the closet island looks amazing and very high-end.

Turn an end table into a vanity

bathroom
The side table brings a unique charm to this bathroom.

HGTV

As it turns out, the closet isn’t the only place Victoria uses a refurbished antique.

Victoria finds a charming old end table and wants to use it—but not as an end table. She puts a sink in the top and has it installed as a vanity in the bathroom.

Once the new vanity is installed, it looks perfect. The wood detail gives the bathroom a classic, elegant look.

“The small side table looks killer in the powder room,” Victoria says when the project is done.

Fill a bathtub from the ceiling

bath
This top-filling tub really makes the bathroom stand out.

HGTV

Victoria gives the master bathroom a large shower and a clean design. Then, to make it extra special, she designs the tub so that it fills up from the ceiling.

“Super cool,” Vince says. “I like that a lot.”

This feature is sure to attract buyers who want a bathroom that feels luxurious and unique.

How does this ‘Windy City Rehab’ turn out?

Given the home’s location and size, Victoria had first seen it as a bargain, paying $487,500 for the place. However, after some expensive delays, she ends up spending a total of $1,029,750 on the renovations.

She lists the house at $1,650,000, and while it’s unknown by the end of the episode whether it sells, if it does at that list price, she could make a profit of $132,000. Maybe after the tough road Victoria’s had lately, her hard work on this place will pay off.

The post Alison Victoria Reveals the ‘Future of Kitchens’: Will It Catch On? appeared first on Real Estate News & Insights | realtor.com®.