Thursday, November 7, 2019

Hollywood Regency Style Defined: Your Guide to Room-by-Room Glam

hikesterson/iStock

“Hollywood Regency style” is one of those terms that get thrown around a lot, making it hard to figure out what it actually means. We know, because we’re guilty of it, too. The term appears constantly in our celebrity home listings, from late designer Max Azria‘s chic mansion to Paris Hilton‘s party pad.

But Hollywood Regency style isn’t just for celebrities. In fact, you can easily incorporate it into your home’s design—even if you don’t own a posh property in Beverly Hills, CA.

“Regency style is known for its over-the-top glamour that evokes a star quality like only Hollywood can provide,” says designer Stephanie Purcell, of Redesigned Classics. “It has a very art deco–inspired feel with its clean, angular lines. More is more in this style of design—think bold patterns, bright colors, and metals that shine.”

To help you get started on your own path toward Hollywood glam, here are five key decor ideas for every room of the house.

1. Install chandeliers in the kitchen
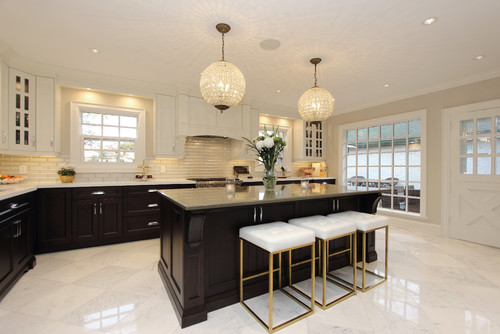
This kitchen screams glam, and it isn’t just because of the all-white interior and marble countertops.

“These lights make a statement with their large opulence, while the bar stools have classic, clean lines with a pop of gold on the legs to make them stand out and demand to be seen,” Purcell says.

Add some sparkle to your kitchen by shopping this exact chandelier (available from Houzz), or take a peek at these gold and white bar stools from Wayfair.

2. Go bold in the bathroom
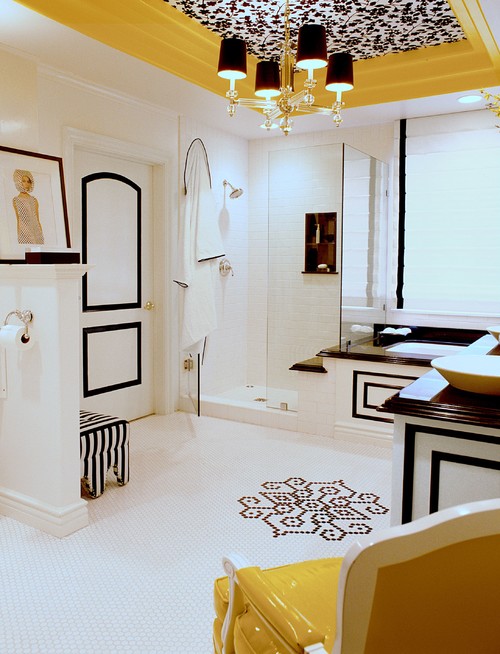
You don’t have to be Audrey Hepburn to appreciate a beautiful bathroom like this one. The featured bold yellow is a fun play on the classic black and white bathrooms of old Hollywood, made even better with details like the floor mosaic, striped footstool, and modern art prints.

“This seemingly traditional room with its black and white background is given a dramatic twist with large bold prints and the pop of a bright yellow,” Purcell says.

You can make your bathroom feel more starworthy by adding some of these luxe details yourself—like this striped ottoman from Target or these fashion wall prints from Etsy.

3. Create a sexy bedroom with silky walls

If it looks like a bedroom fit for royalty—well, that’s the point.

“When designing a bedroom to match the Hollywood Regency look, you should focus on a number of features,” says George Richardson, director of Arbor Living. “Wall silks are a brilliant addition to the space because it adds an element of depth to a room. It needs to be something that will draw attention and create texture for the room and pair well with pillows and lampshades. The floral pattern is brilliant for this because there’s so much going on in such a confined area.”

Make a multidimensional statement in your bedroom by adding some silk wallpaper from Wayfair or a set of elegant throw pillows from One Kings Lane.

4. Add luxury to your living room with gold and fur accents

This living room is proof that even the most traditional space can become Hollywood Regency with the right accessories.

“This room has very traditional lines and a modern feel, but is offset with lots of gold accents and animal fur for a more dazzling effect,” Purcell says.

Even if your living room doesn’t have a museumworthy ceiling, you can still mimic this look with a few well-placed bronze-finished lamps and satin pillows or a statement piece like this room divider from Wayfair or faux fur rug from World Market.

5. Dazzle in the dining room with lots of glass

What’s the best way to make a dining room a little brighter and a little more Hollywood? A glass table, of course.

“The glass is brilliant for opening up a space,” Richardson says. “The light passes through the table and illuminates otherwise dark areas. It also gives the room a feeling of grandeur and evokes the regal style.”

Instantly increase the “wow” factor of your dining room by swapping out the old wooden table for one of these stunning glass dining sets from AllModern.

The post Hollywood Regency Style Defined: Your Guide to Room-by-Room Glam appeared first on Real Estate News & Insights | realtor.com®.


The Property Brothers Reveal That Secret Something That Gives a Home Charm

HGTV; realtor.com

Drew and Jonathan Scott know plenty about how to give a home that extra something that helps it stand out. And in the latest episode of their HGTV show “Property Brothers: Forever Home,” they have a lot to work with!

In the episode titled “Keep the Charm, Not the Layout,” married couple Kate and Gavin already love their Las Vegas home, but when they make plans for Kate’s mother to move into the extra bedroom, they realize that the house needs a lot of updates. Their place is already filled with two kids and plenty of dogs, but now that they’re including one more family member, they need to make sure the house is both comfortable and functional. And if possible, they’d like it to look good, too.

The brothers have a big budget: $110,000 to update the living space, mudroom, and in-law Maryann’s space. Here’s how the Scott brothers put that cash to good use—and the lessons we can all learn along the way.

Make room for a large island

When Kate and Gavin first show Drew and Jonathan the kitchen, they have to explain their strange setup. They don’t have a lot of counter space, and to remedy the space issue, they added a table, right in the middle of the room. This table is small, but it still doesn’t leave much room for cooking.

As strange as this kitchen may seem, the brothers soon learn that it’s not so easy for the couple to simply ditch that table. Kate has had this piece for a long time, and it has moved with her from home to home over the years.

Still, the Scotts decide that they can’t avoid putting in a modern island the family needs, so they take out the table and install a large, green island with a light countertop and lots of storage cabinets.

As for Kate’s sentimental table, the Scott brothers decided to use the wood to make a cutting board with the couple’s initials etched into it. It’s a perfect compromise that gives the couple both the kitchen space they need and a sweet memento.

kitchen
This green island brings needed color to the kitchen.

HGTV

A dining area should work for formal and casual meals

With a large family, it’s important to have plenty of space to sit, especially at dinnertime. And while other families may have problems with limited space (squeezing around a too-small kitchen table), this family actually has too much dining space. The only eating space is at a long, formal dining room, which, as the couple explain, feels like the wrong space for everyday meals like hamburgers and hot dogs.

What they need is a little variety in their dining space, so the Scotts decide to update their way of doing mealtime. They add a peninsula to the kitchen with enough room for two stools so the kids can sit at the counter for a casual meal. Meanwhile, Jonathan is sure to style the updated dining room with a new table that feels a lot less stuffy and formal. Now, the dining room is the perfect place for everyday meals (as well as holidays and dinner parties).

dining room
This dining room feels more comfortable, and it’s a space that could be dressed up or dressed down.

HGTV

Find a style that suits all

There’s one feature that the couple can’t see eye to eye about: two sets of doors. Kate loves the style and the originality of these doors and wants to keep them. But Gavin would prefer something more modern. What to do?

In the end, Drew and Jonathan install new doors, but they make sure to balance Kate’s love of eclectic style with Gavin’s desire for an update. They end up finding a great door design that is both modern and charming. It doesn’t look like just any other door, which Kate likes, but it’s also functional, which pleases Gavin. These doors are also energy-efficient, which means Kate and Gavin can start saving some money (which will be good, especially after this renovation).

front doors
The Scott brothers give Kate and Gavin some stylish, energy-efficient doors—smart move!

HGTV

Recycle original pieces for character

Kate and Gavin love their home’s character, so the brothers are determined to keep plenty of homey aspects of the design as they improve the functionality.

As Jonathan explains, he wants to “clean out the old, but salvage anything with character.”

One of the features they decide to keep is the large sink in the laundry room. It has a classic vintage design that Jonathan likes.

Once the sink is cleaned up a little, it’s clear to Kate and Gavin that keeping it was a good idea. It has a ton of charm.

sink
You’d never guess how this sink looked when the brothers first found it.

HGTV

Do the ‘Property Brothers’ stars deliver?

While Drew and Jonathan don’t exactly stay on budget, they deliver exactly what Kate and Gavin ask for, and then some, and the results are simply gorgeous.

After a beautiful renovation like this, Kate, Gavin, and their family are sure to stay in this house for a very long time!

The post The Property Brothers Reveal That Secret Something That Gives a Home Charm appeared first on Real Estate News & Insights | realtor.com®.

Wednesday, November 6, 2019

5 Creative Things to Do With Your Autumn Leaves That Don’t Involve Mulching

KellyT/iStock

Autumn is the most bittersweet of seasons; it’s invigorating when the leaves begin to turn color—and a bit crushing when, seemingly a few short days later, they all start to fall. And don’t get us started on all the raking and mulching that follow.

But we’ve got a way for you to do less yardwork and enjoy the beauty of this fleeting season a little longer: You can turn those dry, dying leaves into beautiful autumn decor!

Yes, that’s right—rather than blowing your leaves into oblivion or tossing them in the compost pile, you can consider a more crafty approach. All you need are some vibrant-colored leaves, a few simple supplies, and a sunny, crisp autumn afternoon to get crafty.

Ready to dive in (to a pile of leaves)? Here are some ideas for one-of-a-kind DIY decor that you can enjoy all season long.

1. Real fall wreaths

View this post on Instagram

Its beginning to look a like like Fall around here…falling leaves already happening here too! 🍂 These stacked pumpkins form @Trader Joe’s are my new favorite. Everything from Trader Joe’s is my new favorite. 🍂I’ve got a new blog post tomorrow with all the best Trader Joe’s FALL FAVORITES! Tell me, what is your favorite fall flavor..pumpkin, apple, cinnamon..or something else? http://liketk.it/2EZ2Q @liketoknow.it #liketkit . . . #porchdecor #frontdoor #frontdoordecor #falldecorating #stackedpumpkins #pumpkinspiceseason #traderjoesfinds #traderjoes #buffalocheck #outdoordecor #falldecor #falldecoratingideas #falldecorideas #porchdecorations #frontporch #frontporchdecor #diyfalldecor #homedecorblog #clevelandblogger #pumpkins

A post shared by Jaclyn // Mom Life+Style Blog (@coffeepancakesdreams) on

Nothing rings in the season quite like a fall wreath on the front door, just like this gorgeous one we spied on the home of @coffeepancakesdreams.

Make the most out of your fall leaf collection by gathering up the best ones, and then follow along with this tutorial from blogger Bren Did on how to make your own.

All you’ll need for this easy-peasy project are colorful leaves, some cardboard, and a pair of scissors.

2. Paint & press leaf towels

The adorable fall-themed dish towels in stores this time of year are oh-so-tempting. But we’ve got something more affordable (and in our opinion, better) in mind: Make your own custom tea towels! For inspiration, we like these ones from botanical dryer @beebowen.

Even if you’ve never pressed and painted leaves before, this tutorial from We Are Scout can help get you started. It’s easy enough, if you’ve got time and a bit of patience. And don’t stop at tea towels—you can print on napkins and even tablecloths. Imagine creating the conversation starter at your Thanksgiving dinner!

3. Autumn-glow candle holders

View this post on Instagram

Day ✌ of fall crafts: Autumn leaf lanterns! You need leaves, Mod Podge, glue brushes, leaves, and glass containers. Method: paint a think layer of Mod Podge on a section of the glass container, place on leaves, paint over them. Repeat until the glass is covered! It will dry clear. 🍂🍃🍁 We used glass containers we already had: two square flower vases and a mason jar. Larger and/or flatter containers are best. Microwave/pressing the leaves for 30 seconds helped with their pliability. See my stories for lighting tips. 🍂🍃🍁 We collected all these leaves for projects this week. We follow along with @raisinglittleshoots Exploring Nature With Children curriculum and this week we’re studying fall leaves. Well, more playing with them! But did you know, leaves have all those pretty red and gold colors in them all the time?! Chlorophyll just makes the green over-power them during the spring and summer seasons. The chlorophyll stops flowing as the tree goes dormant for winter and the other colors are revealed.

A post shared by blessnestlearning (@blessnestlearning) on

If you’ve got extra glass jars and containers on hand, we’ve got a use for them! Gather them up (or buy some for cheap at the dollar store), then pick up some tea lights. Finally, grab some Mod Podge glue at your local arts and crafts store, and get started creating your very own autumn candle holders with your leaves.

This post from @blessnestlearning should give you some idea of what to expect, but for even more details, check out this tutorial from Spark and Chemistry.

4. Leafy bowls

We just can’t get enough of these leaf bowls from @redtedart, and something tells us we’re not the only ones. This fun and easy project is something the whole family can get in on, even if you don’t have a professional potter’s studio. Take a peek at this tutorial for a variety of ways to make your custom leaf bowls—with or without a kiln.

5. Fall garlands

View this post on Instagram

DECOR LOVE LANGUAGE 🧡 Week 14! 🍂Hey! Does anyone out there speak DECOR? Well..it’s our love language here and the best part is..we want to see your decor love language! Whether it’s adding some new fall feels to your mantel, sprucing up the porch/patio or restyling your breakfast nook for coffee with friends! 🍂We would love to see it! It’s all about spreading the love in your home…your way! 🧡 All you have to do is use our hashtag #decorlovelanguage and tag and follow each one of us in your photos..That’s it and you could be chosen to join us weekly! Hosts: @themustardseed205 @hhawkins16 @cottage.and.design @kelso.designs @designed.to.love @heartofwendy @lifeonrusticdr Are you ready for the best part? You will be also eligible to co-host for the whole month! Please welcome our four guests for October! Show them some love! 🧡 @abrickhome @fallenleafinteriors @mistymorning_ @lexi.pratz This week we have chosen Cindy @somethingpaintedwhite! 📸 We were all drooling over this beautiful fall decor that just popped against her gorgeous neutral home! 🍂Thank you for sharing it with us! . . #decorlovelanguage #fall #fallbeauty #fallgarland #fallleaves #mirrorobsession #mirror #decorandfriends #whiteandwood #neutraldecor

A post shared by The Mustard Seed 205 ℂ𝕚𝕟𝕕𝕚 (@themustardseed205) on

Garlands are so much better when they’re made out of the real thing, are we right? And a fall garland is no exception. Fortunately, you can make one as pretty as the garland featured in this post by @themustardseed205 with the expert advice from DIY blogger Stephanie at Swoodson Says.

Check out this tutorial for all the tips you need to get started making your best real-leaf garland this fall.

Looking for even more fun fall projects? Check out our full list of fall decor DIYs.

The post 5 Creative Things to Do With Your Autumn Leaves That Don’t Involve Mulching appeared first on Real Estate News & Insights | realtor.com®.

How Much Does It Cost to Renovate a House? Bathroom, Kitchen, and Beyond

home renovation costs

kenneth-cheung/iStock

Home renovation and remodel costs may be a hard pill to swallow after shelling out the purchase price of a new home, but if you’re the proud owner of a fixer-upper (or even if you’re the proud owner of an older home that needs some remodeling), you may be itching to make some updates. And that will get you wondering: How much does it cost to renovate a house? Knowing your numbers ahead of time is crucial, lest you end up with plans that are bigger than your budget. So before you so much as eye a tile sample, check out this detailed breakdown on how much your dream home renovation will set you back.

Home renovation costs

The exact cost of renovating your living space will depend on square footage, the region you live in, and just how much of a face-lift your home needs. But to get a rough idea, Than Merrill, founder of FortuneBuilders.com, offers these average costs associated with different remodels:

  • Low ($25,000 to $45,000): A small remodel would likely include interior and exterior painting, minor repairs (like refinishing cabinets), and new landscaping.
  • Medium ($46,000 to $75,000): A more involved remodel would include the low-cost upgrades above, plus a total kitchen remodel (depending on appliances) and minor bathroom remodel.
  • High ($76,000 and up): Low- and medium-cost upgrades, plus fixing any foundation, roof, and sewer line problems.

The largest renovation expenses

Sure, paint can play a big part in a remodel, but gallons of semigloss will be a drop in the bucket compared with big-ticket items for certain rooms (we’re looking at you, kitchen and bathroom). Remember, it’s the appliances and cabinets in those rooms that eat up the biggest chunk of money.

Here’s what homeowners can expect to pay in renovation costs for an average-size house (about 2,500 square feet):

  • Kitchen: The national average cost of a kitchen remodel is $20,474. If a kitchen needs only minor upgrades, renovations should start at around $10,000. A full-on remodel can exceed $50,000, depending on the quality of materials and appliances installed, says Merrill.
  • Bathroom: A bathroom remodel typically costs about $9,000 and tops out at $20,000. (Of course, you could spend more by adding such luxe touches as a steam shower.)
  • New roof: The cost of protecting all of your upgrades from the elements will run about $20,000.
  • New floors: You might want to top off your renovation by taking up that old carpet. Installing new wood floors will cost about $4,400, while laminate, which is less expensive, will set you back about $2,800. Of course, exact cost will depend on how many square feet you have in the kitchen.
  • Electrical updates: If you’re replacing an old panel (and a home’s worth of outdated wiring) as a part of your remodel, expect to spend $3,000 to $5,000.
  • Replacement siding: Any great remodel includes an exterior upgrade. Putting new exterior siding on your home runs an average of $14,000.
  • Replacement windows: If you plan to replace 10 windows and frames to save on your energy bill (you might need the savings after this renovation), the cost will range between $8,500 (vinyl) and $20,000 (wood).
  • The contractor: Unless you plan to oversee the renovation yourself, a budget should include the cost of a general contractor. This pro usually charges 10% to 15% of the project’s total budget. So for a $50,000 renovation, expect to pay a contractor $5,000 to $7,500.


One easy way for homeowners to save money on home renovations is to negotiate to pay actual builder costs on finish materials, says Jesse Fowler, president of Tellus Build, a green custom-build firm in Los Angeles and Santa Barbara counties.

The contractor you choose should be getting a discount on retail prices, and Fowler says that this can benefit you, too, in that you can “capture some or all of those savings.”

Return on investment (ROI)

Ah, the magic words that make a homeowner’s pain of parting with thousands of dollars more palatable, as those big checks you write for home renovation costs today may pay dividends if you ever sell your home.

A typical kitchen remodel typically yields an 83.1% return on investment. That means for every $1,000 you spend on those cabinets and countertops, you’ll get back $831.

Meanwhile, a bathroom renovation boasts an ROI of 65.7%, and if you go for those pricey wood-framed windows during your remodel, you’ll enjoy a high ROI of 72.1%. Check here for the renovations that offer the best return on investment.

The post How Much Does It Cost to Renovate a House? Bathroom, Kitchen, and Beyond appeared first on Real Estate News & Insights | realtor.com®.

7 Home Maintenance Projects You Might Overlook—but Really Need to Do

7 Home Maintenance Projects You Might Overlook—But Really Need To Do

iStock

The big improvements always get all the glory—the classic kitchen remodel, the bathroom addition, the transformation of a once creepy basement into a media room. But what about all those little projects around the house?

Sure, they may not be as gratifying as ripping out 1980s cabinets, but tackling necessary home maintenance chores now will save you big headaches down the road. So before you undertake another huge home improvement, check out these projects that you might have neglected—but really should take on.

1. Clean your exhaust fans

“Two maintenance areas that home buyers often overlook have to do with fans—bathroom exhaust fans and attic or ventilation fans,” says Kathleen Kuhn, the CEO and president of HouseMaster.com, a home inspection franchise.

Bathroom exhaust fans play an important role in reducing odor as well as moisture, which helps prevent mold and mildew. And attic or ventilation fans are designed to expel hot air from the top of a home and draw cooler air in. This helps save energy and reduces the potential for costly heat-related damage to the roof or roof framing.

Both fans should be cleaned and wiped down every three months to ensure they are functioning properly.

2. Fix broken window seals

“One of the most harmful delayed maintenance issues I see in the field is broken window seals,” says real estate agent Jodi Moody of Smoky Mountain Realty in Lenoir City, TN. A homeowner might notice a piece of caulk peeling up around a window’s edge and think it’s no big deal. Most often, it simply goes unnoticed.

“Unfortunately, once a window seal is broken, problems are created that homeowners can’t see until major damage occurs,” says Moody.

Those problems include moisture, condensation, mildew, mold, and wood rot, which build up in the window framing and eventually move into the wall. Entire window frames and even sections of flooring can eventually rot, due to the moisture seeping in through missing or damaged window caulk.

“Homeowners should inspect their windows twice a year, and repair any cracked or torn caulk, rubber seals, or damaged wood as soon as possible,” says Moody.

3. Repair small foundation cracks

Foundation cracks can naturally develop over time. And though tiny cracks may not be a problem at first, it’s a good idea to patch them before they increase in size. Large cracks could result in your having to replace the foundation completely, which could cost you big bucks.

“You can repair a small crack with a concrete sealer that you can find at any home improvement store,” says Sacha Ferrandi, founder and principal of Texas Hard Money and Source Capital Funding.

4. Lube your garage door springs

Preserve the longevity of your garage door with some simple maintenance, so you won’t have to replace it sooner than needed.

“Lubricating the springs will help a garage door last a lot longer,” says Ferrandi.

Be sure to apply a lubricant annually to the rollers, hinges, and tracks. Since garage doors have a heavy workload, use a heavy-duty lubricant such as silicon spray or motor oil.

5. Drain and clean the water heater

Water heaters naturally build up mineral deposits over time. This forms a thick, crusty coating that will begin to chip off and clog faucets, drains, and the water heater valve. Such deposits can also cause your water heater to run constantly, which can crack the inner lining and run up your utility bills.

“You may even end up needing to replace your water heater, which can cost you a good amount of money,” says Shawn Breyer of Atlanta’s Breyer Home Buyers.

The good news is that the fix is simple. Every six to 12 months, place a small bucket underneath the drain valve on your water heater and drain the sediment out of the tank. Here’s more on how to flush a water heater.

6. Check out your crawl space

One commonly overlooked area of the home is the crawl space below your house.

“That cramped underbelly of your house actually has a purpose, and just like any other part of a home, it needs maintenance and can save a home from costly damage,” says Nick Rorabaugh, brand advocate for Rev Sells, a realty group based in Athens, GA. “I have seen several instances where a homeowner received the unpleasant news after a house inspection that their crawl space had moisture damage.”

Avoid that possibility by laying a vapor barrier or installing a humidifier to protect against mold, water damage, and termites. Bonus: This can improve the air quality of a house as well.

7. Caulk your kitchen sink

The sink is subject to daily wear and tear. And the chemicals in cleansers added to the frequent exposure to water, can damage the caulking.

“Avoid leakage under the sink, with the simple fix of recaulking,” says Vivian Young, senior content manager at GoodNightsRest.com.

Removing all traces of the old caulking is key and a trusty utility knife will do the trick. Clean up any loose grout, rinse off the area, let it dry completely, and you’re ready to caulk. Here’s more on how to caulk sinks, windows, and more.

The post 7 Home Maintenance Projects You Might Overlook—but Really Need to Do appeared first on Real Estate News & Insights | realtor.com®.